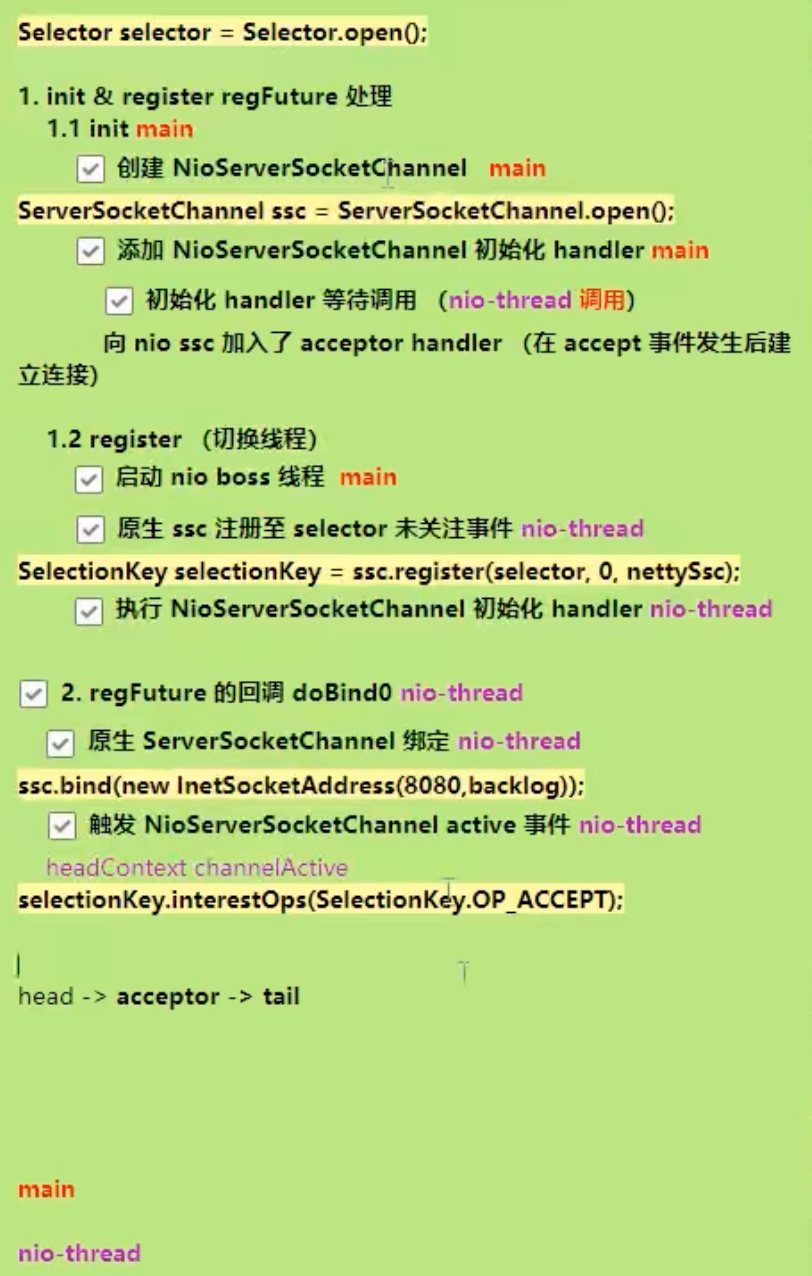
一. NIO 基础 non-blocking io 非阻塞 IO
1. 三大组件 1.1 Channel & Buffer channel 有一点类似于 stream,它就是读写数据的双向通道 ,可以从 channel 将数据读入 buffer,也可以将 buffer 的数据写入 channel,而之前的 stream 要么是输入,要么是输出,channel 比 stream 更为底层
graph LR
channel --> buffer
buffer --> channel
常见的 Channel 有
FileChannel
DatagramChannel
SocketChannel
ServerSocketChannel
buffer 则用来缓冲读写数据,常见的 buffer 有
ByteBuffer(抽象类)
MappedByteBuffer(实现类)
DirectByteBuffer(实现类)
HeapByteBuffer(实现类)
ShortBuffer
IntBuffer
LongBuffer
FloatBuffer
DoubleBuffer
CharBuffer
1.2 Selector selector 单从字面意思不好理解,需要结合服务器的设计演化来理解它的用途
多线程版设计 一个连接一个线程,BIO(阻塞IO)设计。
graph TD
subgraph 多线程版
t1(thread) --> s1(socket1)
t2(thread) --> s2(socket2)
t3(thread) --> s3(socket3)
end
⚠️ 多线程版缺点
内存占用高,每个线程需要占用一定的内存,多个线程占用内存过多
线程上下文切换成本高(如果一个服务器只有16核,如果有多余16个线程同时在运行,那么这多个线程频繁切换,所带来的线程上下文切换成本过高)
只适合连接数少的场景
线程池版设计 graph TD
subgraph 线程池版
t4(thread) --> s4(socket1)
t5(thread) --> s5(socket2)
t4(thread) -.-> s6(socket3)
t5(thread) -.-> s7(socket4)
end
⚠️ 线程池版缺点
阻塞模式下,一个线程同一时间内仅能处理一个 socket 连接(即一个线程,只有等到当前socket连接断开以后,才能处理下一个socket连接)
仅适合短连接场景(所以早期服务器(比如:早期Tomcat服务器)都是短连接,在处理完一项业务后,赶紧断开socket连接,释放当前线程,让当前线程去处理其他业务)
总而言之,由于socket是阻塞IO,导致线程的利用率不高
selector 版设计 selector 的作用就是配合一个线程来管理多个 channel,获取这些 channel 上发生的事件,这些 channel 工作在非阻塞模式 下,不会让线程吊死在一个 channel 上。适合连接数特别多 ,但流量低 的场景(low traffic)
graph TD
subgraph selector 版
thread --> selector
selector --> c1(channel)
selector --> c2(channel)
selector --> c3(channel)
end
调用 selector 的 select() 会阻塞直到 channel 发生了读写就绪事件,这些事件发生,select 方法就会返回这些事件交给 thread 来处理。
2. ByteBuffer 有一普通文本文件 data.txt,内容为
使用 FileChannel 来读取文件内容
1
2
3
4
5
6
7
8
9
10
11
12
13
14
15
16
17
18
19
20
21
22
23
24
25
26
@Slf4j public class ChannelDemo1 public static void main (String[] args) try (RandomAccessFile file = new RandomAccessFile("helloword/data.txt" , "rw" )) {10 );do {int len = channel.read(buffer);"读到字节数:{}" , len);if (len == -1 ) {break ;while (buffer.hasRemaining()) {"{}" , (char )buffer.get());while (true );catch (IOException e) {
输出
1
2
3
4
5
6
7
8
9
10
11
12
13
14
15
16
17
10 :39 :03 [DEBUG] [main] c.i .n .ChannelDemo1 - 读到字节数:10 10 :39 :03 [DEBUG] [main] c.i .n .ChannelDemo1 - 1 10 :39 :03 [DEBUG] [main] c.i .n .ChannelDemo1 - 2 10 :39 :03 [DEBUG] [main] c.i .n .ChannelDemo1 - 3 10 :39 :03 [DEBUG] [main] c.i .n .ChannelDemo1 - 4 10 :39 :03 [DEBUG] [main] c.i .n .ChannelDemo1 - 5 10 :39 :03 [DEBUG] [main] c.i .n .ChannelDemo1 - 6 10 :39 :03 [DEBUG] [main] c.i .n .ChannelDemo1 - 7 10 :39 :03 [DEBUG] [main] c.i .n .ChannelDemo1 - 8 10 :39 :03 [DEBUG] [main] c.i .n .ChannelDemo1 - 9 10 :39 :03 [DEBUG] [main] c.i .n .ChannelDemo1 - 0 10 :39 :03 [DEBUG] [main] c.i .n .ChannelDemo1 - 读到字节数:4 10 :39 :03 [DEBUG] [main] c.i .n .ChannelDemo1 - a 10 :39 :03 [DEBUG] [main] c.i .n .ChannelDemo1 - b 10 :39 :03 [DEBUG] [main] c.i .n .ChannelDemo1 - c10 :39 :03 [DEBUG] [main] c.i .n .ChannelDemo1 - d10 :39 :03 [DEBUG] [main] c.i .n .ChannelDemo1 - 读到字节数:-1
2.1 ByteBuffer 正确使用姿势
向 buffer 写入数据,例如调用 channel.read(buffer)
调用 flip() 切换至读模式
从 buffer 读取数据,例如调用 buffer.get()
调用 clear() 或 compact() 切换至写模式
重复 1~4 步骤
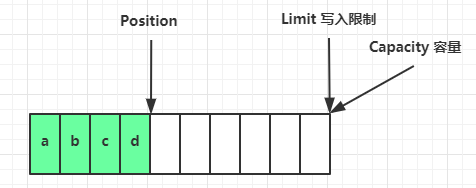
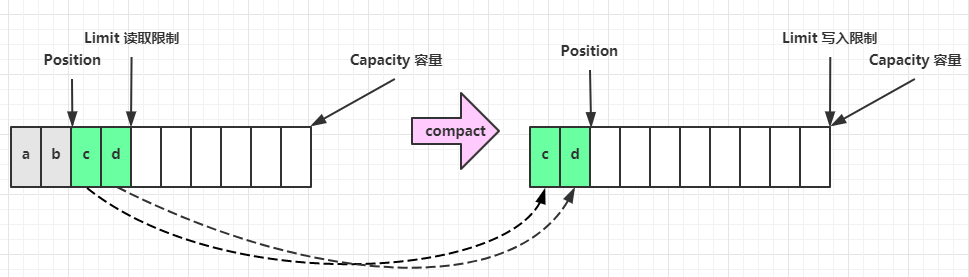
2.2 ByteBuffer 结构 ByteBuffer 有以下重要属性
一开始
写模式下,position 是写入位置,limit 等于容量,下图表示写入了 4 个字节后的状态
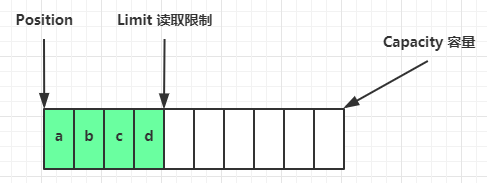
flip 动作发生后,position 切换为读取位置,limit 切换为读取限制
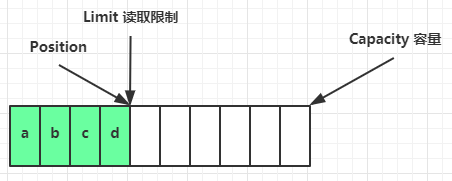
读取 4 个字节后,状态
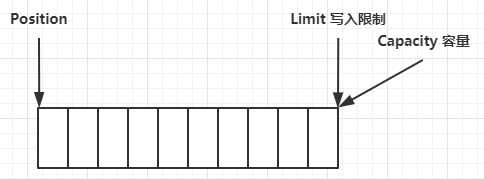
clear 动作发生后,状态:(clear动作并不会清楚数据,只是移动了Position和Limit指针 )
compact 方法,是把未读完的部分向前压缩,然后切换至写模式
💡 调试工具类 1 2 3 4 5 6 7 8 9 10 11 12 13 14 15 16 17 18 19 20 21 22 23 24 25 26 27 28 29 30 31 32 33 34 35 36 37 38 39 40 41 42 43 44 45 46 47 48 49 50 51 52 53 54 55 56 57 58 59 60 61 62 63 64 65 66 67 68 69 70 71 72 73 74 75 76 77 78 79 80 81 82 83 84 85 86 87 88 89 90 91 92 93 94 95 96 97 98 99 100 101 102 103 104 105 106 107 108 109 110 111 112 113 114 115 116 117 118 119 120 121 122 123 124 125 126 127 128 129 130 131 132 133 134 135 136 137 138 139 140 141 142 143 144 145 146 147 148 149 150 151 152 153 154 155 156 157 158 159 160 161 162 163 164 165 166 167 168 public class ByteBufferUtil private static final char [] BYTE2CHAR = new char [256 ];private static final char [] HEXDUMP_TABLE = new char [256 * 4 ];private static final String[] HEXPADDING = new String[16 ];private static final String[] HEXDUMP_ROWPREFIXES = new String[65536 >>> 4 ];private static final String[] BYTE2HEX = new String[256 ];private static final String[] BYTEPADDING = new String[16 ];static {final char [] DIGITS = "0123456789abcdef" .toCharArray();for (int i = 0 ; i < 256 ; i++) {1 ] = DIGITS[i >>> 4 & 0x0F ];1 ) + 1 ] = DIGITS[i & 0x0F ];int i;for (i = 0 ; i < HEXPADDING.length; i++) {int padding = HEXPADDING.length - i;new StringBuilder(padding * 3 );for (int j = 0 ; j < padding; j++) {" " );for (i = 0 ; i < HEXDUMP_ROWPREFIXES.length; i++) {new StringBuilder(12 );4 & 0xFFFFFFFFL | 0x100000000L ));9 , '|' );'|' );for (i = 0 ; i < BYTE2HEX.length; i++) {' ' + StringUtil.byteToHexStringPadded(i);for (i = 0 ; i < BYTEPADDING.length; i++) {int padding = BYTEPADDING.length - i;new StringBuilder(padding);for (int j = 0 ; j < padding; j++) {' ' );for (i = 0 ; i < BYTE2CHAR.length; i++) {if (i <= 0x1f || i >= 0x7f ) {'.' ;else {char ) i;public static void debugAll (ByteBuffer buffer) int oldlimit = buffer.limit();new StringBuilder(256 );0 , buffer.capacity());"+--------+-------------------- all ------------------------+----------------+" );"position: [%d], limit: [%d]\n" , buffer.position(), oldlimit);public static void debugRead (ByteBuffer buffer) new StringBuilder(256 );"+--------+-------------------- read -----------------------+----------------+" );"position: [%d], limit: [%d]\n" , buffer.position(), buffer.limit());private static void appendPrettyHexDump (StringBuilder dump, ByteBuffer buf, int offset, int length) if (isOutOfBounds(offset, length, buf.capacity())) {throw new IndexOutOfBoundsException("expected: " + "0 <= offset(" + offset + ") <= offset + length(" + length") <= " + "buf.capacity(" + buf.capacity() + ')' );if (length == 0 ) {return ;" +-------------------------------------------------+" +" | 0 1 2 3 4 5 6 7 8 9 a b c d e f |" +"+--------+-------------------------------------------------+----------------+" );final int startIndex = offset;final int fullRows = length >>> 4 ;final int remainder = length & 0xF ;for (int row = 0 ; row < fullRows; row++) {int rowStartIndex = (row << 4 ) + startIndex;int rowEndIndex = rowStartIndex + 16 ;for (int j = rowStartIndex; j < rowEndIndex; j++) {" |" );for (int j = rowStartIndex; j < rowEndIndex; j++) {'|' );if (remainder != 0 ) {int rowStartIndex = (fullRows << 4 ) + startIndex;int rowEndIndex = rowStartIndex + remainder;for (int j = rowStartIndex; j < rowEndIndex; j++) {" |" );for (int j = rowStartIndex; j < rowEndIndex; j++) {'|' );"+--------+-------------------------------------------------+----------------+" );private static void appendHexDumpRowPrefix (StringBuilder dump, int row, int rowStartIndex) if (row < HEXDUMP_ROWPREFIXES.length) {else {0xFFFFFFFFL | 0x100000000L ));9 , '|' );'|' );public static short getUnsignedByte (ByteBuffer buffer, int index) return (short ) (buffer.get(index) & 0xFF );
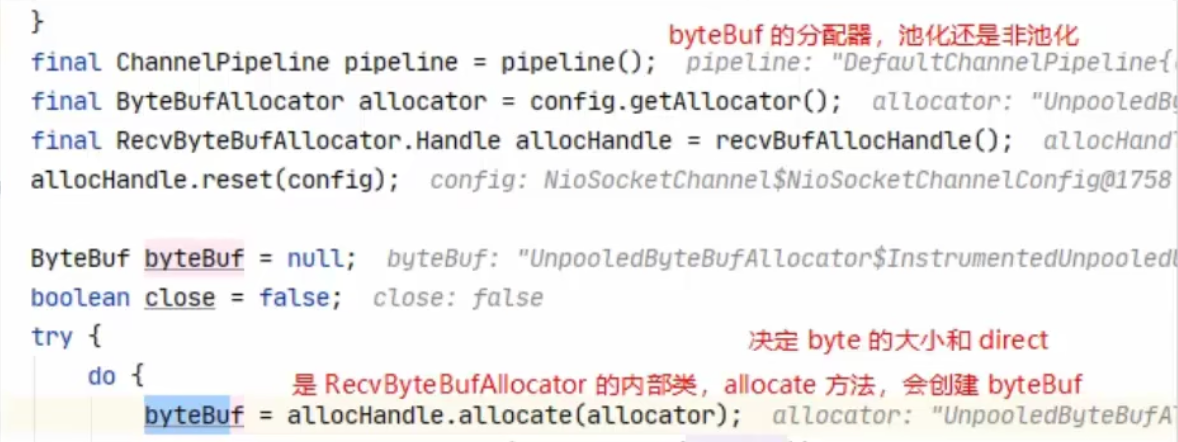
2.3 ByteBuffer 常见方法 分配空间 可以使用 allocate 方法为 ByteBuffer 分配空间(不可以动态调整 ),其它 buffer 类也有该方法。
1 2 System.out.println(ByteBuffer.allocate(10 )); 10 ));
class java.nio.HeapByteBuffer java 堆内存,读写效率较低,受到JVM的GC的影响(复制和标记-整理垃圾回收算法有可能为了减少内存碎片,会来回的拷贝该内存)
class java.nio.DirectByteBuffer 直接内存,读写效率高(少一次拷贝),不会受到JVM的GC影响;由于直接内存是系统内存,分配时需要调用系统函数,分配的效率低,并且使用结束,需要正确释放直接内存,否则会造成内存泄露。
向 buffer 写入数据 有两种办法
调用 channel 的 read 方法
调用 buffer 自己的 put 方法
1 int readBytes = channel.read(buf);
和
从 buffer 读取数据 同样有两种办法
调用 channel 的 write 方法
调用 buffer 自己的 get 方法
1 int writeBytes = channel.write(buf);
和
get 方法会让 position 读指针向后走,如果想重复读取数据
mark 和 reset mark() 是在读取时,做一个标记,即使 position 改变,只要调用 reset() 就能回到 mark 的位置。目的是重复读取某段数据。
1 2 3 4 5 6 7 8 9 10 11 ByteBuffer buffer = ByteBuffer.allocate(10 );new byte []{'a' , 'b' , 'c' , 'd' });new byte [2 ]);new byte [2 ]);
注意
rewind 和 flip 都会清除 mark 位置
字符串与 ByteBuffer 互转 1 2 3 4 5 6 7 8 9 10 11 12 13 14 15 16 17 18 19 20 21 22 23 24 25 26 27 28 29 30 import java.nio.ByteBuffer;import java.nio.charset.Charset;import java.nio.charset.StandardCharsets;public class Netty public static void main (String[] args) 16 );"hello" .getBytes());"你好" );"你好" .getBytes(StandardCharsets.UTF_8));
⚠️ Buffer 的线程安全
Buffer 是非线程安全的
2.4 Scattering Reads 分散读取,有一个文本文件 3parts.txt
使用如下方式读取,可以将数据填充至多个 buffer
1 2 3 4 5 6 7 8 9 10 11 12 13 14 15 try (RandomAccessFile file = new RandomAccessFile("helloword/3parts.txt" , "rw" )) {3 );3 );5 );new ByteBuffer[]{a, b, c});catch (IOException e) {
结果
1 2 3 4 5 6 7 8 9 10 11 12 13 14 15 +-------------------------------------------------+ | 0 1 2 3 4 5 6 7 8 9 a b c d e f | +--------+-------------------------------------------------+----------------+ |00000000| 6f 6e 65 |one | +--------+-------------------------------------------------+----------------+ +-------------------------------------------------+ | 0 1 2 3 4 5 6 7 8 9 a b c d e f | +--------+-------------------------------------------------+----------------+ |00000000| 74 77 6f |two | +--------+-------------------------------------------------+----------------+ +-------------------------------------------------+ | 0 1 2 3 4 5 6 7 8 9 a b c d e f | +--------+-------------------------------------------------+----------------+ |00000000| 74 68 72 65 65 |three | +--------+-------------------------------------------------+----------------+
2.5 Gathering Writes 使用如下方式写入,可以将多个 buffer 的数据填充至 channel
1 2 3 4 5 6 7 8 9 10 11 12 13 14 15 16 try (RandomAccessFile file = new RandomAccessFile("helloword/3parts.txt" , "rw" )) {4 );4 );11 );new byte []{'f' , 'o' , 'u' , 'r' });new byte []{'f' , 'i' , 'v' , 'e' });new ByteBuffer[]{d, e});catch (IOException e) {
输出
1 2 3 4 5 6 7 8 9 10 +-------------------------------------------------+ | 0 1 2 3 4 5 6 7 8 9 a b c d e f | +--------+-------------------------------------------------+----------------+ |00000000| 66 6f 75 72 |four | +--------+-------------------------------------------------+----------------+ +-------------------------------------------------+ | 0 1 2 3 4 5 6 7 8 9 a b c d e f | +--------+-------------------------------------------------+----------------+ |00000000| 66 69 76 65 |five | +--------+-------------------------------------------------+----------------+
文件内容
使用多个buffer分散读和分散写,这样减少了数据在各个buffer或者数组之间来回拷贝,提高了效率。
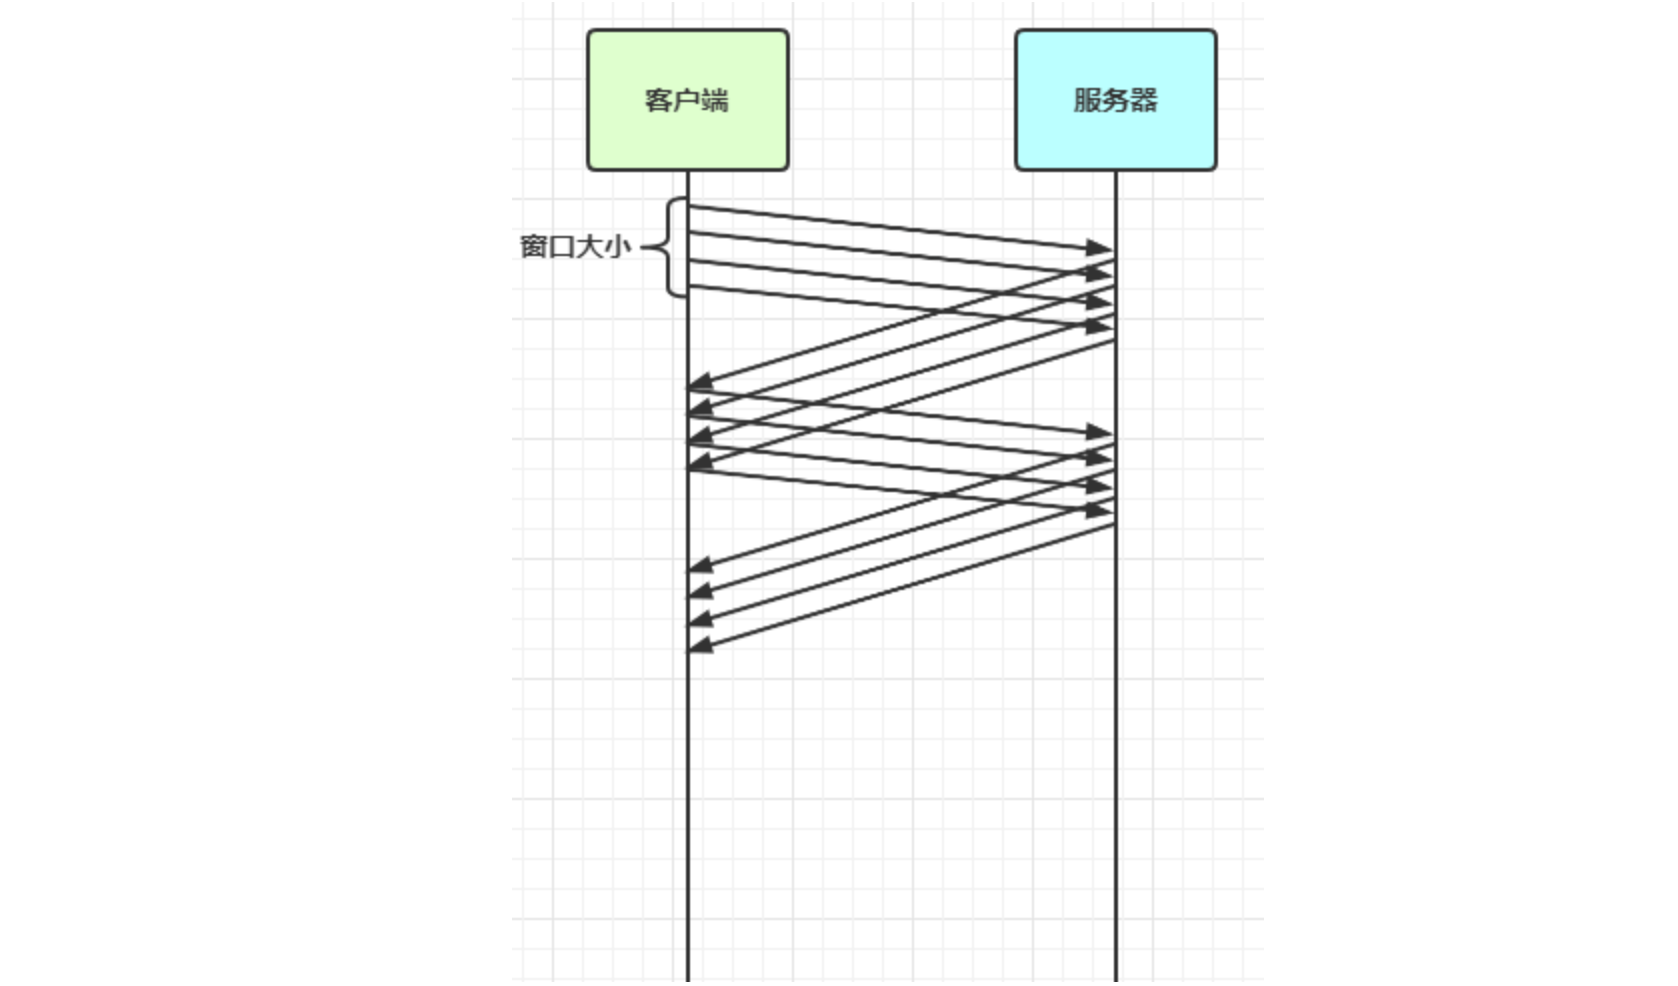
2.6 练习 黏包和半包现象 网络上有多条数据发送给服务端,数据之间使用 \n 进行分隔
Hello,world\n
I’m zhangsan\n
How are you?\n
变成了下面的两个 byteBuffer (黏包,半包)
Hello,world\nI’m zhangsan\nHo
w are you?\n
现在要求你编写程序,将错乱的数据恢复成原始的按 \n 分隔的数据
1 2 3 4 5 6 7 8 9 10 11 12 13 14 15 16 17 18 19 20 21 22 23 24 25 26 public static void main (String[] args) 32 );"Hello,world\nI'm zhangsan\nHo" .getBytes());"w are you?\nhaha!\n" .getBytes());private static void split (ByteBuffer source) int oldLimit = source.limit();for (int i = 0 ; i < oldLimit; i++) {if (source.get(i) == '\n' ) {1 - source.position());1 );
3. 文件编程 3.1 FileChannel ⚠️ FileChannel 工作模式
FileChannel 只能工作在阻塞模式下,不能配合Selector运行
获取 不能直接打开 FileChannel,必须通过 FileInputStream、FileOutputStream 或者 RandomAccessFile 来获取 FileChannel,它们都有 getChannel 方法
通过 FileInputStream 获取的 channel 只能读
通过 FileOutputStream 获取的 channel 只能写
通过 RandomAccessFile 是否能读写是根据构造 RandomAccessFile 时的读写模式决定的
读取 会从 channel 读取数据填充 ByteBuffer,返回值表示读到了多少字节,-1 表示到达了文件的末尾
1 int readBytes = channel.read(buffer);
写入 写入的正确姿势如下
1 2 3 4 5 6 7 ByteBuffer buffer = ...;while (buffer.hasRemaining()) {
在 while 中调用 channel.write 是因为 write 方法并不能保证一次将 buffer 中的内容全部写入 channel(channel的写入能力是有上限的,FileChannel没有这个限制,但是后面用到的SocketChannel有上限)。
关闭 channel 必须关闭,不过调用了 FileInputStream、FileOutputStream 或者 RandomAccessFile 的 close 方法会间接地调用 channel 的 close 方法,当然也可以只调用channel的close方法。
位置 获取当前位置
1 long position = channel.position();
设置当前位置
1 2 long newPos = ...;
设置当前位置时,如果设置为文件的末尾
这时读取会返回 -1
这时写入,会追加内容,但要注意如果 position 超过了文件末尾,再写入时在新内容和原末尾之间会有空洞(00)
大小 使用 size 方法获取文件的大小
强制写入 操作系统出于性能的考虑,会将数据缓存,不是立刻写入磁盘。可以调用 force(true) 方法将文件内容和元数据(文件的权限等信息)立刻写入磁盘
3.2 两个 Channel 传输数据 FileChannel.transferTo()效率高,底层会利用操作系统的零拷贝进行优化。
1 2 3 4 5 6 7 8 9 10 11 12 String FROM = "helloword/data.txt" ;"helloword/to.txt" ;long start = System.nanoTime();try (FileChannel from = new FileInputStream(FROM).getChannel();new FileOutputStream(TO).getChannel();0 , from.size(), to);catch (IOException e) {long end = System.nanoTime();"transferTo 用时:" + (end - start) / 1000_000.0 );
输出
FileChannel.transferTo()每次传输最大2G字节,如果超过2G字节,需要多次传输。
超过 2g 大小的文件传输
1 2 3 4 5 6 7 8 9 10 11 12 13 14 15 16 17 18 public class TestFileChannelTransferTo public static void main (String[] args) try (new FileInputStream("data.txt" ).getChannel();new FileOutputStream("to.txt" ).getChannel();long size = from.size();for (long left = size; left > 0 ; ) {"position:" + (size - left) + " left:" + left);catch (IOException e) {
实际传输一个超大文件
1 2 3 4 position :0 left:7769948160 position :2147483647 left:5622464513 position :4294967294 left:3474980866 position :6442450941 left:1327497219
3.3 Path jdk7 引入了 Path 和 Paths 类
Path 用来表示文件路径
Paths 是工具类,用来获取 Path 实例
1 2 3 4 5 6 7 Path source = Paths.get("1.txt" ); "d:\\1.txt" ); "d:/1.txt" ); "d:\\data" , "projects" );
例如目录结构如下
1 2 3 4 5 d:|- data |- projects |- a |- b
代码
1 2 3 Path path = Paths.get("d:\\data\\projects\\a\\..\\b" );
会输出
1 2 d:\d ata\p rojects\a \. .\b \d ata\p rojects\b
3.4 Files 检查文件是否存在
1 2 Path path = Paths.get("helloword/data.txt" );
创建一级目录
1 2 Path path = Paths.get("helloword/d1" );
如果目录已存在,会抛异常 FileAlreadyExistsException
不能一次创建多级目录,否则会抛异常 NoSuchFileException
创建多级目录用
1 2 Path path = Paths.get("helloword/d1/d2" );
拷贝文件
1 2 3 4 Path source = Paths.get("helloword/data.txt" );"helloword/target.txt" );
如果文件已存在,会抛异常 FileAlreadyExistsException
如果希望用 source 覆盖掉 target,需要用 StandardCopyOption 来控制
1 Files.copy(source, target, StandardCopyOption.REPLACE_EXISTING);
Files.copy和FileChannel.transferTo的具体实习不同,但是性能都很好,Files.copy调用了操作系统的系统调用。
移动文件
1 2 3 4 Path source = Paths.get("helloword/data.txt" );"helloword/data.txt" );
StandardCopyOption.ATOMIC_MOVE 保证文件移动的原子性
删除文件
1 2 3 Path target = Paths.get("helloword/target.txt" );
如果文件不存在,会抛异常 NoSuchFileException
删除目录
1 2 3 Path target = Paths.get("helloword/d1" );
如果目录还有内容,会抛异常 DirectoryNotEmptyException
遍历目录文件
使用Files类的walkFileTree()方法:
1 2 3 4 5 6 7 8 9 10 11 12 13 14 15 16 17 18 19 20 21 22 23 24 public static void main (String[] args) throws IOException "C:\\Program Files\\Java\\jdk1.8.0_91" );new AtomicInteger();new AtomicInteger();new SimpleFileVisitor<Path>(){@Override public FileVisitResult preVisitDirectory (Path dir, BasicFileAttributes attrs) throws IOException {return super .preVisitDirectory(dir, attrs);@Override public FileVisitResult visitFile (Path file, BasicFileAttributes attrs) throws IOException {return super .visitFile(file, attrs);
上面这段代码,使用到了访问者模式。
统计 jar 的数目
1 2 3 4 5 6 7 8 9 10 11 12 13 Path path = Paths.get("C:\\Program Files\\Java\\jdk1.8.0_91" );new AtomicInteger();new SimpleFileVisitor<Path>(){@Override public FileVisitResult visitFile (Path file, BasicFileAttributes attrs) throws IOException {if (file.toFile().getName().endsWith(".jar" )) {return super .visitFile(file, attrs);
删除多级目录
1 2 3 4 5 6 7 8 9 10 11 12 13 14 15 16 Path path = Paths.get("d:\\a" );new SimpleFileVisitor<Path>(){@Override public FileVisitResult visitFile (Path file, BasicFileAttributes attrs) throws IOException {return super .visitFile(file, attrs);@Override public FileVisitResult postVisitDirectory (Path dir, IOException exc) throws IOException {return super .postVisitDirectory(dir, exc);
⚠️ 删除很危险
删除是危险操作,确保要递归删除的文件夹没有重要内容,调用Files.delete方法是直接删除文件,不会在回收站中保存文件。
拷贝多级目录
1 2 3 4 5 6 7 8 9 10 11 12 13 14 15 16 17 18 19 20 21 long start = System.currentTimeMillis();"D:\\Snipaste-1.16.2-x64" ;"D:\\Snipaste-1.16.2-x64aaa" ;try {if (Files.isDirectory(path)) {else if (Files.isRegularFile(path)) {catch (IOException e) {long end = System.currentTimeMillis();
4. 网络编程 4.1 非阻塞 vs 阻塞 阻塞
阻塞模式下,相关方法都会导致线程暂停
ServerSocketChannel.accept 会在没有连接建立时让线程暂停
SocketChannel.read 会在没有数据可读时让线程暂停
阻塞的表现其实就是线程暂停了,暂停期间不会占用 cpu,但线程相当于闲置
单线程下,阻塞方法之间相互影响,几乎不能正常工作,需要多线程支持
但多线程下,有新的问题,体现在以下方面
32 位 jvm 一个线程 320k,64 位 jvm 一个线程 1024k,如果连接数过多,必然导致 OOM,并且线程太多,反而会因为频繁上下文切换导致性能降低
可以采用线程池技术来减少线程数和线程上下文切换,但治标不治本,如果有很多连接建立,但长时间 inactive,可能会阻塞线程池中所有线程,因此不适合长连接,只适合短连接
服务器端
1 2 3 4 5 6 7 8 9 10 11 12 13 14 15 16 17 18 19 20 21 22 23 24 25 26 27 16 );new InetSocketAddress(8080 ));new ArrayList<>();while (true ) {"connecting..." );"connected... {}" , sc);for (SocketChannel channel : channels) {"before read... {}" , channel);"after read...{}" , channel);
客户端
1 2 3 SocketChannel sc = SocketChannel.open();new InetSocketAddress("localhost" , 8080 ));"waiting..." );
非阻塞
非阻塞模式下,相关方法都会不会让线程暂停
在 ServerSocketChannel.accept 在没有连接建立时,会返回 null,继续运行
SocketChannel.read 在没有数据可读时,会返回 0,但线程不必阻塞,可以去执行其它 SocketChannel 的 read 或是去执行 ServerSocketChannel.accept
写数据时,线程只是等待数据写入 Channel 即可,无需等 Channel 通过网络把数据发送出去
但非阻塞模式下,即使没有连接建立,和可读数据,线程仍然在不断运行,白白浪费了 cpu
数据复制过程中,线程实际还是阻塞的(AIO 改进的地方)
服务器端,客户端代码不变
1 2 3 4 5 6 7 8 9 10 11 12 13 14 15 16 17 18 19 20 21 22 23 24 25 26 27 28 29 16 );false ); new InetSocketAddress(8080 ));new ArrayList<>();while (true ) {if (sc != null ) {"connected... {}" , sc);false ); for (SocketChannel channel : channels) {int read = channel.read(buffer);if (read > 0 ) {"after read...{}" , channel);
多路复用 单线程可以配合 Selector 完成对多个 Channel 可读写事件的监控,这称之为多路复用
多路复用仅针对网络 IO、普通文件 IO 没法利用多路复用
如果不用 Selector 的非阻塞模式,线程大部分时间都在做无用功,而 Selector 能够保证
有可连接事件时才去连接
有可读事件才去读取
有可写事件才去写入
限于网络传输能力,Channel 未必时时可写,一旦 Channel 可写,会触发 Selector 的可写事件
IO多路复用是一种同步的IO模型 。 利用IO多路复用模型,可以实现一个线程监视多个文件句柄;一旦某个文件句柄就绪,就能够通知到对应应用程序进行相应的读写操作;没有文件句柄就绪时就会阻塞应用程序,从而释放出CPU资源。 复用是指复用一个或多个线程资源。
4.2 Selector graph TD
subgraph selector 版
thread --> selector
selector --> c1(channel)
selector --> c2(channel)
selector --> c3(channel)
end
好处
一个线程配合 selector 就可以监控多个 channel 的事件,事件发生线程才去处理。避免非阻塞模式下所做无用功
让这个线程能够被充分利用
节约了线程的数量
减少了线程上下文切换
创建 1 Selector selector = Selector.open();
绑定 Channel 事件 也称之为注册事件,绑定的事件 selector 才会关心
1 2 channel.configureBlocking(false );
channel 必须工作在非阻塞模式 FileChannel 没有非阻塞模式,因此不能配合 selector 一起使用
绑定的事件类型可以有
connect - 客户端连接成功时触发
accept - 服务器端成功接受连接时触发
read - 数据可读入时触发,有因为接收能力弱,数据暂不能读入的情况
write - 数据可写出时触发,有因为发送能力弱,数据暂不能写出的情况
监听 Channel 事件 可以通过下面三种方法来监听是否有事件发生,方法的返回值代表有多少 channel 发生了事件
方法1,阻塞直到绑定事件发生
1 int count = selector.select();
方法2,阻塞直到绑定事件发生,或是超时(时间单位为 ms)
1 int count = selector.select(long timeout);
方法3,不会阻塞,也就是不管有没有事件,立刻返回,自己根据返回值检查是否有事件
1 int count = selector.selectNow();
💡 select() 何时不阻塞 select() 在事件未处理时,它不会阻塞;没有事件发生、事件发生后被处理、事件发生后被取消(cancel),它会阻塞。总而言之,使用select() 事件发生后要么处理,要么取消,不能置之不理。
事件发生时
客户端发起连接请求,会触发 accept 事件,此时select()不会被阻塞,直到事件被处理或者被取消(cancel)
客户端发送数据过来,客户端正常、异常关闭时,都会触发 read 事件,另外如果发送的数据大于 buffer 缓冲区,会触发多次读取事件
channel 可写,会触发 write 事件
在 linux 下 nio bug 发生时,这是因为Java对不同平台的代码实现不同,故而在linux下有bug,至今未被处理。
调用 selector.wakeup()
调用 selector.close()
selector 所在线程 interrupt
4.3 处理 accept 事件 客户端代码为
1 2 3 4 5 6 7 8 9 10 11 public class Client public static void main (String[] args) try (Socket socket = new Socket("localhost" , 8080 )) {"world" .getBytes());catch (IOException e) {
服务器端代码为
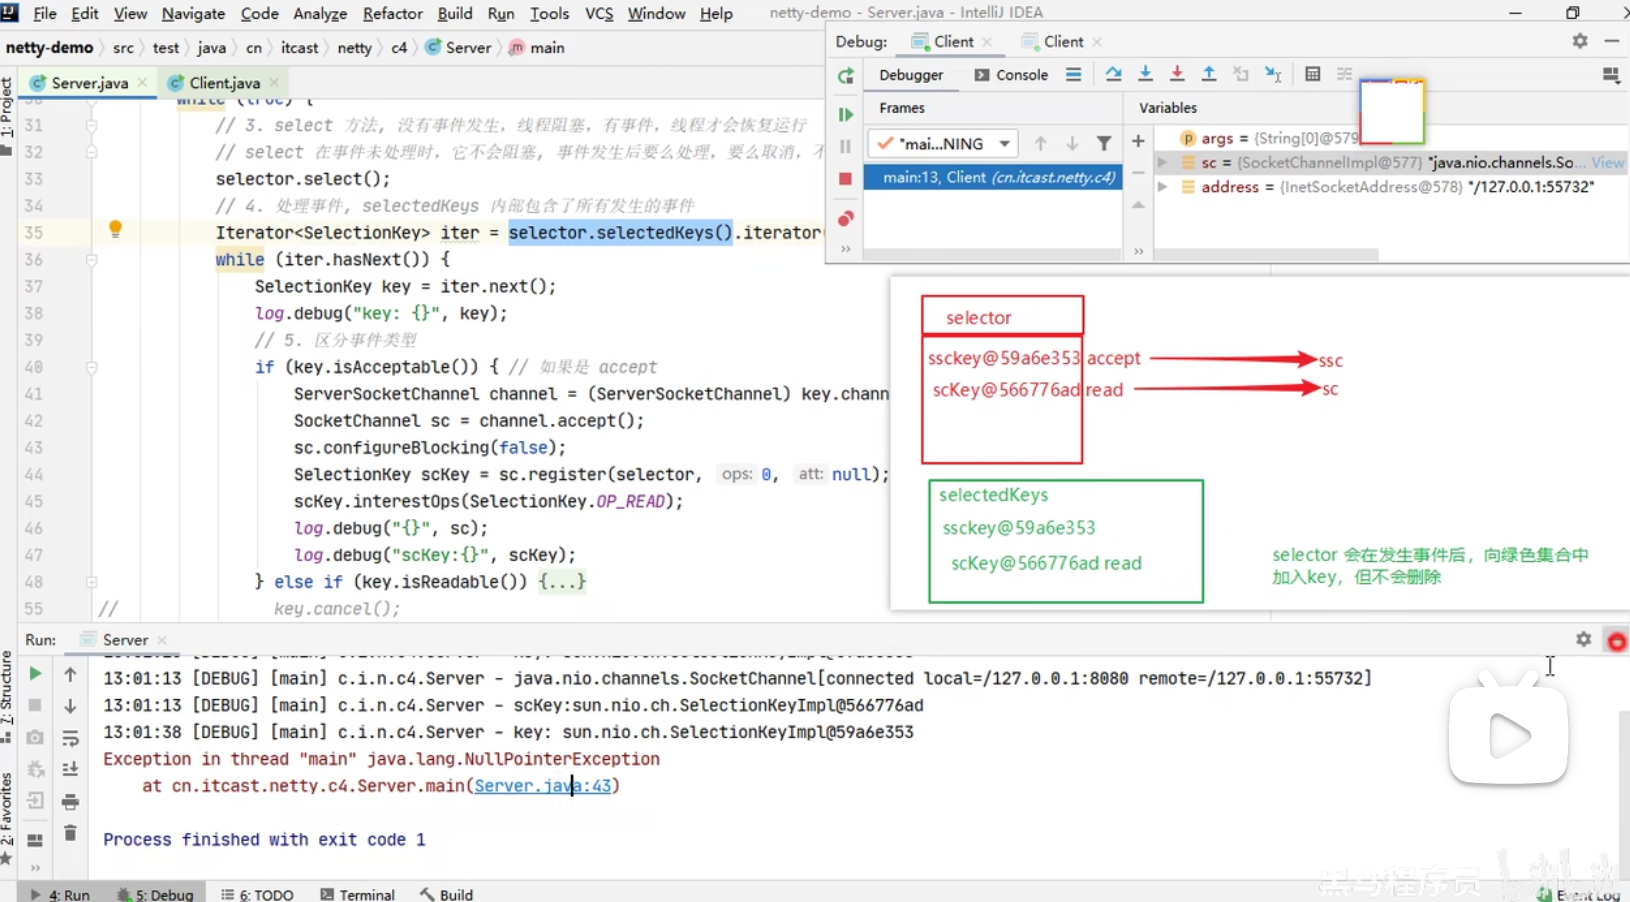
1 2 3 4 5 6 7 8 9 10 11 12 13 14 15 16 17 18 19 20 21 22 23 24 25 26 27 28 29 30 31 32 33 34 35 36 37 38 39 40 41 @Slf4j public class ChannelDemo6 public static void main (String[] args) try (ServerSocketChannel channel = ServerSocketChannel.open()) {new InetSocketAddress(8080 ));false );while (true ) {int count = selector.select();"select count: {}" , count);while (iter.hasNext()) {if (key.isAcceptable()) {"{}" , sc);catch (IOException e) {
💡 事件发生后能否不处理
事件发生后,要么处理,要么取消(cancel),不能什么都不做,否则下次该事件仍会触发,这是因为 nio 底层使用的是水平触发
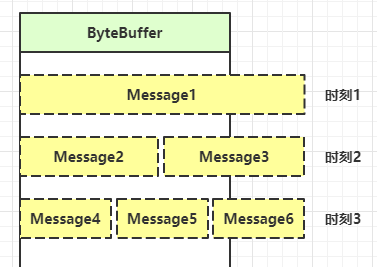
4.4 处理 read 事件 客户端不论是正常断开,还是异常断开,都会不断地触发read事件。不同点是,正常断开时服务器channel.read()返回-1;异常断开直接抛出异常。需要特别注意的是,不论是正常断开(调用Channel.close()方法),还是异常断开,另外一方都会不断收到read事件,所以在判断断开连接后需要取消掉检测该Channel的read事件的SelectionKey。
如果一次read事件没有把消息全部读完,那么会触发多个read事件,直到读完发送来的所有消息。
1 2 3 4 5 6 7 8 9 10 11 12 13 14 15 16 17 18 19 20 21 22 23 24 25 26 27 28 29 30 31 32 33 34 35 36 37 38 39 40 41 42 43 44 45 46 47 48 49 50 51 52 53 54 @Slf4j public class ChannelDemo6 public static void main (String[] args) try (ServerSocketChannel channel = ServerSocketChannel.open()) {new InetSocketAddress(8080 ));false );while (true ) {int count = selector.select();"select count: {}" , count);while (iter.hasNext()) {if (key.isAcceptable()) {false );"连接已建立: {}" , sc);else if (key.isReadable()) {128 );int read = sc.read(buffer);if (read == -1 ) {else {catch (IOException e) {
开启两个客户端,修改一下发送文字,输出
1 2 3 4 5 6 7 8 9 10 11 12 13 14 15 16 17 sun.nio.ch.ServerSocketChannelImpl[/0:0:0:0:0:0:0:0:8080] +-------------------------------------------------+ | 0 1 2 3 4 5 6 7 8 9 a b c d e f | +--------+-------------------------------------------------+----------------+ |00000000| 68 65 6c 6c 6f |hello | +--------+-------------------------------------------------+----------------+ +-------------------------------------------------+ | 0 1 2 3 4 5 6 7 8 9 a b c d e f | +--------+-------------------------------------------------+----------------+ |00000000| 77 6f 72 6c 64 |world | +--------+-------------------------------------------------+----------------+
💡 为何要 iter.remove()
因为 selector 在事件发生后,就会将相关的 key 放入 selectedKeys 集合,但不会在处理完后从 selectedKeys 集合中移除,需要我们自己编码删除。例如
第一次触发了 ssckey 上的 accept 事件,没有移除 ssckey ,但是ssckey上的accept事件在被处理后标记为已处理。
第二次触发了 sckey 上的 read 事件,但这时 selectedKeys 中还有上次的 ssckey ,在处理时因为没有真正的 serverSocket 连上了,就会导致空指针异常
💡 cancel 的作用
cancel 会取消注册在 selector 上的 channel,并从 keys 集合中删除 key 后续不会再监听事件
⚠️ 不处理边界的问题 以前有同学写过这样的代码,思考注释中两个问题,以 bio 为例,其实 nio 道理是一样的
1 2 3 4 5 6 7 8 9 10 11 12 13 14 15 16 17 18 19 public class Server public static void main (String[] args) throws IOException new ServerSocket(9000 );while (true ) {byte [] arr = new byte [4 ];while (true ) {int read = in.read(arr);if (read == -1 ) {break ;new String(arr, 0 , read));
客户端
1 2 3 4 5 6 7 8 9 10 public class Client public static void main (String[] args) throws IOException new Socket("localhost" , 9000 );"hello" .getBytes());"world" .getBytes());"你好" .getBytes());
输出
为什么?
处理消息的边界
一种思路是固定消息长度,数据包大小一样,客户端按预定长度发送,服务器按预定长度读取,缺点是浪费带宽。
另一种思路是按分隔符拆分,缺点是效率低。这种思路有两个问题,第一如果客户端发送的消息包长度大于服务器的buffer,那么服务器需要扩容(比如buffer的capacity变为2倍),才能容纳这次的消息包;第二个问题是服务器收到消息,需要按分隔符拆分消息包,效率低。
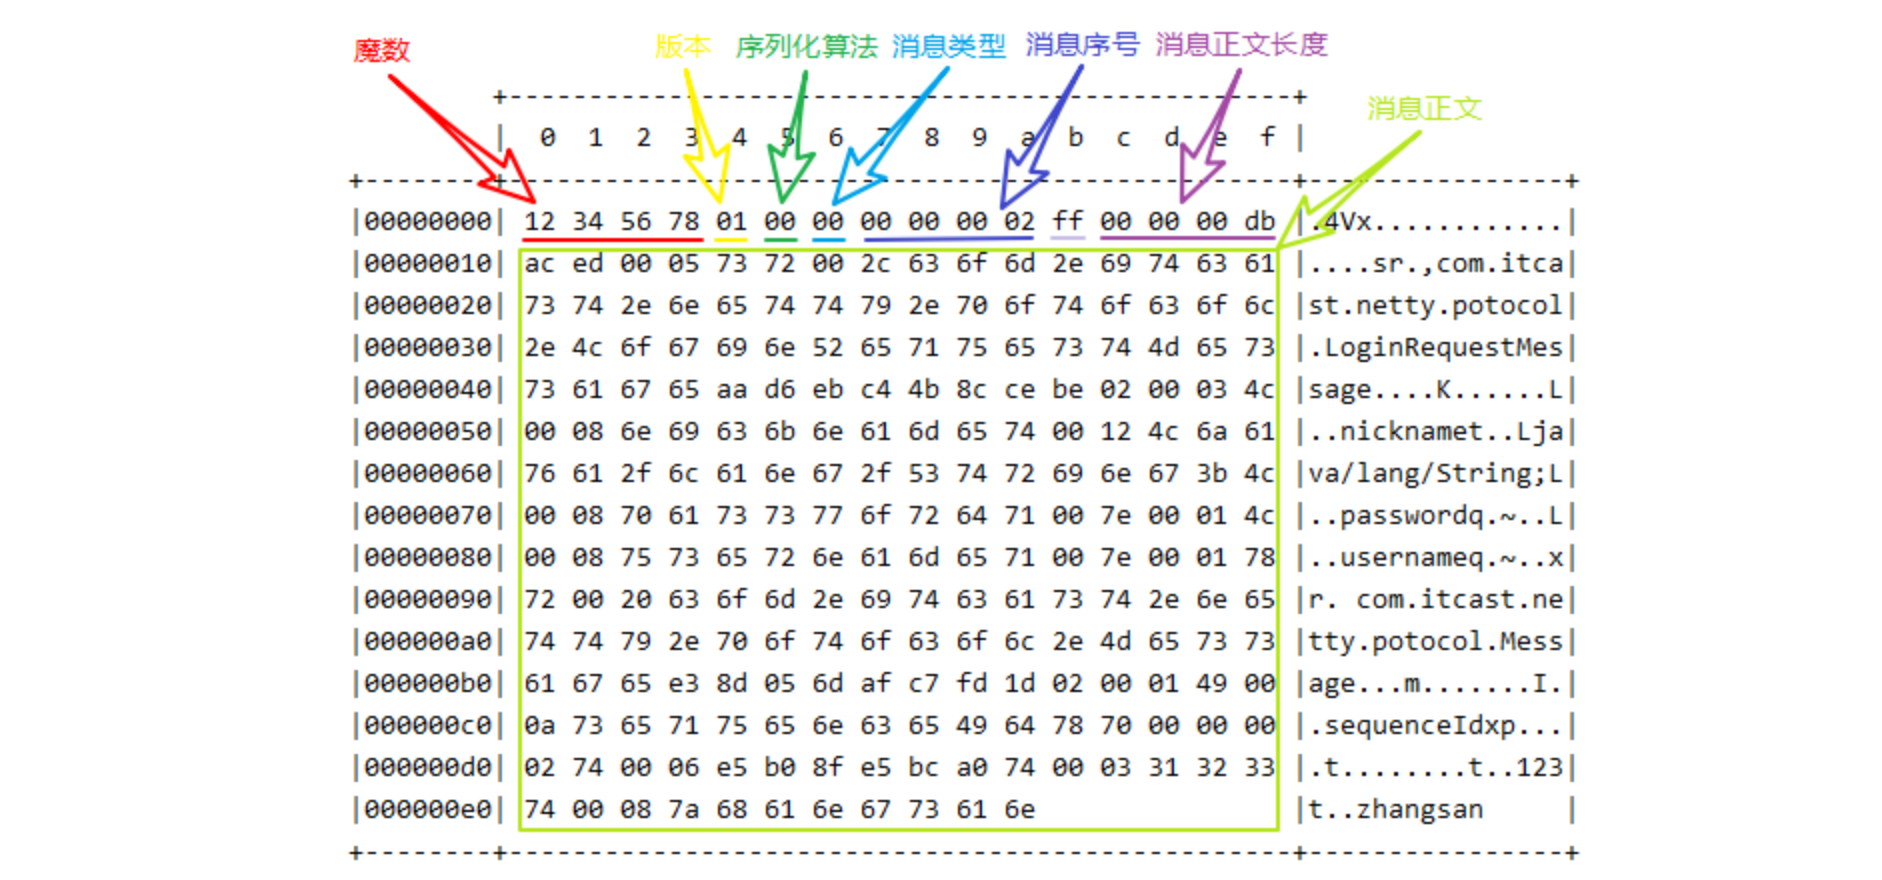
TLV 格式,即 Type 类型、Length 长度、Value 数据,类型和长度已知的情况下,就可以方便获取消息大小,分配合适的 buffer,缺点是 buffer 需要提前分配,如果内容过大,则影响 server 吞吐量
Http 1.1 是 TLV 格式
Http 2.0 是 LTV 格式
sequenceDiagram
participant c1 as 客户端1
participant s as 服务器
participant b1 as ByteBuffer1
participant b2 as ByteBuffer2
c1 ->> s: 发送 01234567890abcdef3333\r
s ->> b1: 第一次 read 存入 01234567890abcdef
s ->> b2: 扩容
b1 ->> b2: 拷贝 01234567890abcdef
s ->> b2: 第二次 read 存入 3333\r
b2 ->> b2: 01234567890abcdef3333\r
服务器端
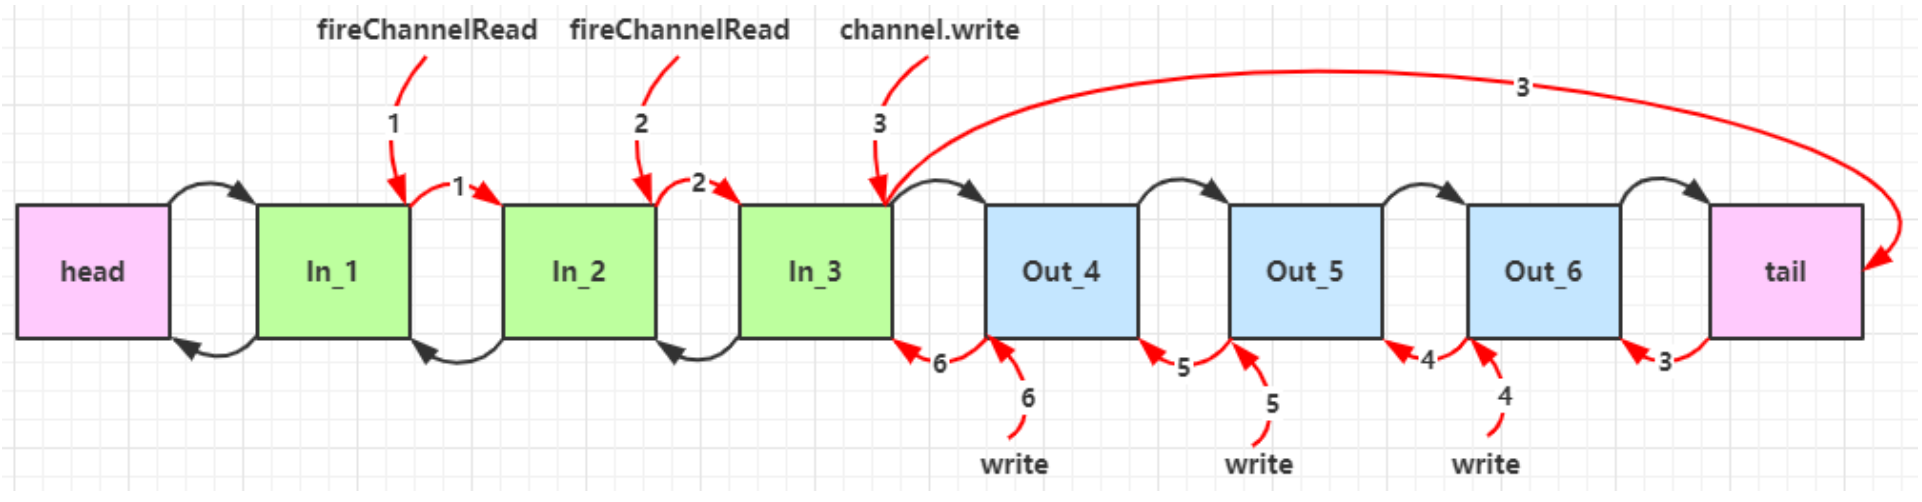
1 2 3 4 5 6 7 8 9 10 11 12 13 14 15 16 17 18 19 20 21 22 23 24 25 26 27 28 29 30 31 32 33 34 35 36 37 38 39 40 41 42 43 44 45 46 47 48 49 50 51 52 53 54 55 56 57 58 59 60 61 62 63 64 65 66 67 68 69 70 71 72 73 74 75 76 77 78 79 80 private static void split (ByteBuffer source) for (int i = 0 ; i < source.limit(); i++) {if (source.get(i) == '\n' ) {int length = i + 1 - source.position();for (int j = 0 ; j < length; j++) {public static void main (String[] args) throws IOException false );0 , null );"sscKey:{}" , sscKey);new InetSocketAddress(8080 ));while (true ) {while (iter.hasNext()) {"key: {}" , key);if (key.isAcceptable()) { false );16 ); 0 , buffer);"{}" , sc);"scKey:{}" , scKey);else if (key.isReadable()) { try {int read = channel.read(buffer); if (read == -1 ) {else {if (buffer.position() == buffer.limit()) {2 );catch (IOException e) {
客户端
1 2 3 4 5 6 7 SocketChannel sc = SocketChannel.open();new InetSocketAddress("localhost" , 8080 ));"0123\n456789abcdef" ));"0123456789abcdef3333\n" ));
ByteBuffer 大小分配
每个 channel 都需要记录可能被切分的消息,因为 ByteBuffer 不能被多个 channel 共同使用,因此需要为每个 channel 维护一个独立的 ByteBuffer
ByteBuffer 不能太大,比如一个 ByteBuffer 1Mb 的话,要支持百万连接就要 1Tb 内存,因此需要设计大小可变的 ByteBuffer
4.5 处理 write 事件 一次无法写完例子
非阻塞模式下,无法保证把 buffer 中所有数据都写入 channel,因此需要追踪 write 方法的返回值(代表实际写入字节数)
用 selector 监听所有 channel 的可写事件,每个 channel 都需要一个 key 来跟踪 buffer,但这样又会导致占用内存过多,就有两阶段策略
当消息处理器第一次写入消息时,才将 channel 注册到 selector 上
selector 检查 channel 上的可写事件,如果所有的数据写完了,就取消 channel 的注册
如果不取消,会每次可写均会触发 write 事件
1 2 3 4 5 6 7 8 9 10 11 12 13 14 15 16 17 18 19 20 21 22 23 24 25 26 27 28 29 30 31 32 33 34 35 36 37 38 39 40 41 42 43 44 45 46 47 48 49 50 51 52 public class WriteServer public static void main (String[] args) throws IOException false );new InetSocketAddress(8080 ));while (true ) {while (iter.hasNext()) {if (key.isAcceptable()) {false );new StringBuilder();for (int i = 0 ; i < 30000000 ; i++) {"a" );int write = sc.write(buffer);"实际写入字节:" + write);if (buffer.hasRemaining()) {else if (key.isWritable()) {int write = sc.write(buffer);"实际写入字节:" + write);if (!buffer.hasRemaining()) { null );
客户端
1 2 3 4 5 6 7 8 9 10 11 12 13 14 15 16 17 18 19 20 21 22 23 24 25 26 public class WriteClient public static void main (String[] args) throws IOException false );new InetSocketAddress("localhost" , 8080 ));int count = 0 ;while (true ) {while (iter.hasNext()) {if (key.isConnectable()) {else if (key.isReadable()) {1024 * 1024 );
💡 write 为何要取消 只要向 channel 发送数据时,socket 缓冲可写,这个事件会频繁触发,因此应当只在 socket 缓冲区写不下时再关注可写事件,数据写完之后再取消关注。
4.6 更进一步 💡 利用多线程优化
现在都是多核 cpu,设计时要充分考虑别让 cpu 的力量被白白浪费。
还有就是单线程处理多种事件,如果其中一种事件复杂度高,那么会影响其他时间的处理,故而像Redis这种单线程程序,不要使用复杂度高的操作,否则会影响其他操作。
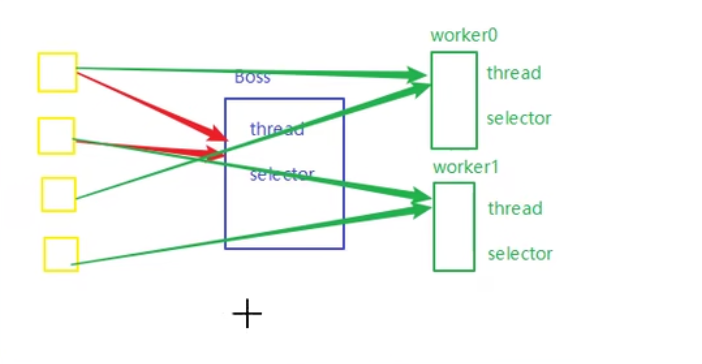
前面的代码只有一个选择器,没有充分利用多核 cpu,如何改进呢?
分两组选择器
单线程配一个选择器,专门处理 accept 事件
创建 cpu 核心数的线程,每个线程配一个选择器,轮流处理 read 事件
Boss线程只处理accept事件,worker0和worker1处理read和write事件。
1 2 3 4 5 6 7 8 9 10 11 12 13 14 15 16 17 18 19 20 21 22 23 24 25 26 27 28 29 30 31 32 33 34 35 36 37 38 39 40 41 42 43 44 45 46 47 48 49 50 51 52 53 54 55 56 57 58 59 60 61 62 63 64 65 66 67 68 69 70 71 72 73 74 75 76 77 78 79 80 81 82 83 84 85 86 87 88 89 90 91 92 93 94 95 96 97 98 99 100 101 102 103 104 105 106 107 108 109 110 111 112 113 114 115 116 117 118 119 120 121 122 123 124 125 126 127 128 129 130 131 132 133 134 public class ChannelDemo7 public static void main (String[] args) throws IOException new BossEventLoop().register();@Slf4j static class BossEventLoop implements Runnable private Selector boss;private WorkerEventLoop[] workers;private volatile boolean start = false ;new AtomicInteger();public void register () throws IOException if (!start) {new InetSocketAddress(8080 ));false );0 , null );new Thread(this , "boss" ).start();"boss start..." );true ;public WorkerEventLoop[] initEventLoops() {new WorkerEventLoop[2 ];for (int i = 0 ; i < workerEventLoops.length; i++) {new WorkerEventLoop(i);return workerEventLoops;@Override public void run () while (true ) {try {while (iter.hasNext()) {if (key.isAcceptable()) {false );"{} connected" , sc.getRemoteAddress());catch (IOException e) {@Slf4j static class WorkerEventLoop implements Runnable private Selector worker;private volatile boolean start = false ;private int index;private final ConcurrentLinkedQueue<Runnable> tasks = new ConcurrentLinkedQueue<>();public WorkerEventLoop (int index) this .index = index;public void register (SocketChannel sc) throws IOException if (!start) {new Thread(this , "worker-" + index).start();true ;try {0 , null );catch (IOException e) {@Override public void run () while (true ) {try {if (task != null ) {while (iter.hasNext()) {if (key.isReadable()) {128 );try {int read = sc.read(buffer);if (read == -1 ) {else {"{} message:" , sc.getRemoteAddress());catch (IOException e) {catch (IOException e) {
注意:
Selector.select()的时候会锁住key集合,先select的话,Selector.register()注册就进不去了。
也可以使用Selector.wakeup(),唤醒Selector对象,即使Selector对象还未被阻塞,Selector.wakeup()就已经运行,下次Selector.select()还是不会被阻塞,因为Selector.wakeup()相当于给Selector对象发了一张不阻塞的门票。
💡 如何拿到 cpu 个数
Runtime.getRuntime().availableProcessors() 如果工作在 docker 容器下,因为容器不是物理隔离的,会拿到物理 cpu 个数,而不是容器申请时的个数
这个问题直到 jdk 10 才修复,使用 jvm 参数 UseContainerSupport 配置, 默认开启
如何设置线程数
如果任务是cpu密集型任务:那么线程数设置成cpu的核心数比较合适,因为减少了线程之间的上下文切换,尽最大限度利用cpu的时间片完成任务。
如果任务是io密集型任务:那么线程数设置成大于cpu的核心数比较合适,因为io密集型任务,伴随着cpu的空转情况,故而设置更多的线程数能够最大限度利用cpu的时间片,具体数目参考阿姆达尔定律 。
4.7 UDP
UDP 是无连接的,client 发送数据不会管 server 是否开启
server 这边的 receive 方法会将接收到的数据存入 bytebuffer,但如果数据报文超过 buffer 大小,多出来的数据会被默默抛弃
首先启动服务器端
1 2 3 4 5 6 7 8 9 10 11 12 13 14 public class UdpServer public static void main (String[] args) try (DatagramChannel channel = DatagramChannel.open()) {new InetSocketAddress(9999 ));"waiting..." );32 );catch (IOException e) {
输出
运行客户端
1 2 3 4 5 6 7 8 9 10 11 public class UdpClient public static void main (String[] args) try (DatagramChannel channel = DatagramChannel.open()) {"hello" );new InetSocketAddress("localhost" , 9999 );catch (Exception e) {
接下来服务器端输出
1 2 3 4 5 +-------------------------------------------------+ | 0 1 2 3 4 5 6 7 8 9 a b c d e f | +--------+-------------------------------------------------+----------------+ |00000000| 68 65 6c 6c 6f |hello | +--------+-------------------------------------------------+----------------+
5. NIO vs BIO 5.1 stream vs channel
stream 不会自动缓冲数据,channel 会利用系统提供的发送缓冲区、接收缓冲区(更为底层)
stream 仅支持阻塞 API,channel 同时支持阻塞、非阻塞 API,网络 channel 可配合 selector 实现多路复用
二者均为全双工,即读写可以同时进行
5.2 IO 模型 同步阻塞、同步非阻塞、同步多路复用、异步阻塞(没有此情况)、异步非阻塞
同步:线程自己去获取结果(一个线程)
异步:线程自己不去获取结果,而是由其它线程(比如内核Kernel)送结果(至少两个线程)
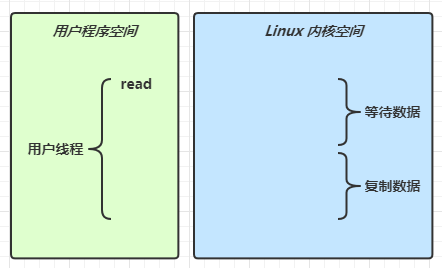
当调用一次 channel.read 或 stream.read 后,会切换至操作系统内核态来完成真正数据读取,而读取又分为两个阶段,分别为:
等待数据阶段:比如等待发送端把数据发送过来。
复制数据阶段:比如把发送端发送来的数据从网卡复制到内存
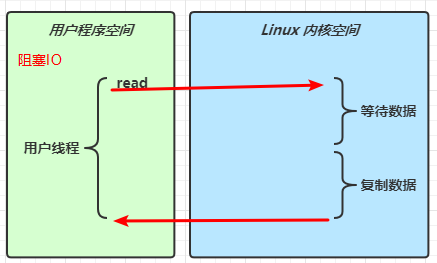
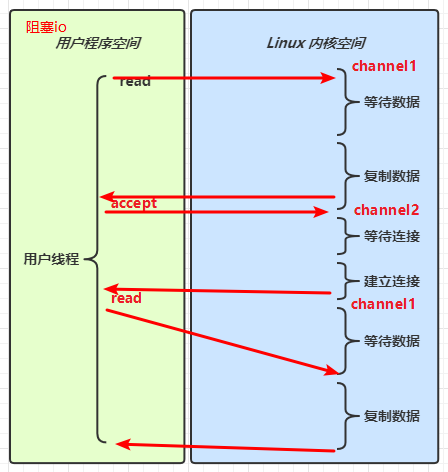
阻塞 IO
在阻塞IO中,用户线程在等待数据和复制数据阶段一直被阻塞,不能处理其他任务。
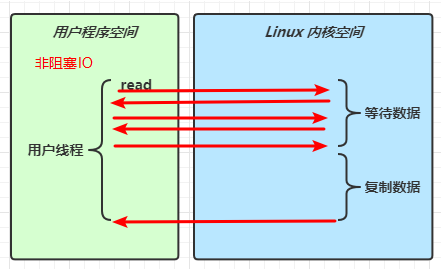
非阻塞 IO
在非阻塞IO中,用户线程在等待数据阶段不会被阻塞住,可以处理其他任务;但是在复制数据阶段仍然会被阻塞住,不能处理其他任务。用户线程在等待数据阶段调用read()后,不会被阻塞住,会立刻得到返回值,用户线程会得知等待数据阶段是否完成,如果没有完成,可以去处理其他任务,过一段时间再来查询带带数据阶段是否完成。如果等待数据阶段完成,进入复制数据阶段,用户线程会被阻塞住。
需要注意的是,由于非阻塞IO在等待数据阶段频繁调用系统函数read(),涉及到多次的用户态和系统态的切换,故而性能不一定比阻塞IO好多少。
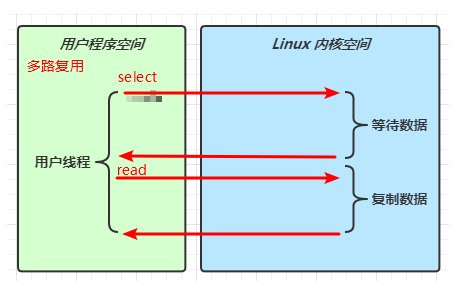
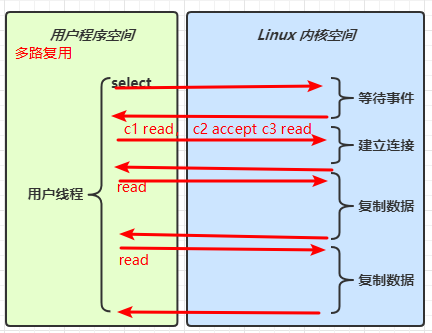
多路复用
IO多路复用是一种同步的IO模型 。 利用IO多路复用模型,可以实现一个线程监视多个文件句柄;一旦某个文件句柄就绪,就能够通知到对应应用程序进行相应的读写操作;没有文件句柄就绪时就会阻塞应用程序,从而释放出CPU资源。 复用是指复用一个或多个线程资源。多路复用有三种:selector,poll,epoll。
IO多路复用模型指的是:使用单个进程同时处理多个网络连接IO,他的原理就是select、 poll、 epoll 不断轮询所负责的所有 socket, 当某个socket有数据到达了,就通知用户进程。该模型的优势并不是对于单个连接能处理得更快,而是在于能处理更多的连接。
多路复用,select()方法在等待数据阶段阻塞,等获得SelectionKey之后,调用read()方法又会在复制数据阶段被阻塞。
信号驱动
不太常用,不做了解。
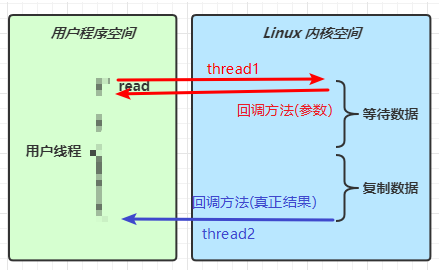
异步 IO
用户进程发起 aio_read 调用之后,立刻就可以开始去做其它的事。而另一方面,从 kernel 的角度,当它发现一个 asynchronous read 之后,首先它会立刻返回,所以不会对用户进程产生任何 block。然后,kernel 会等待数据准备完成,然后将数据拷贝到用户内存,当这一切都完成之后,kernel 会给用户进程发送一个 signal,告诉它 read 操作完成了。
thread1和thread2是如何通信的呢?在thread1调用read()方法时,定义了一个回调方法(参数),等到thread2讲数据拷贝到用户空间了,此时thread2会调用thread1定义的回调方法,并把结果作为参数进行返回,以此来达到线程间通信。
阻塞 IO vs 多路复用
阻塞IO只能通过当前事件的结束来结束阻塞,而多路复用可以通过任意注册的事件的发生来结束阻塞。
而多路复用的select()每次等待事件,可以一次拿到多个SelectionKey,处理多个请求,不需要像阻塞IO那样多次进入等待阶段。
🔖 参考 UNIX 网络编程 - 卷 I
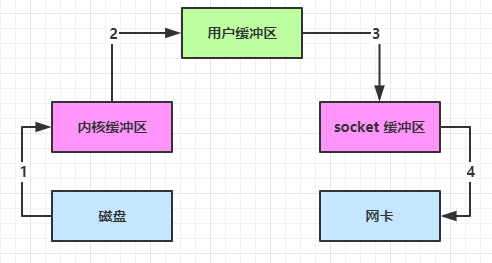
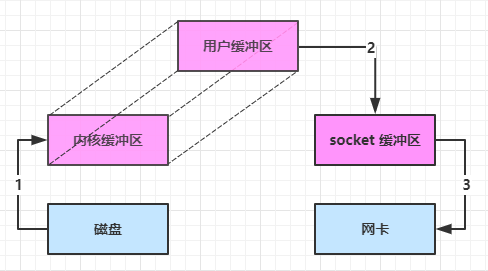
5.3 零拷贝 传统 IO 问题 传统的 IO 将一个文件通过 socket 写出
1 2 3 4 5 6 7 8 File f = new File("helloword/data.txt" );new RandomAccessFile(f, "r" );byte [] buf = new byte [(int )f.length()];
内部工作流程是这样的:
java 本身并不具备 IO 读写能力,因此 read 方法调用后,要从 java 程序的用户态 切换至内核态 ,去调用操作系统(Kernel)的读能力,将数据读入内核缓冲区 。这期间用户线程阻塞,操作系统使用 DMA(Direct Memory Access)来实现文件读,其间也不会使用 cpu
DMA 也可以理解为硬件单元,用来解放 cpu 完成文件 IO
从内核态 切换回用户态 ,将数据从内核缓冲区 读入用户缓冲区 (即 byte[] buf),这期间 cpu 会参与拷贝,无法利用 DMA
调用 write 方法,这时将数据从用户缓冲区 (byte[] buf)写入 socket 缓冲区 ,cpu 会参与拷贝
接下来要向网卡写数据,这项能力 java 又不具备,因此又得从用户态 切换至内核态 ,调用操作系统的写能力,使用 DMA 将 socket 缓冲区 的数据写入网卡,不会使用 cpu
可以看到中间环节较多,java 的 IO 实际不是物理设备级别的读写,而是缓存的复制,底层的真正读写是操作系统来完成的
用户态与内核态的切换发生了 3 次,这个操作比较重量级(第一次是调用read()方法从用户态到内核态,第二次是read()方法结束从内核态到用户态,第三次是调用write()方法从用户态切换到内核态)
数据拷贝了共 4 次
NIO 优化 通过 DirectByteBuf
ByteBuffer.allocate(10) HeapByteBuffer 使用的还是 java 内存
ByteBuffer.allocateDirect(10) DirectByteBuffer 使用的是操作系统内存(这块操作系统内存比较特殊,Java程序和操作系统均可访问)
大部分步骤与优化前相同,不再赘述。唯有一点:java 可以使用 DirectByteBuf 将堆外内存映射(mmap )到 jvm 内存中来直接访问使用
这块内存不受 jvm 垃圾回收的影响,因此内存地址固定,有助于 IO 读写
java 中的 DirectByteBuf 对象仅维护了此内存的虚引用,内存回收分成两步
DirectByteBuf 对象被垃圾回收,将虚引用加入引用队列
通过专门线程访问引用队列,根据虚引用释放堆外内存
减少了一次数据拷贝,用户态与内核态的切换次数没有减少
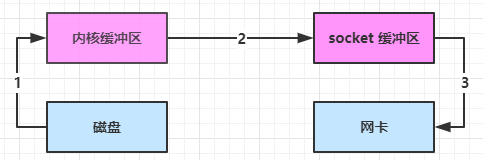
进一步优化(底层采用了 linux 2.1 后提供的 sendFile 方法),java 中对应着两个 channel 调用 transferTo/transferFrom 方法拷贝数据
java 调用 transferTo 方法后,要从 java 程序的用户态 切换至内核态 ,使用 DMA将数据读入内核缓冲区 ,不会使用 cpu
数据从内核缓冲区 传输到 socket 缓冲区 ,cpu 会参与拷贝
最后使用 DMA 将 socket 缓冲区 的数据写入网卡,不会使用 cpu
可以看到
只发生了一次用户态与内核态的切换
数据拷贝了 3 次
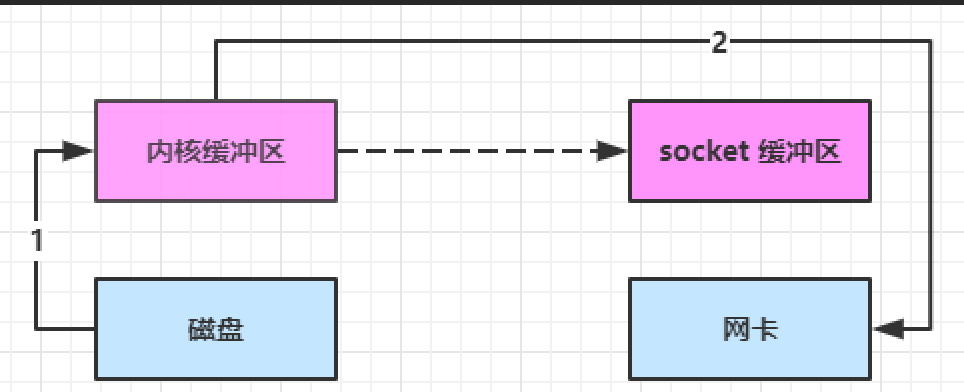
进一步优化(linux 2.4)
java 调用 transferTo 方法后,要从 java 程序的用户态 切换至内核态 ,使用 DMA将数据读入内核缓冲区 ,不会使用 cpu
只会将一些 offset 和 length 信息拷入 socket 缓冲区 ,几乎无消耗
使用 DMA 将 内核缓冲区 的数据写入网卡,不会使用 cpu
整个过程仅只发生了一次用户态与内核态的切换,数据拷贝了 2 次。所谓的【零拷贝】,并不是真正无拷贝,而是在不会拷贝重复数据到 jvm 内存中,零拷贝的优点有
更少的用户态与内核态的切换
不利用 cpu 计算,减少 cpu 缓存伪共享,direct memory access(DMA) 直接内存访问,硬件直接支持,不用cpu参与。
零拷贝适合小文件传输(大文件需要一次性加载到内核缓冲区,会影响其他文件的读取)
5.3 AIO AIO 用来解决数据复制阶段的阻塞问题
同步意味着,在进行读写操作时,线程需要等待结果,还是相当于闲置
异步意味着,在进行读写操作时,线程不必等待结果,而是将来由操作系统来通过回调方式由另外的线程来获得结果
异步模型需要底层操作系统(Kernel)提供支持
Windows 系统通过 IOCP 实现了真正的异步 IO
Linux 系统异步 IO 在 2.6 版本引入,但其底层实现还是用多路复用模拟了异步 IO,性能没有优势
文件 AIO 先来看看 AsynchronousFileChannel
1 2 3 4 5 6 7 8 9 10 11 12 13 14 15 16 17 18 19 20 21 22 23 24 25 26 27 28 29 30 31 32 33 34 35 @Slf4j public class AioDemo1 public static void main (String[] args) throws IOException try {"1.txt" ),,StandardOpenOption.READ);2 );"begin..." );0 , null , new CompletionHandler<Integer, ByteBuffer>() {@Override public void completed (Integer result, ByteBuffer attachment) "read completed...{}" , result);@Override public void failed (Throwable exc, ByteBuffer attachment) "read failed..." );catch (IOException e) {"do other things..." );
输出
1 2 3 4 5 6 7 8 13:44:56 [DEBUG] [main] c.i.aio.AioDemo1 - begin... +-------------------------------------------------+ | 0 1 2 3 4 5 6 7 8 9 a b c d e f | +--------+-------------------------------------------------+----------------+ |00000000| 61 0d |a. | +--------+-------------------------------------------------+----------------+
可以看到
响应文件读取成功的是另一个线程 Thread-5
主线程并没有 IO 操作阻塞
💡 守护线程 默认文件 AIO 使用的线程都是守护线程,所以最后要执行 System.in.read() 以避免守护线程意外结束
网络 AIO 1 2 3 4 5 6 7 8 9 10 11 12 13 14 15 16 17 18 19 20 21 22 23 24 25 26 27 28 29 30 31 32 33 34 35 36 37 38 39 40 41 42 43 44 45 46 47 48 49 50 51 52 53 54 55 56 57 58 59 60 61 62 63 64 65 66 67 68 69 70 71 72 73 74 75 76 77 78 79 80 81 82 83 84 85 86 87 88 89 90 91 92 93 94 95 96 97 98 99 100 public class AioServer public static void main (String[] args) throws IOException new InetSocketAddress(8080 ));null , new AcceptHandler(ssc));private static void closeChannel (AsynchronousSocketChannel sc) try {"[%s] %s close\n" , Thread.currentThread().getName(), sc.getRemoteAddress());catch (IOException e) {private static class ReadHandler implements CompletionHandler <Integer , ByteBuffer > private final AsynchronousSocketChannel sc;public ReadHandler (AsynchronousSocketChannel sc) this .sc = sc;@Override public void completed (Integer result, ByteBuffer attachment) try {if (result == -1 ) {return ;"[%s] %s read\n" , Thread.currentThread().getName(), sc.getRemoteAddress());this );catch (IOException e) {@Override public void failed (Throwable exc, ByteBuffer attachment) private static class WriteHandler implements CompletionHandler <Integer , ByteBuffer > private final AsynchronousSocketChannel sc;private WriteHandler (AsynchronousSocketChannel sc) this .sc = sc;@Override public void completed (Integer result, ByteBuffer attachment) if (attachment.hasRemaining()) {@Override public void failed (Throwable exc, ByteBuffer attachment) private static class AcceptHandler implements CompletionHandler <AsynchronousSocketChannel , Object > private final AsynchronousServerSocketChannel ssc;public AcceptHandler (AsynchronousServerSocketChannel ssc) this .ssc = ssc;@Override public void completed (AsynchronousSocketChannel sc, Object attachment) try {"[%s] %s connected\n" , Thread.currentThread().getName(), sc.getRemoteAddress());catch (IOException e) {16 );new ReadHandler(sc));"server hello!" ), ByteBuffer.allocate(16 ), new WriteHandler(sc));null , this );@Override public void failed (Throwable exc, Object attachment)
水平触发和边沿触发 epoll模式下的水平触发、边沿触发
1,epoll默认是水平触发
2,水平触发通俗来讲:只要有数据,epoll_wait函数就一直返回;边沿触发通俗来讲:只有socket状态发生变化,epoll_wait函数才会返回。
3,水平触发优、缺点及应用场景:
优点:当进行socket通信的时候,保证了数据的完整输出,进行IO操作的时候,如果还有数据,就会一直的通知你。
缺点:由于只要还有数据,内核就会不停的从内核空间转到用户空间,所有占用了大量内核资源,试想一下当有大量数据到来的时候,每次读取一个字节,这样就会不停的进行切换。内核资源的浪费严重。效率来讲也是很低的。
应用场景:
4,边沿触发优、缺点及应用场景:
优点:每次内核只会通知一次,大大减少了内核资源的浪费,提高效率。
缺点:不能保证数据的完整。不能及时的取出所有的数据。
应用场景:处理大数据。使用non-block模式的socket。
总结:
如果我们用水平触发不用担心数据有没有读完因为下次epoll返回时,没有读完的socket依然会被返回,但是要注意这种模式下的写事件,因为是水平触发,每次socket可写时epoll都会返回,当我们写的数据包过大时,一次写不完,要多次才能写完或者每次socket写都写一个很小的数据包时,每次写都会被epoll检测到,因此长期关注socket写事件会无故cpu消耗过大甚至导致cpu跑满,所以在水平触发模式下我们一般不关注socket可写事件而是通过调用socket write或者send api函数来写socket,说到这我们可以看到这种模式在效率上是没有边缘触发高的,因为每个socket读或者写可能被返回两次甚至多次,所以有时候我们也会用到边缘触发但是这种模式下在读数据的时候一定要注意,因为如果一次可写事件我们没有把数据读完,如果没有读完,在socket没有新的数据可读时epoll就不回返回了,只有在新的数据到来时,我们才能读取到上次没有读完的数据。
二. Netty 入门 1. 概述 1.1 Netty 是什么? 1 2 Netty is an asynchronous event-driven network application frameworkfor rapid development of maintainable high performance protocol servers & clients.
Netty 是一个异步的、基于事件驱动的网络应用框架,用于快速开发可维护、高性能的网络服务器和客户端。
这里说的异步不是指异步IO,Netty底层使用的还是同步多路复用。这里的异步是指,使用多线程将方法调用和处理结果相分离(二者可以不是同一个线程处理),称为异步。
1.2 Netty 的作者
他还是另一个著名网络应用框架 Mina 的重要贡献者
1.3 Netty 的地位 Netty 在 Java 网络应用框架中的地位就好比:Spring 框架在 JavaEE 开发中的地位
以下的框架都使用了 Netty,因为它们有网络通信需求!
Cassandra - nosql 数据库
Spark - 大数据分布式计算框架
Hadoop - 大数据分布式存储框架
RocketMQ - ali 开源的消息队列
ElasticSearch - 搜索引擎
gRPC - rpc 框架
Dubbo - rpc 框架
Spring 5.x - flux api 完全抛弃了 tomcat ,使用 netty 作为服务器端
Zookeeper - 分布式协调框架
1.4 Netty 的优势
Netty vs NIO,工作量大,bug 多
需要自己构建协议
解决 TCP 传输问题,如粘包、半包
epoll 空轮询导致 CPU 100%(linux的epoll多路复用有一个严重的bug,会导致CPU100%,也就是select()方法不能被正常阻塞)
对 API 进行增强,使之更易用,如 FastThreadLocal => ThreadLocal,ByteBuf => ByteBuffer
Netty vs 其它网络应用框架
Mina 由 apache 维护,将来 3.x 版本可能会有较大重构,破坏 API的向下兼容性,Netty 的开发迭代更迅速,API 更简洁、文档更优秀
久经考验,已经发展了16年,Netty 版本
2.x 2004
3.x 2008
4.x 2013
5.x 已废弃(引入AIO,但没有明显的性能提升,维护成本高)
2. Hello World 2.1 目标 开发一个简单的服务器端和客户端
客户端向服务器端发送 hello, world
服务器仅接收,不返回
加入依赖
1 2 3 4 5 <dependency > <groupId > io.netty</groupId > <artifactId > netty-all</artifactId > <version > 4.1.39.Final</version > </dependency >
2.2 服务器端 1 2 3 4 5 6 7 8 9 10 11 12 13 14 15 16 17 18 19 20 21 22 23 24 new ServerBootstrap() new NioEventLoopGroup()) new ChannelInitializer<NioSocketChannel>() { protected void initChannel (NioSocketChannel ch) new StringDecoder()); new SimpleChannelInboundHandler<String>() { @Override protected void channelRead0 (ChannelHandlerContext ctx, String msg) 8080 );
代码解读
1 处,创建 NioEventLoopGroup,可以简单理解为 线程池 + Selector 后面会详细展开
2 处,选择服务 ServerSocketChannel 实现类,其中 NioServerSocketChannel 表示基于 NIO 的服务器端实现,其它实现还有
3 处,为啥方法叫 childHandler,是接下来添加的处理器都是给 SocketChannel 用的,而不是给 ServerSocketChannel。ChannelInitializer 处理器(仅执行一次),它的作用是待客户端 SocketChannel 建立连接后,执行 initChannel 以便添加更多的处理器
4 处,ServerSocketChannel 绑定的监听端口
5 处,SocketChannel 的处理器,解码 ByteBuf => String
6 处,SocketChannel 的业务处理器,使用上一个处理器的处理结果
2.3 客户端 1 2 3 4 5 6 7 8 9 10 11 12 13 14 15 16 17 18 19 20 new Bootstrap() new NioEventLoopGroup()) new ChannelInitializer<Channel>() { @Override protected void initChannel (Channel ch) new StringEncoder()); "127.0.0.1" , 8080 ) new Date() + ": hello world!" );
代码解读
1 处,创建 NioEventLoopGroup,同 Server
2 处,选择客户 Socket 实现类,NioSocketChannel 表示基于 NIO 的客户端实现,其它实现还有
3 处,添加 SocketChannel 的处理器,ChannelInitializer 处理器(仅执行一次),它的作用是待客户端 SocketChannel 建立连接后,执行 initChannel 以便添加更多的处理器
4 处,指定要连接的服务器和端口
5 处,Netty 中很多方法都是异步的,如 connect,这时需要使用 sync 方法等待 connect 建立连接完毕
6 处,获取 channel 对象,它即为通道抽象,可以进行数据读写操作
7 处,写入消息并清空缓冲区
8 处,消息会经过通道 handler 处理,这里是将 String => ByteBuf 发出
数据经过网络传输,到达服务器端,服务器端 5 和 6 处的 handler 先后被触发,走完一个流程
2.4 流程梳理
💡 提示
一开始需要树立正确的观念
把 channel 理解为数据的通道
把 msg 理解为流动的数据,最开始输入是 ByteBuf,但经过 pipeline 的加工,会变成其它类型对象,最后输出又变成 ByteBuf
把 handler 理解为数据的处理工序
工序有多道,合在一起就是 pipeline,pipeline 负责发布事件(读、读取完成…)传播给每个 handler, handler 对自己感兴趣的事件进行处理(重写了相应事件处理方法)
handler 分 Inbound(入站) 和 Outbound(出站) 两类
把 eventLoop 理解为处理数据的工人
工人可以管理多个 channel 的 io 操作,并且一旦工人负责了某个 channel,就要负责到底(绑定)目的是为了线程安全,防止多个线程同时操作同一个channel
工人既可以执行 io 操作,也可以进行任务处理,每位工人有任务队列,队列里可以堆放多个 channel 的待处理任务,任务分为普通任务、定时任务
工人按照 pipeline 顺序,依次按照 handler 的规划(代码)处理数据,可以为每道工序(非IO操作的工序)指定不同的工人
3. 组件 3.1 EventLoop 事件循环对象
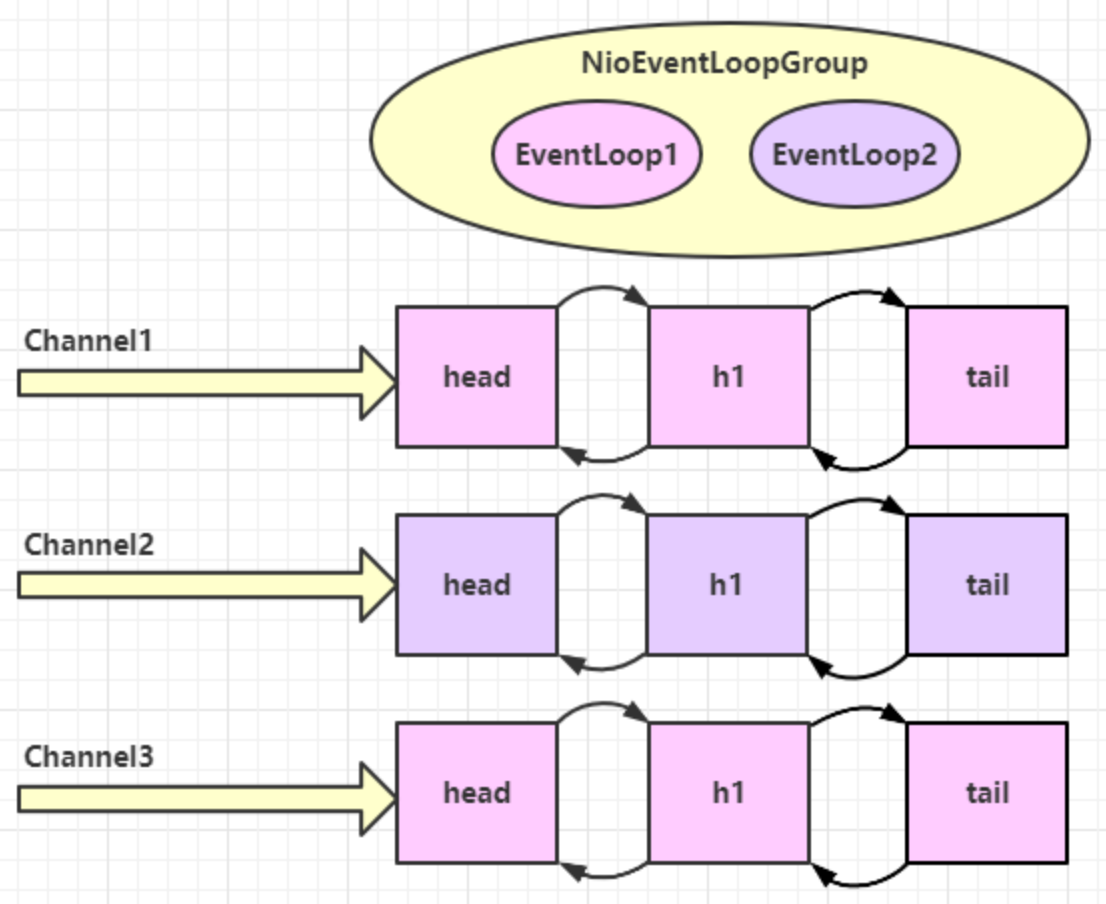
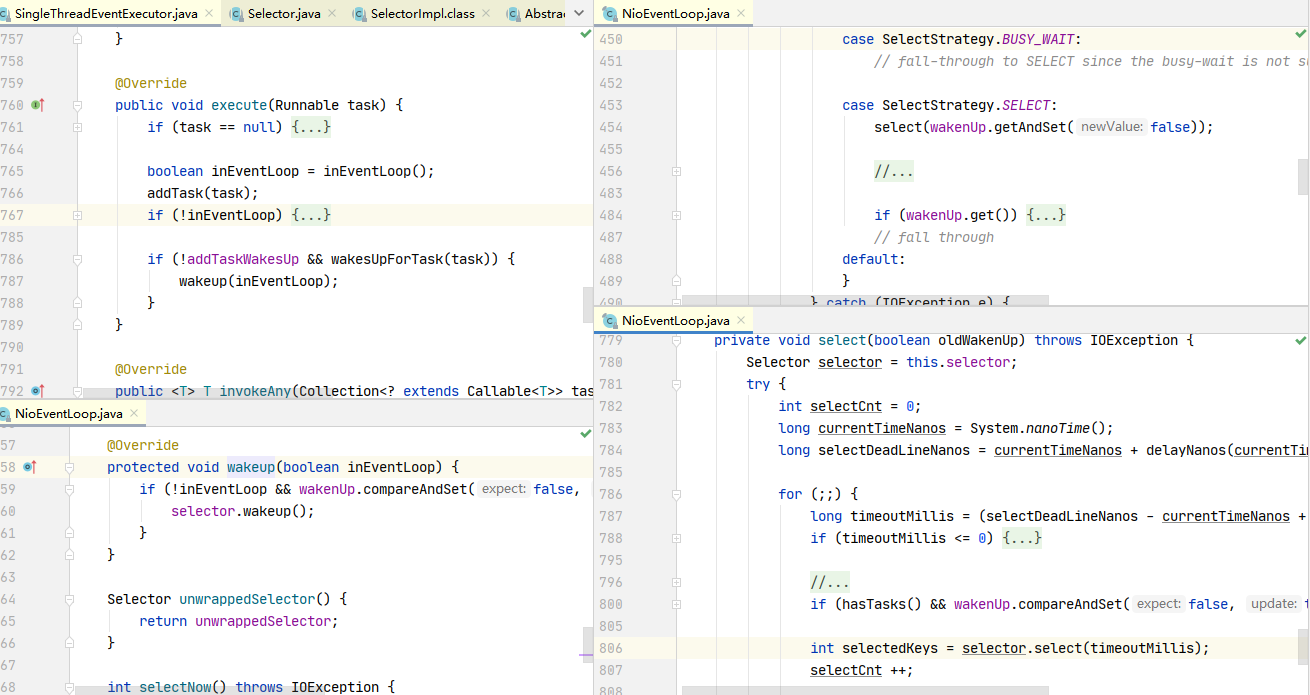
EventLoop 本质是一个单线程执行器(同时维护了一个 Selector),里面有 run 方法处理 Channel 上源源不断的 io 事件。
它的继承关系比较复杂
一条线是继承自 j.u.c.ScheduledExecutorService 因此包含了线程池中所有的方法
另一条线是继承自 netty 自己的 OrderedEventExecutor,
提供了 boolean inEventLoop(Thread thread) 方法判断一个线程是否属于此 EventLoop
提供了 parent 方法来看看自己属于哪个 EventLoopGroup
单线程的线程池的意思是从线程池里拿一个线程,不是线程池里只有一个线程。和一个线程的区别是线程意外结束后,可以立马从线程池里调一个线程
事件循环组
EventLoopGroup 是一组 EventLoop,Channel 一般会调用 EventLoopGroup 的 register 方法来绑定其中一个 EventLoop,后续这个 Channel 上的 io 事件都由此 EventLoop 来处理(保证了 io 事件处理时的线程安全),当然Channel上的普通任务和定时任务也会绑定其中一个EventLoop。
继承自 netty 自己的 EventExecutorGroup
实现了 Iterable 接口提供遍历 EventLoop 的能力
另有 next 方法获取集合中下一个 EventLoop
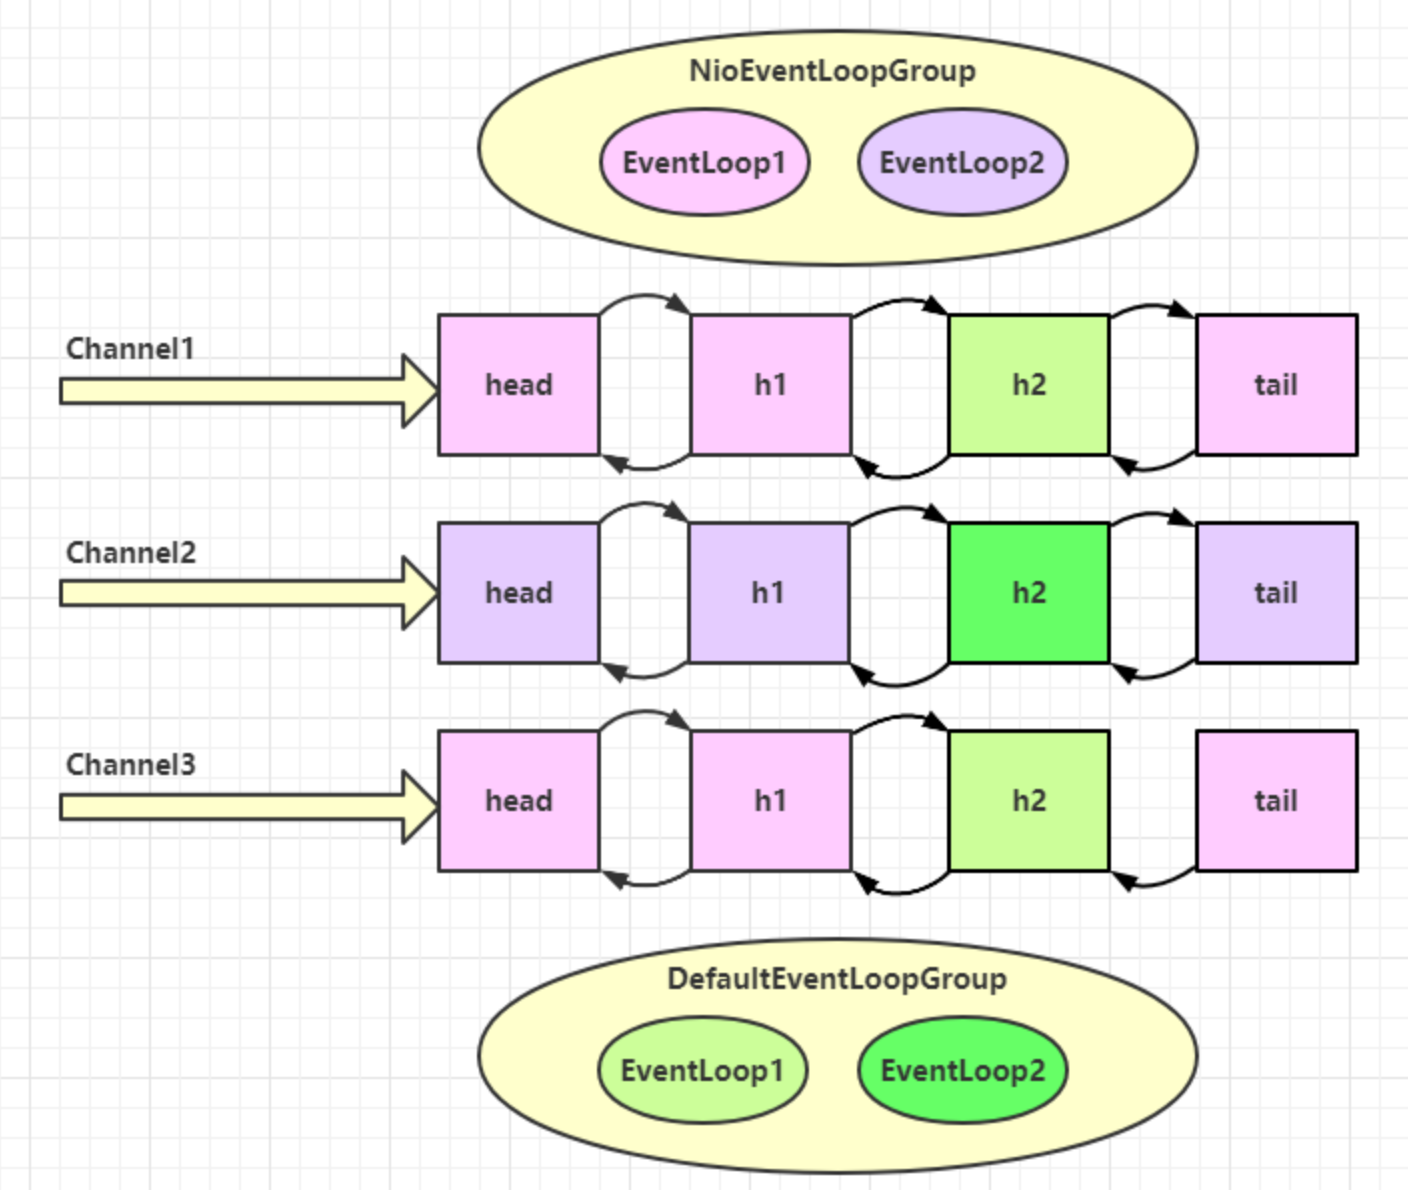
NioEventLoopGroup可以处理IO事件、普通任务以及定时任务。
DefaultEventLoopGroup可以处理普通任务,定时任务
以一个简单的实现为例:
创建:
1 2 new DefaultEventLoopGroup(2 );
使用next()取出EventLoop:
1 2 3 System.out.println(group.next());
输出
1 2 3 io .netty.channel.DefaultEventLoop@60 f82 f98 io .netty.channel.DefaultEventLoop@35 f983 a6 io .netty.channel.DefaultEventLoop@60 f82 f98
也可以使用 for 循环
1 2 3 4 DefaultEventLoopGroup group = new DefaultEventLoopGroup(2 );for (EventExecutor eventLoop : group) {
输出
1 2 io .netty.channel.DefaultEventLoop@60 f82 f98 io .netty.channel.DefaultEventLoop@35 f983 a6
使用EventLoop处理普通任务:
1 2 3 group.next().submit(() -> {"ok" );
💡 优雅关闭 优雅关闭 shutdownGracefully 方法。该方法会首先切换 EventLoopGroup 到关闭状态从而拒绝新的任务的加入,然后在任务队列的任务都处理完成后,停止线程的运行。从而确保整体应用是在正常有序的状态下退出的
演示 NioEventLoop 处理 io 事件 服务器端一个bossEventLoop,两个 nio worker 工人
1 2 3 4 5 6 7 8 9 10 11 12 13 14 15 16 17 18 19 20 21 22 23 new ServerBootstrap()new NioEventLoopGroup(1 ), new NioEventLoopGroup(2 ))new ChannelInitializer<NioSocketChannel>() {@Override protected void initChannel (NioSocketChannel ch) new ChannelInboundHandlerAdapter() {@Override public void channelRead (ChannelHandlerContext ctx, Object msg) instanceof ByteBuf ? ((ByteBuf) msg) : null ;if (byteBuf != null ) {byte [] buf = new byte [16 ];0 , byteBuf.readableBytes());new String(buf));8080 ).sync();
客户端,启动三次,分别修改发送字符串为 zhangsan(第一次),lisi(第二次),wangwu(第三次)
1 2 3 4 5 6 7 8 9 10 11 12 13 14 15 16 17 public static void main (String[] args) throws InterruptedException new Bootstrap()new NioEventLoopGroup(1 ))new ChannelInitializer<NioSocketChannel>() {@Override protected void initChannel (NioSocketChannel ch) throws Exception "init..." );new LoggingHandler(LogLevel.DEBUG));"localhost" , 8080 )"wangwu" .getBytes()));2000 );"wangwu" .getBytes()));
最后输出
1 2 3 4 5 6 22 :03 :34 [DEBUG] [nioEventLoopGroup-3-1] c.i .o .EventLoopTest - zhangsan 22 :03 :36 [DEBUG] [nioEventLoopGroup-3-1] c.i .o .EventLoopTest - zhangsan 22 :05 :36 [DEBUG] [nioEventLoopGroup-3-2] c.i .o .EventLoopTest - lisi 22 :05 :38 [DEBUG] [nioEventLoopGroup-3-2] c.i .o .EventLoopTest - lisi 22 :06 :09 [DEBUG] [nioEventLoopGroup-3-1] c.i .o .EventLoopTest - wangwu 22 :06 :11 [DEBUG] [nioEventLoopGroup-3-1] c.i .o .EventLoopTest - wangwu
可以看到两个工人轮流处理 channel,但工人与 channel 之间进行了绑定
分工细化 为什么要细分任务,增加DefaultEventLoopGroup呢?这是为了防止增加NioEventLoopGroup的工作量,Netty中的黄金法则,不能阻塞IO线程。
再增加两个非 nio 工人
1 2 3 4 5 6 7 8 9 10 11 12 13 14 15 16 17 18 19 20 21 22 DefaultEventLoopGroup normalWorkers = new DefaultEventLoopGroup(2 );new ServerBootstrap()new NioEventLoopGroup(1 ), new NioEventLoopGroup(2 ))new ChannelInitializer<NioSocketChannel>() {@Override protected void initChannel (NioSocketChannel ch) new LoggingHandler(LogLevel.DEBUG));"myhandler" ,new ChannelInboundHandlerAdapter() {@Override public void channelRead (ChannelHandlerContext ctx, Object msg) instanceof ByteBuf ? ((ByteBuf) msg) : null ;if (byteBuf != null ) {byte [] buf = new byte [16 ];0 , byteBuf.readableBytes());new String(buf));8080 ).sync();
客户端代码不变,启动三次,分别修改发送字符串为 zhangsan(第一次),lisi(第二次),wangwu(第三次)
输出
1 2 3 4 5 6 7 8 9 10 11 12 13 14 15 16 17 18 19 20 21 22 23 24 25 26 27 28 29 30 31 32 33 34 35 36 37 38 39 40 41 42 43 44 45 46 47 48 49 50 51 52 53 54 22:19:48 [DEBUG] [nioEventLoopGroup-4-1] i.n.h.l.LoggingHandler - [id: 0x251562d5, L:/127.0.0.1:8080 - R:/127.0.0.1:52588] REGISTERED +-------------------------------------------------+ | 0 1 2 3 4 5 6 7 8 9 a b c d e f | +--------+-------------------------------------------------+----------------+ |00000000| 7a 68 61 6e 67 73 61 6e |zhangsan | +--------+-------------------------------------------------+----------------+ +-------------------------------------------------+ | 0 1 2 3 4 5 6 7 8 9 a b c d e f | +--------+-------------------------------------------------+----------------+ |00000000| 7a 68 61 6e 67 73 61 6e |zhangsan | +--------+-------------------------------------------------+----------------+ +-------------------------------------------------+ | 0 1 2 3 4 5 6 7 8 9 a b c d e f | +--------+-------------------------------------------------+----------------+ |00000000| 6c 69 73 69 |lisi | +--------+-------------------------------------------------+----------------+ +-------------------------------------------------+ | 0 1 2 3 4 5 6 7 8 9 a b c d e f | +--------+-------------------------------------------------+----------------+ |00000000| 6c 69 73 69 |lisi | +--------+-------------------------------------------------+----------------+ +-------------------------------------------------+ | 0 1 2 3 4 5 6 7 8 9 a b c d e f | +--------+-------------------------------------------------+----------------+ |00000000| 77 61 6e 67 77 75 |wangwu | +--------+-------------------------------------------------+----------------+ +-------------------------------------------------+ | 0 1 2 3 4 5 6 7 8 9 a b c d e f | +--------+-------------------------------------------------+----------------+ |00000000| 77 61 6e 67 77 75 |wangwu | +--------+-------------------------------------------------+----------------+
可以看到,nio 工人和 非 nio 工人也分别绑定了 channel(LoggingHandler 由 nio 工人执行,而我们自己的 handler 由非 nio 工人执行)
💡 handler 执行中如何换人? 一个Channel的headler在执行过程中是如何切换线程的呢?就是使用invokeChannelRead()方法调用下一个handler。
关键代码 io.netty.channel.AbstractChannelHandlerContext#invokeChannelRead()
1 2 3 4 5 6 7 8 9 10 11 12 13 14 15 16 17 18 19 20 static void invokeChannelRead (final AbstractChannelHandlerContext next, Object msg) final Object m = next.pipeline.touch(ObjectUtil.checkNotNull(msg, "msg" ), next);if (executor.inEventLoop()) { else {new Runnable() {@Override public void run ()
如果两个 handler 绑定的是同一个线程,那么就直接调用
否则,把要调用的代码封装为一个任务对象,由下一个 handler 的线程来调用,不能在当前EventLoop线程直接调用
演示 NioEventLoop 处理普通任务 NioEventLoop 除了可以处理 io 事件,同样可以向它提交普通任务
1 2 3 4 5 6 7 NioEventLoopGroup nioWorkers = new NioEventLoopGroup(2 );"server start..." );2000 );"normal task..." );
输出
1 2 22 :30 :36 [DEBUG ] [main] c.i.o.EventLoopTest2 - server start...22 :30 :38 [DEBUG ] [nioEventLoopGroup-2 -1 ] c.i.o.EventLoopTest2 - normal task...
可以用来执行耗时较长的任务
演示 NioEventLoop 处理定时任务 1 2 3 4 5 6 7 NioEventLoopGroup nioWorkers = new NioEventLoopGroup(2 );"server start..." );2000 );"running..." );0 , 1 , TimeUnit.SECONDS);
输出
1 2 3 4 5 6 22 :35 :15 [DEBUG] [main] c.i .o .EventLoopTest2 - server start...22 :35 :17 [DEBUG] [nioEventLoopGroup-2-1] c.i .o .EventLoopTest2 - running...22 :35 :18 [DEBUG] [nioEventLoopGroup-2-1] c.i .o .EventLoopTest2 - running...22 :35 :19 [DEBUG] [nioEventLoopGroup-2-1] c.i .o .EventLoopTest2 - running...22 :35 :20 [DEBUG] [nioEventLoopGroup-2-1] c.i .o .EventLoopTest2 - running...
可以用来执行定时任务
3.2 Channel channel 的主要作用
close() 可以用来关闭 channel,这是一个异步操作
closeFuture() 用来处理 channel 的关闭
sync 方法作用是同步等待 channel 关闭
而 addListener 方法是异步等待 channel 关闭
pipeline() 方法添加处理器
write() 方法将数据写入,可能不会立刻刷出,因为可能会先存放在缓冲区中
writeAndFlush() 方法将数据写入并刷出
ChannelFuture 带有Future, Promise 的类型都是异步方法配套使用,用来正确处理结果
这时刚才的客户端代码
1 2 3 4 5 6 7 8 9 10 11 12 13 new Bootstrap()new NioEventLoopGroup())new ChannelInitializer<Channel>() {@Override protected void initChannel (Channel ch) new StringEncoder());"127.0.0.1" , 8080 ) new Date() + ": hello world!" );
现在把它拆开来看
1 2 3 4 5 6 7 8 9 10 11 12 ChannelFuture channelFuture = new Bootstrap()new NioEventLoopGroup())new ChannelInitializer<Channel>() {@Override protected void initChannel (Channel ch) new StringEncoder());"127.0.0.1" , 8080 ); new Date() + ": hello world!" );
1 处返回的是 ChannelFuture 对象,它的作用是利用 channel() 方法来获取 Channel 对象
注意 connect 方法是异步的,意味着不等连接建立,方法执行就返回了(真正执行 connect 是 nio 线程)。因此 channelFuture 对象中不能【立刻】获得到正确Channel 对象
方法一:使用sync()方法同步处理结果 实验如下:
在调用sync()方法时,当前线程会被阻塞住,知道nio线程真正完成连接的建立,当前线程才会恢复运行。
1 2 3 4 5 6 7 8 9 10 11 12 13 14 ChannelFuture channelFuture = new Bootstrap()new NioEventLoopGroup())new ChannelInitializer<Channel>() {@Override protected void initChannel (Channel ch) new StringEncoder());"127.0.0.1" , 8080 );
执行到 1 时,连接未建立,打印 [id: 0x2e1884dd]
执行到 2 时,sync 方法是同步等待连接建立完成
执行到 3 时,连接肯定建立了,打印 [id: 0x2e1884dd, L:/127.0.0.1:57191 - R:/127.0.0.1:8080]
方法二:使用 addListener(回调对象) 方法异步处理结果 连接建立以后,当前线程也不做处理了,由其他线程进行处理,所以是异步处理结果。
除了用 sync 方法 可以让异步操作同步以外,还可以使用回调的方式 :
1 2 3 4 5 6 7 8 9 10 11 12 13 14 ChannelFuture channelFuture = new Bootstrap()new NioEventLoopGroup())new ChannelInitializer<Channel>() {@Override protected void initChannel (Channel ch) new StringEncoder());"127.0.0.1" , 8080 );
执行到 1 时,连接未建立,打印 [id: 0x749124ba]
ChannelFutureListener 会在连接建立时被调用(其中 operationComplete 方法),因此执行到 2 时,连接肯定建立了,打印 [id: 0x749124ba, L:/127.0.0.1:57351 - R:/127.0.0.1:8080](在 nio线程连接建立好之后,会调用 operationComplete,传入operationComplete方法的参数,也是当前调用addListener的ChannelFutrue对象)
CloseFuture 1 2 3 4 5 6 7 8 9 10 11 12 13 14 15 16 17 18 19 20 21 22 23 24 25 26 27 28 29 30 31 32 33 34 35 36 37 38 39 40 41 42 43 44 45 46 47 48 49 @Slf4j public class CloseFutureClient public static void main (String[] args) throws InterruptedException NioEventLoopGroup group new NioEventLoopGroup () ;new Bootstrap()new ChannelInitializer<NioSocketChannel>() {@Override protected void initChannel (NioSocketChannel ch) throws Exception new LoggingHandler(LogLevel.DEBUG));new StringEncoder());new InetSocketAddress("localhost" , 8080 ));"{}" , channel);new Thread(()->{new Scanner(System.in);while (true ) {if ("q" .equals(line)) {break ;"input" ).start();new ChannelFutureListener() {@Override public void operationComplete (ChannelFuture future) throws Exception "处理关闭之后的操作" );
💡 异步提升的是什么
有些同学看到这里会有疑问:为什么不在一个线程中去执行建立连接、去执行关闭 channel,那样不是也可以吗?非要用这么复杂的异步方式:比如一个线程发起建立连接,另一个线程去真正建立连接
还有同学会笼统地回答,因为 netty 异步方式用了多线程、多线程就效率高。其实这些认识都比较片面,多线程和异步所提升的效率并不是所认为的
异步 future 使用主要是将任务进行划子任务,子任务间可以进行并行操作,提高效率。 将任务划分为子任务进行处理 和 每个任务使用一个线程相比,前者并发与任务数无关只与子任务划分数相关。异步提高的是吞吐量。
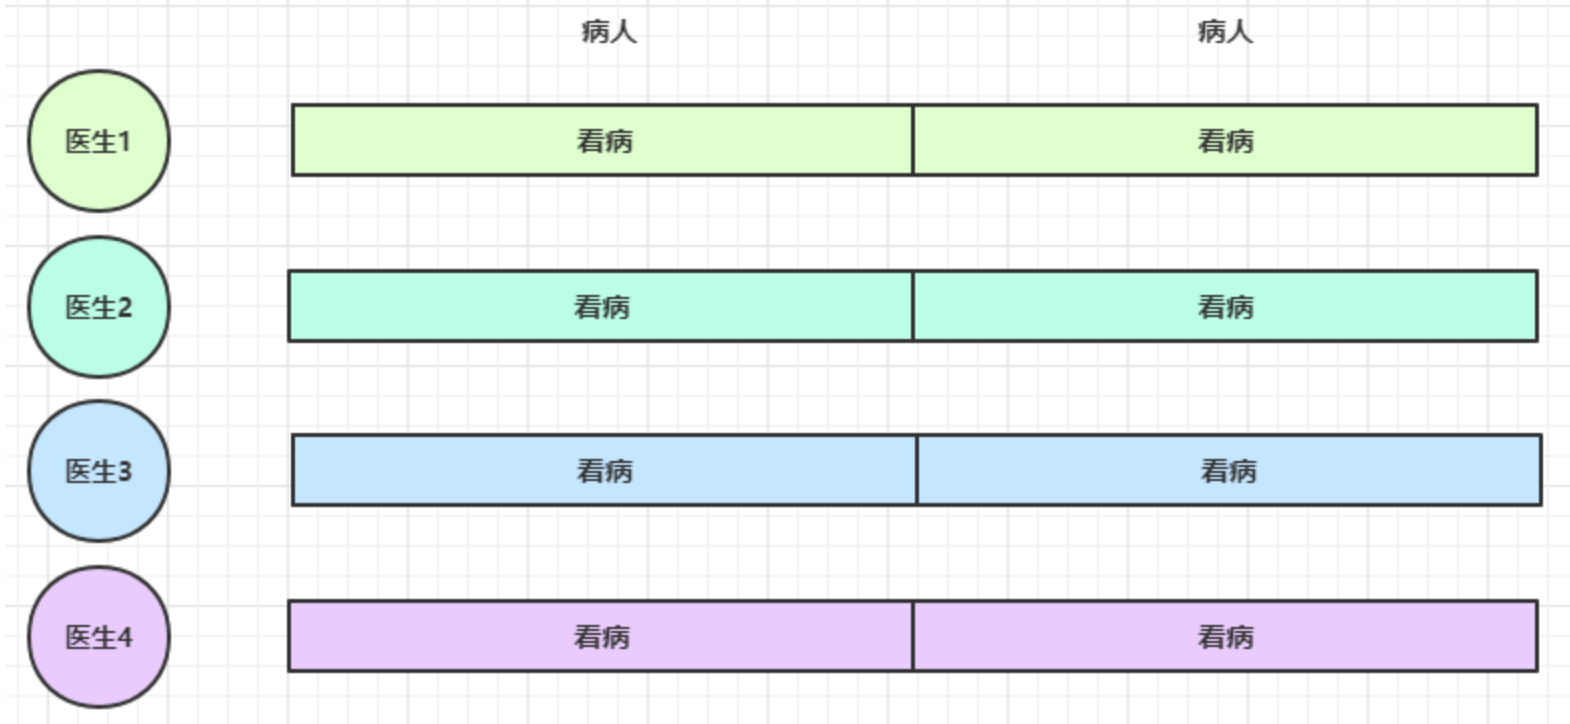
思考下面的场景,4 个医生给人看病,每个病人花费 20 分钟,而且医生看病的过程中是以病人为单位的,一个病人看完了,才能看下一个病人。假设病人源源不断地来,可以计算一下 4 个医生一天工作 8 小时,处理的病人总数是:4 * 8 * 3 = 96
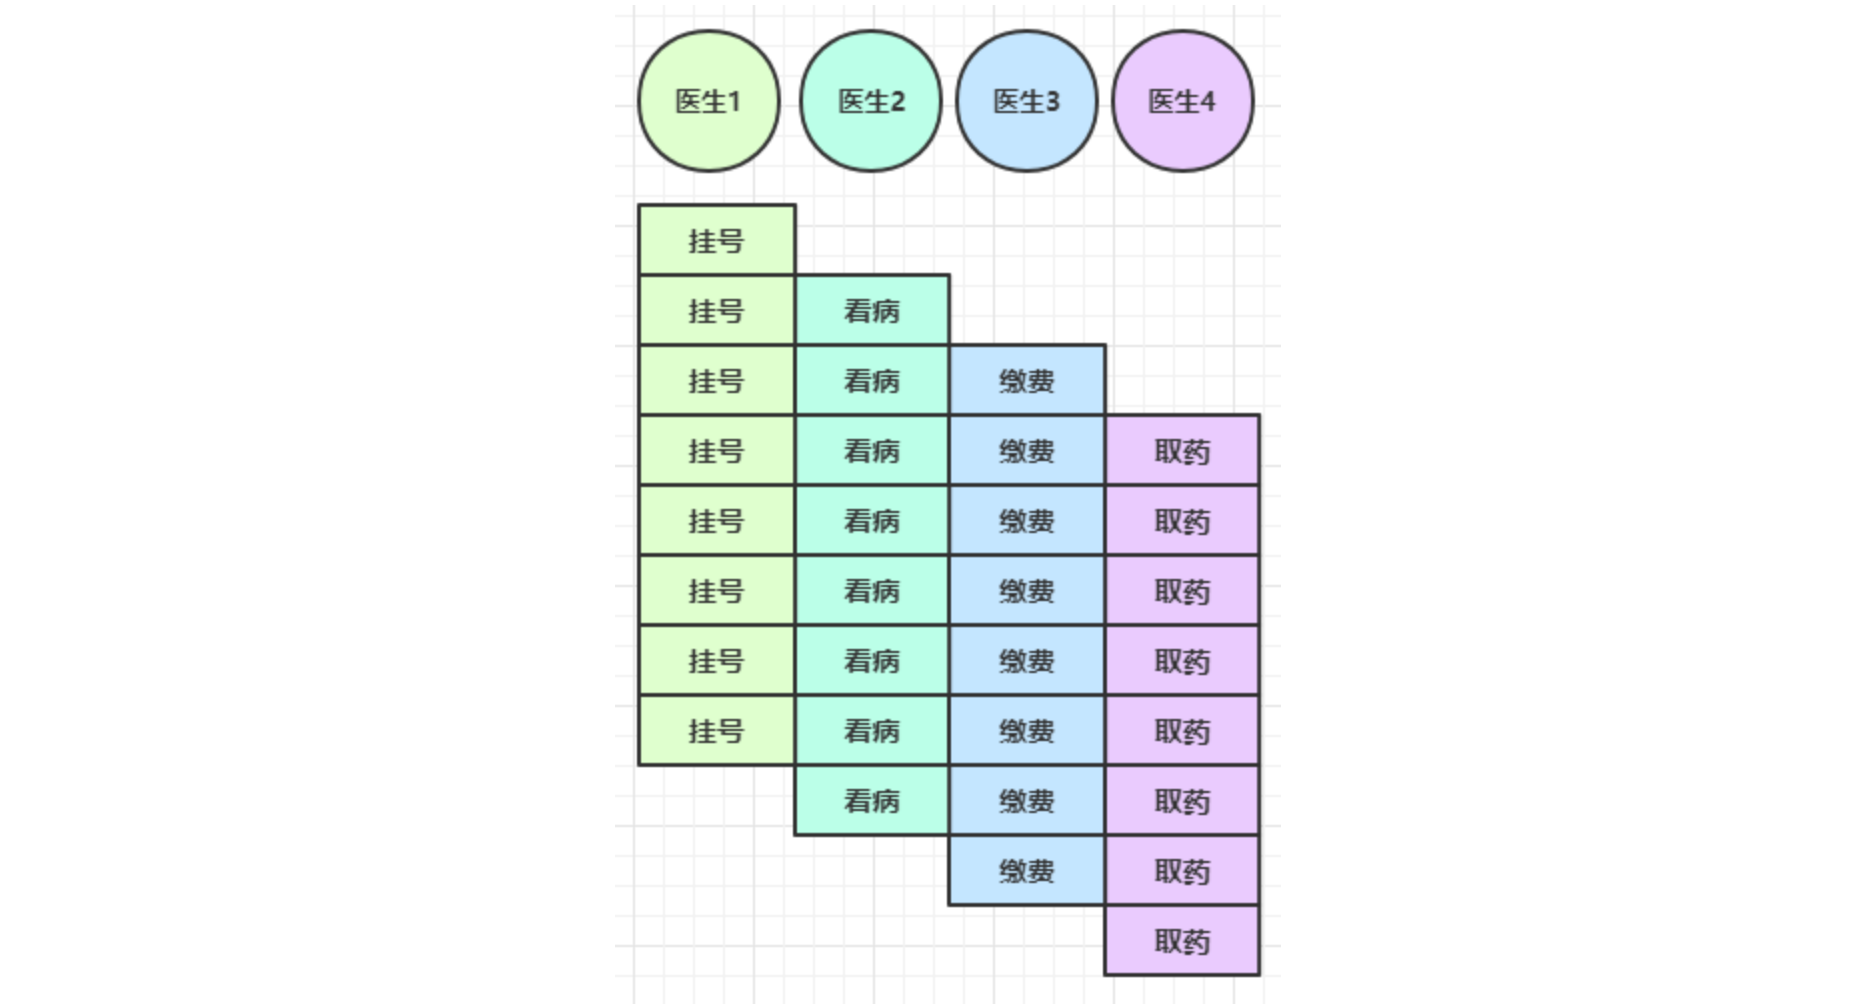
经研究发现,看病可以细分为四个步骤,经拆分后每个步骤需要 5 分钟,如下
因此可以做如下优化,只有一开始,医生 2、3、4 分别要等待 5、10、15 分钟才能执行工作,但只要后续病人源源不断地来,他们就能够满负荷工作,并且处理病人的能力提高到了 4 * 8 * 12 效率几乎是原来的四倍处理病人的能力仍然是1 * 8 * 12 = 96
虽然看起来这个例子,好像吞吐量上没有提升,但是假设将挂号的时间缩短,比如只需要1分钟,那么异步处理这个任务,吞吐量会变成原来的60 / 12 = 5倍!!!
时间没变,但是吞吐量变高了,本来30分钟只有4个病人开始处理,netty的异步做法是6个人已经开始处理了。
要点
单线程没法异步提高效率,必须配合多线程、多核 cpu 才能发挥异步的优势
异步并没有缩短响应时间,反而有所增加;异步真正增加的是吞吐量
合理进行任务拆分,也是利用异步的关键
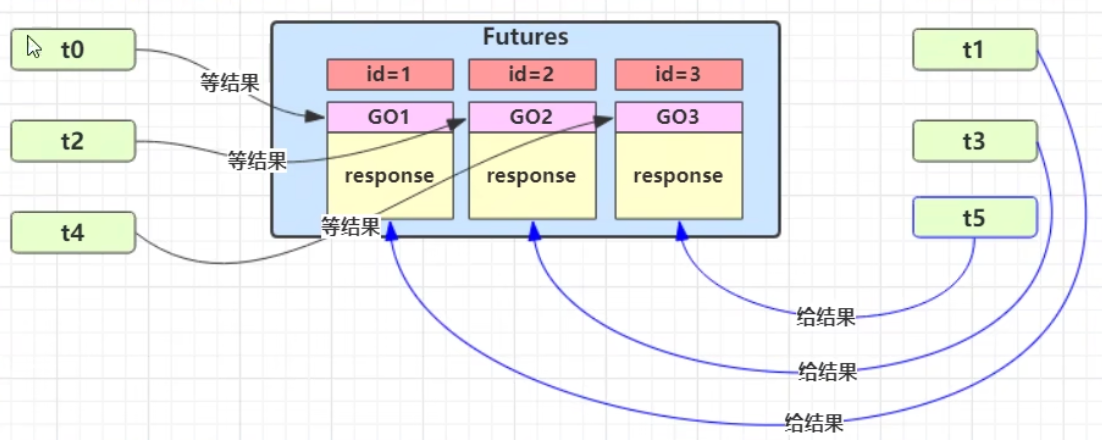
3.3 Future & Promise 在异步处理时,经常用到这两个接口Future和Promise接口
首先要说明 netty 中的 Future 与 jdk 中的 Future 同名,但是是两个接口,netty 的 Future 继承自 jdk 的 Future,而 Promise 又对 netty Future 进行了扩展
jdk Future 只能同步等待任务结束(或成功、或失败)才能得到结果
netty Future 可以同步等待任务结束得到结果,也可以异步方式得到结果,但都是要等任务结束
netty Promise 不仅有 netty Future 的功能,而且脱离了任务独立存在,只作为两个线程间传递结果的容器
功能/名称
jdk Future
netty Future
Promise
cancel
取消任务
-
-
isCanceled
任务是否取消
-
-
isDone
任务是否完成,不能区分成功失败
-
-
get
获取任务结果,阻塞等待
-
-
getNow
-
获取任务结果,非阻塞,还未产生结果时返回 null
-
await
-
等待任务结束,如果任务失败,不会抛异常,而是通过 isSuccess 判断
-
sync
-
等待任务结束,如果任务失败,抛出异常
-
isSuccess
-
判断任务是否成功
-
cause
-
获取失败信息,非阻塞,如果没有失败,返回null
-
addListener
-
添加回调,异步接收结果
-
setSuccess
-
-
设置成功结果
setFailure
-
-
设置失败结果
JDK的Future 1 2 3 4 5 6 7 8 9 10 11 12 13 14 15 16 17 18 19 20 21 import java.util.concurrent.*;public class Test public static void main (String[] args) throws ExecutionException, InterruptedException 2 );new Callable<Integer>() {@Override public Integer call () throws Exception 1000 );return 50 ;
Netty的Future 1 2 3 4 5 6 7 8 9 10 11 12 13 14 15 16 17 18 19 20 21 22 23 24 25 26 27 28 29 30 31 32 33 34 35 36 37 38 import io.netty.channel.EventLoop;import io.netty.channel.EventLoopGroup;import io.netty.channel.nio.NioEventLoopGroup;import io.netty.util.concurrent.Future;import java.util.concurrent.*;public class Test public static void main (String[] args) throws ExecutionException, InterruptedException new NioEventLoopGroup(2 );new Callable<Integer>() {@Override public Integer call () throws Exception 1000 );return 50 ;new GenericFutureListener<Future<? super Integer>>() {@Override public void operationComplete (Future<? super Integer> future) throws Exception
Netty的Promise Netty的Promise的对象可以提前创建好,不想JDK和Netty的Future需要提交任务才能创建。
例1:同步处理任务成功 1 2 3 4 5 6 7 8 9 10 11 12 13 14 15 16 17 18 19 20 21 new DefaultEventLoop();new DefaultPromise<>(eventExecutors);try {1000 );catch (InterruptedException e) {"set success, {}" ,10 );10 );"start..." );"{}" ,promise.getNow()); "{}" ,promise.get());
输出
1 2 3 4 11 :51 :53 [DEBUG] [main] c.i .o .DefaultPromiseTest2 - start...11 :51 :53 [DEBUG] [main] c.i .o .DefaultPromiseTest2 - null11 :51 :54 [DEBUG] [defaultEventLoop-1-1] c.i .o .DefaultPromiseTest2 - set success, 10 11 :51 :54 [DEBUG] [main] c.i .o .DefaultPromiseTest2 - 10
例2:异步处理任务成功 1 2 3 4 5 6 7 8 9 10 11 12 13 14 15 16 17 18 19 20 21 DefaultEventLoop eventExecutors = new DefaultEventLoop();new DefaultPromise<>(eventExecutors);"{}" ,future.getNow());try {1000 );catch (InterruptedException e) {"set success, {}" ,10 );10 );"start..." );
输出
1 2 3 11 :49 :30 [DEBUG] [main] c.i .o .DefaultPromiseTest2 - start...11 :49 :31 [DEBUG] [defaultEventLoop-1-1] c.i .o .DefaultPromiseTest2 - set success, 10 11 :49 :31 [DEBUG] [defaultEventLoop-1-1] c.i .o .DefaultPromiseTest2 - 10
例3:同步处理任务失败 - sync & get 1 2 3 4 5 6 7 8 9 10 11 12 13 14 15 16 17 DefaultEventLoop eventExecutors = new DefaultEventLoop();new DefaultPromise<>(eventExecutors);try {1000 );catch (InterruptedException e) {new RuntimeException("error..." );"set failure, {}" , e.toString());"start..." );"{}" , promise.getNow());
输出
1 2 3 4 5 6 7 8 9 10 11 12 13 12 :11 :07 [DEBUG] [main] c.i .o .DefaultPromiseTest2 - start...12 :11 :07 [DEBUG] [main] c.i .o .DefaultPromiseTest2 - null12 :11 :08 [DEBUG] [defaultEventLoop-1-1] c.i .o .DefaultPromiseTest2 - set failure, java.lang .RuntimeException : error...in thread "main" java.util .concurrent .ExecutionException : java.lang .RuntimeException : error....netty .util .concurrent .AbstractFuture .get (AbstractFuture.java :41 ).itcast .oio .DefaultPromiseTest2 .main (DefaultPromiseTest2.java :34 ).lang .RuntimeException : error....itcast .oio .DefaultPromiseTest2 .lambda$main $0 (DefaultPromiseTest2.java :27 ).netty .channel .DefaultEventLoop .run (DefaultEventLoop.java :54 ).netty .util .concurrent .SingleThreadEventExecutor$5 .run (SingleThreadEventExecutor.java :918 ).netty .util .internal .ThreadExecutorMap$2 .run (ThreadExecutorMap.java :74 ).netty .util .concurrent .FastThreadLocalRunnable .run (FastThreadLocalRunnable.java :30 ).lang .Thread .run (Thread.java :745 )
例4:同步处理任务失败 - await 1 2 3 4 5 6 7 8 9 10 11 12 13 14 15 16 17 18 DefaultEventLoop eventExecutors = new DefaultEventLoop();new DefaultPromise<>(eventExecutors);try {1000 );catch (InterruptedException e) {new RuntimeException("error..." );"set failure, {}" , e.toString());"start..." );"{}" , promise.getNow());"result {}" , (promise.isSuccess() ? promise.getNow() : promise.cause()).toString());
输出
1 2 3 4 12 :18 :53 [DEBUG] [main] c.i .o .DefaultPromiseTest2 - start...12 :18 :53 [DEBUG] [main] c.i .o .DefaultPromiseTest2 - null12 :18 :54 [DEBUG] [defaultEventLoop-1-1] c.i .o .DefaultPromiseTest2 - set failure, java.lang .RuntimeException : error...12 :18 :54 [DEBUG] [main] c.i .o .DefaultPromiseTest2 - result java.lang .RuntimeException : error...
例5:异步处理任务失败 1 2 3 4 5 6 7 8 9 10 11 12 13 14 15 16 17 18 19 DefaultEventLoop eventExecutors = new DefaultEventLoop();new DefaultPromise<>(eventExecutors);"result {}" , (promise.isSuccess() ? promise.getNow() : promise.cause()).toString());try {1000 );catch (InterruptedException e) {new RuntimeException("error..." );"set failure, {}" , e.toString());"start..." );
输出
1 2 3 12 :04 :57 [DEBUG] [main] c.i .o .DefaultPromiseTest2 - start...12 :04 :58 [DEBUG] [defaultEventLoop-1-1] c.i .o .DefaultPromiseTest2 - set failure, java.lang .RuntimeException : error...12 :04 :58 [DEBUG] [defaultEventLoop-1-1] c.i .o .DefaultPromiseTest2 - result java.lang .RuntimeException : error...
例6:await 死锁检查 1 2 3 4 5 6 7 8 9 10 11 12 13 14 15 16 17 18 19 20 21 22 23 24 DefaultEventLoop eventExecutors = new DefaultEventLoop();new DefaultPromise<>(eventExecutors);"1" );try {catch (Exception e) { "2" );"3" );try {catch (Exception e) {"4" );
输出
1 2 3 4 5 6 7 8 9 10 11 12 13 14 15 16 17 18 19 20 21 22 23 24 25 26 27 1 2 3 4 .netty .util .concurrent .BlockingOperationException : DefaultPromise@47499 c2a(incomplete).netty .util .concurrent .DefaultPromise .checkDeadLock (DefaultPromise.java :384 ).netty .util .concurrent .DefaultPromise .await (DefaultPromise.java :212 ).itcast .oio .DefaultPromiseTest .lambda$main $0 (DefaultPromiseTest.java :27 ).netty .util .concurrent .PromiseTask$RunnableAdapter .call (PromiseTask.java :38 ).netty .util .concurrent .PromiseTask .run (PromiseTask.java :73 ).netty .channel .DefaultEventLoop .run (DefaultEventLoop.java :54 ).netty .util .concurrent .SingleThreadEventExecutor$5 .run (SingleThreadEventExecutor.java :918 ).netty .util .internal .ThreadExecutorMap$2 .run (ThreadExecutorMap.java :74 ).netty .util .concurrent .FastThreadLocalRunnable .run (FastThreadLocalRunnable.java :30 ).lang .Thread .run (Thread.java :745 ).netty .util .concurrent .BlockingOperationException : DefaultPromise@47499 c2a(incomplete).netty .util .concurrent .DefaultPromise .checkDeadLock (DefaultPromise.java :384 ).netty .util .concurrent .DefaultPromise .await (DefaultPromise.java :212 ).itcast .oio .DefaultPromiseTest .lambda$main $1 (DefaultPromiseTest.java :36 ).netty .util .concurrent .PromiseTask$RunnableAdapter .call (PromiseTask.java :38 ).netty .util .concurrent .PromiseTask .run (PromiseTask.java :73 ).netty .channel .DefaultEventLoop .run (DefaultEventLoop.java :54 ).netty .util .concurrent .SingleThreadEventExecutor$5 .run (SingleThreadEventExecutor.java :918 ).netty .util .internal .ThreadExecutorMap$2 .run (ThreadExecutorMap.java :74 ).netty .util .concurrent .FastThreadLocalRunnable .run (FastThreadLocalRunnable.java :30 ).lang .Thread .run (Thread.java :745 )
3.4 Handler & Pipeline ChannelHandler 用来处理 Channel 上的各种事件,分为入站、出站两种。所有 ChannelHandler 被连成一串,就是 Pipeline
入站处理器通常是 ChannelInboundHandlerAdapter 的子类,主要用来读取客户端数据,写回结果
出站处理器通常是 ChannelOutboundHandlerAdapter 的子类,主要对写回结果进行加工
打个比喻,每个 Channel 是一个产品的加工车间,Pipeline 是车间中的流水线,ChannelHandler 就是流水线上的各道工序,而后面要讲的 ByteBuf 是原材料,经过很多工序的加工:先经过一道道入站工序,再经过一道道出站工序最终变成产品
先搞清楚顺序,服务端
1 2 3 4 5 6 7 8 9 10 11 12 13 14 15 16 17 18 19 20 21 22 23 24 25 26 27 28 29 30 31 32 33 34 35 36 37 38 39 40 41 42 43 44 45 46 47 48 49 50 51 52 53 new ServerBootstrap()new NioEventLoopGroup())new ChannelInitializer<NioSocketChannel>() {protected void initChannel (NioSocketChannel ch) new ChannelInboundHandlerAdapter(){@Override public void channelRead (ChannelHandlerContext ctx, Object msg) 1 );new ChannelInboundHandlerAdapter(){@Override public void channelRead (ChannelHandlerContext ctx, Object msg) 2 );new ChannelInboundHandlerAdapter(){@Override public void channelRead (ChannelHandlerContext ctx, Object msg) 3 );new ChannelOutboundHandlerAdapter(){@Override public void write (ChannelHandlerContext ctx, Object msg, ChannelPromise promise) 4 );new ChannelOutboundHandlerAdapter(){@Override public void write (ChannelHandlerContext ctx, Object msg, ChannelPromise promise) 5 );new ChannelOutboundHandlerAdapter(){@Override public void write (ChannelHandlerContext ctx, Object msg, ChannelPromise promise) 6 );8080 );
客户端
1 2 3 4 5 6 7 8 9 10 11 12 13 new Bootstrap()new NioEventLoopGroup())new ChannelInitializer<Channel>() {@Override protected void initChannel (Channel ch) new StringEncoder());"127.0.0.1" , 8080 )"hello,world" );
服务器端打印:
可以看到,ChannelInboundHandlerAdapter 是按照 addLast 的顺序执行的,而 ChannelOutboundHandlerAdapter 是按照 addLast 的逆序执行的。ChannelPipeline 的实现是一个 ChannelHandlerContext(包装了 ChannelHandler) 组成的双向链表。这里Netty会帮助程序员自动创建位于链首和链尾的head和tail这两个Handler。需要注意的是,入站处理器不一定要在出站处理器前面,这里入站处理器和出站处理器的顺序是根据业务来的。
入站处理器中,ctx.fireChannelRead(msg) 是 调用下一个入站处理器
如果注释掉 1 处代码,则仅会打印 1
如果注释掉 2 处代码,则仅会打印 1 2
3 处的 ctx.channel().write(msg) 会 从尾部开始触发 后续出站处理器的执行
类似的,出站处理器中,ctx.write(msg, promise) 的调用也会 触发上一个出站处理器
如果注释掉 6 处代码,则仅会打印 1 2 3 6
ctx.channel().write(msg) vs ctx.write(msg)
都是触发出站处理器的执行
ctx.channel().write(msg) 从尾部开始查找出站处理器
ctx.write(msg) 是从当前节点找上一个出站处理器
3 处的 ctx.channel().write(msg) 如果改为 ctx.write(msg) 仅会打印 1 2 3,因为节点3 之前没有其它出站处理器了(假设节点3之前有出站处理器,那么还是会调用节点3之前的处理器 )
6 处的 ctx.write(msg, promise) 如果改为 ctx.channel().write(msg) 会打印 1 2 3 6 6 6… 因为 ctx.channel().write() 是从尾部开始查找,结果又是节点6 自己
图1 - 服务端 pipeline 触发的原始流程,图中数字代表了处理步骤的先后次序
入站是从head开始向后传递,直到传递到tail
出站是从tail开始向前传递,直到传递到head
EmbeddedChannel EmbenddedChannel是Netty用来测试的一个类,这样每次测试不需要再重新写一个客户端一个服务端了。
1 2 3 4 5 6 7 8 9 10 11 12 13 14 15 16 17 18 19 20 21 22 23 24 25 26 27 28 29 30 31 32 33 34 35 36 37 38 39 40 41 42 43 44 45 46 47 48 49 50 51 52 53 54 55 56 57 58 59 60 61 62 import io.netty.channel.ChannelHandlerContext;import io.netty.channel.ChannelInboundHandlerAdapter;import io.netty.channel.ChannelOutboundHandlerAdapter;import io.netty.channel.ChannelPromise;import io.netty.channel.embedded.EmbeddedChannel;import java.util.concurrent.*;public class Test public static void main (String[] args) new ChannelInboundHandlerAdapter() {@Override public void channelRead (ChannelHandlerContext ctx, Object msg) throws Exception 1 );super .channelRead(ctx, msg);new ChannelInboundHandlerAdapter() {@Override public void channelRead (ChannelHandlerContext ctx, Object msg) throws Exception 2 );super .channelRead(ctx, msg);new ChannelInboundHandlerAdapter() {@Override public void channelRead (ChannelHandlerContext ctx, Object msg) throws Exception 3 );super .channelRead(ctx, msg);new ChannelOutboundHandlerAdapter() {@Override public void write (ChannelHandlerContext ctx, Object msg, ChannelPromise promise) throws Exception 4 );super .write(ctx, msg, promise);new ChannelOutboundHandlerAdapter() {@Override public void write (ChannelHandlerContext ctx, Object msg, ChannelPromise promise) throws Exception 5 );super .write(ctx, msg, promise);new ChannelOutboundHandlerAdapter() {@Override public void write (ChannelHandlerContext ctx, Object msg, ChannelPromise promise) throws Exception 6 );super .write(ctx, msg, promise);new EmbeddedChannel(handler1, handler2, handler3, handler4, handler5, handler6);"inbound" );"-------------------------" );"oubound" );
1 2 3 4 5 6 7 1 2 3 6 5 4
3.5 ByteBuf 是对字节数据的封装
1)创建 1 2 ByteBuf buffer = ByteBufAllocator.DEFAULT.buffer(10 );
上面代码创建了一个默认的 ByteBuf(池化基于直接内存的 ByteBuf),初始容量是 10
输出
1 read index :0 write index :0 capacity:10
其中 log 方法参考如下
1 2 3 4 5 6 7 8 9 10 11 private static void log (ByteBuf buffer) int length = buffer.readableBytes();int rows = length / 16 + (length % 15 == 0 ? 0 : 1 ) + 4 ;new StringBuilder(rows * 80 * 2 )"read index:" ).append(buffer.readerIndex())" write index:" ).append(buffer.writerIndex())" capacity:" ).append(buffer.capacity())
2)直接内存 vs 堆内存 可以使用下面的代码来创建池化基于堆的 ByteBuf
1 ByteBuf buffer = ByteBufAllocator.DEFAULT.heapBuffer(10 );
也可以使用下面的代码来创建池化基于直接内存的 ByteBuf
1 ByteBuf buffer = ByteBufAllocator.DEFAULT.directBuffer(10 );
直接内存创建和销毁的代价昂贵,但读写性能高(少一次内存复制),适合配合池化功能一起用
堆内存创建和销毁的代价昂贵,但读写性能差(内存复制次数多)
直接内存对 GC 压力小,因为这部分内存不受 JVM 垃圾回收的管理,但也要注意及时主动释放
3)池化 vs 非池化 池化的最大意义在于可以重用 ByteBuf,优点有
没有池化,则每次都得创建新的 ByteBuf 实例,这个操作对直接内存代价昂贵,就算是堆内存,也会增加 GC 压力
有了池化,则可以重用池中 ByteBuf 实例,并且采用了与 jemalloc 类似的内存分配算法提升分配效率
高并发时,池化功能更节约内存,减少内存溢出的可能
池化功能是否开启,可以通过下面的系统环境变量(即JVM参数)来设置
1 -Dio.netty.allocator.type={unpooled|pooled}
4.1 以后,非 Android 平台默认启用池化实现,Android 平台启用非池化实现
4.1 之前,池化功能还不成熟,默认是非池化实现
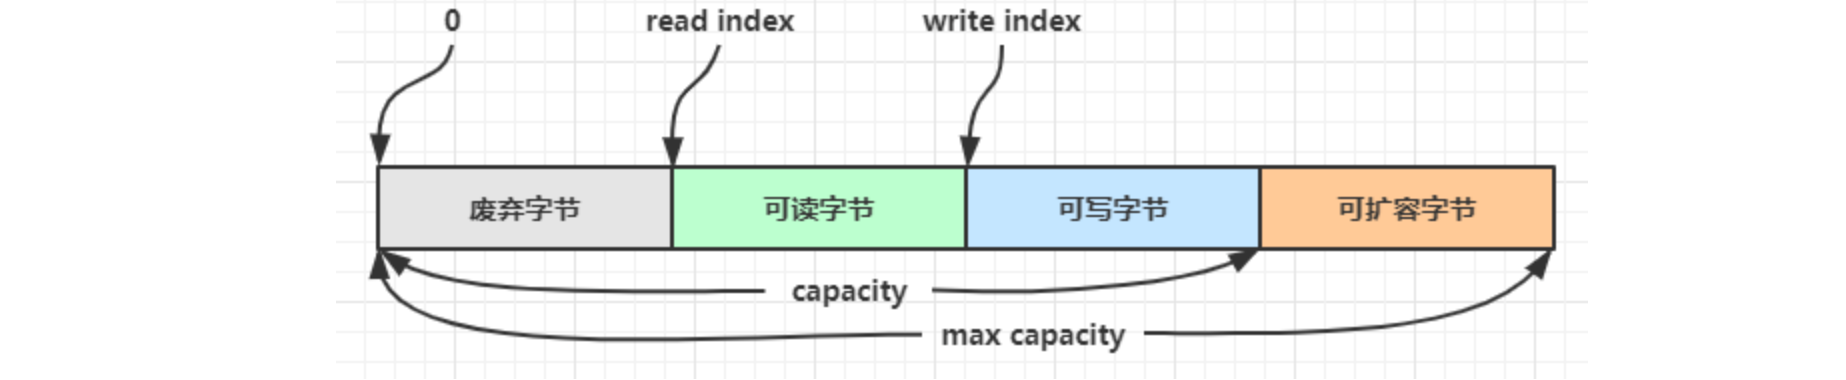
4)组成 ByteBuf 由四部分组成
默认的max capacity = Integer.MAX_VALUE,所以ByteBuf不能无限制的扩容。
最开始读写指针都在 0 位置
ByteBuf和ByteBuffer相比
ByteBuffer的读写指针共用,所以在读写之前,需要切换对应的读写模式;ByteBuf读写指针分离,所以读写操作不需要先切换模式,直接开始读写操作。
ByteBuffer对象一经创建,其容量不可变;但是ByteBuf对象可以根据写操作自动扩容
ByteBuf有池化功能,ByteBuffer没有池化功能
5)写入 方法列表,省略一些不重要的方法
方法签名
含义
备注
writeBoolean(boolean value)
写入 boolean 值
用一字节 01|00 代表 true|false
writeByte(int value)
写入 byte 值
writebyte把Java四个字节的有效位写进去,一个字节
writeShort(int value)
写入 short 值
writeInt(int value)
写入 int 值
Big Endian(大端写入,先写入大端),即 0x250,写入后 00 00 02 50一般网路编程采用打断写入
writeIntLE(int value)
写入 int 值
Little Endian(小端写入,先写入小端),即 0x250,写入后 50 02 00 00
writeLong(long value)
写入 long 值
writeChar(int value)
写入 char 值
writeFloat(float value)
写入 float 值
writeDouble(double value)
写入 double 值
writeBytes(ByteBuf src)
写入 netty 的 ByteBuf
writeBytes(byte[] src)
写入 byte[]
writeBytes(ByteBuffer src)
写入 nio 的 ByteBuffer
int writeCharSequence(CharSequence sequence, Charset charset)
写入字符串
注意
这些方法的未指明返回值的,其返回值都是 ByteBuf,意味着可以链式调用
网络传输,默认习惯是 Big Endian
先写入 4 个字节
1 2 buffer.writeBytes(new byte []{1 , 2 , 3 , 4 });
结果是
1 2 3 4 5 6 read index:0 write index:4 capacity:10 +-------------------------------------------------+ | 0 1 2 3 4 5 6 7 8 9 a b c d e f | +--------+-------------------------------------------------+----------------+ |00000000| 01 02 03 04 |.... | +--------+-------------------------------------------------+----------------+
再写入一个 int 整数,也是 4 个字节
1 2 buffer.writeInt(5 );
结果是
1 2 3 4 5 6 read index:0 write index:8 capacity:10 +-------------------------------------------------+ | 0 1 2 3 4 5 6 7 8 9 a b c d e f | +--------+-------------------------------------------------+----------------+ |00000000| 01 02 03 04 00 00 00 05 |........ | +--------+-------------------------------------------------+----------------+
还有一类方法是 set 开头的一系列方法,也可以写入数据,但不会改变写指针位置
6)扩容 再写入一个 int 整数时,容量不够了(初始容量是 10),这时会引发扩容
1 2 buffer.writeInt(6 );
扩容规则是
如何写入后数据大小未超过 512,则选择下一个 16 的整数倍,例如写入后大小为 12 ,则扩容后 capacity 是 16
如果写入后数据大小超过 512,则选择下一个 2^n,例如写入后大小为 513,则扩容后 capacity 是 2^10=1024(2^9=512 已经不够了)
扩容不能超过 max capacity 会报错
结果是
1 2 3 4 5 6 read index:0 write index:12 capacity:16 +-------------------------------------------------+ | 0 1 2 3 4 5 6 7 8 9 a b c d e f | +--------+-------------------------------------------------+----------------+ |00000000| 01 02 03 04 00 00 00 05 00 00 00 06 |............ | +--------+-------------------------------------------------+----------------+
7)读取 例如读了 4 次,每次一个字节
1 2 3 4 5 System.out.println(buffer.readByte());
读过的内容,就属于废弃部分了,再读只能读那些尚未读取的部分
1 2 3 4 5 6 7 8 9 10 1 +-------------------------------------------------+ | 0 1 2 3 4 5 6 7 8 9 a b c d e f | +--------+-------------------------------------------------+----------------+ |00000000| 00 00 00 05 00 00 00 06 |........ | +--------+-------------------------------------------------+----------------+
如果需要重复读取 int 整数 5,怎么办?
可以在 read 前先做个标记 mark
1 2 3 buffer.markReaderIndex();
结果
1 2 3 4 5 6 7 5 +-------------------------------------------------+ | 0 1 2 3 4 5 6 7 8 9 a b c d e f | +--------+-------------------------------------------------+----------------+ |00000000| 00 00 00 06 |.... | +--------+-------------------------------------------------+----------------+
这时要重复读取的话,重置到标记位置 reset
1 2 buffer.resetReaderIndex();
这时
1 2 3 4 5 6 read index:4 write index:12 capacity:16 +-------------------------------------------------+ | 0 1 2 3 4 5 6 7 8 9 a b c d e f | +--------+-------------------------------------------------+----------------+ |00000000| 00 00 00 05 00 00 00 06 |........ | +--------+-------------------------------------------------+----------------+
还有种办法是采用 get 开头的一系列方法,这些方法不会改变 read index。
8)retain() & release()方法 由于 Netty 中有堆外内存的 ByteBuf 实现,堆外内存最好是手动来释放,而不是等 GC 垃圾回收。
UnpooledHeapByteBuf 使用的是 JVM 内存,只需等 GC 回收内存即可
UnpooledDirectByteBuf 使用的就是直接内存了,虽然直接内存也可以等到GC回收时,间接触发直接内存的回收,但是这种效率比较慢,并且不及时。可以通过特殊的方法来回收内存
PooledByteBuf 和它的子类使用了池化机制,需要更复杂的规则来回收内存
回收内存的源码实现,请关注下面方法的不同实现
protected abstract void deallocate()
Netty 这里采用了引用计数法 来控制回收内存,每个 ByteBuf 都实现了 ReferenceCounted 接口
每个 ByteBuf 对象的初始计数为 1
调用 release 方法计数减 1,如果计数为 0,ByteBuf 内存被回收
调用 retain 方法计数加 1,表示调用者没用完之前,其它 handler 即使调用了 release 也不会造成回收
当计数为 0 时,底层内存会被回收,这时即使 ByteBuf 对象还在,其各个方法均无法正常使用
谁来负责调用 release() 方法呢?
不是我们想象的(一般情况下)
1 2 3 4 5 6 ByteBuf buf = ...try {finally {
请思考,因为 pipeline 的存在,一般需要将 ByteBuf 传递给下一个 ChannelHandler,如果在 finally 中 release 了,就失去了传递性(当然,如果在这个 ChannelHandler 内这个 ByteBuf 已完成了它的使命,那么便无须再传递)
基本规则是,谁是最后使用者,谁负责 release ,详细分析如下
起点,对于 NIO 实现来讲,在 io.netty.channel.nio.AbstractNioByteChannel.NioByteUnsafe#read 方法中首次创建 ByteBuf 放入 pipeline(line 163 pipeline.fireChannelRead(byteBuf))
入站 ByteBuf 处理原则
对原始 ByteBuf 不做处理,调用 ctx.fireChannelRead(msg) 向后传递,这时无须 release
将原始 ByteBuf 转换为其它类型的 Java 对象,这时 ByteBuf 就没用了,必须 release
如果不调用 ctx.fireChannelRead(msg) 向后传递,那么也必须 release
注意各种异常,如果 ByteBuf 没有成功传递到下一个 ChannelHandler,必须 release
假设消息一直向后传,那么 TailContext 会负责释放未处理消息(原始的 ByteBuf)
出站 ByteBuf 处理原则
出站消息最终都会转为 ByteBuf 输出,一直向前传,由 HeadContext flush 后 release
异常处理原则
有时候不清楚 ByteBuf 被引用了多少次,但又必须彻底释放,可以循环调用 release 直到返回 true
TailContext 释放入站未处理ByteBuf逻辑
1 2 3 4 5 6 7 8 9 10 protected void onUnhandledInboundMessage (Object msg) try {"Discarded inbound message {} that reached at the tail of the pipeline. " +"Please check your pipeline configuration." , msg);finally {
具体代码
1 2 3 4 5 6 7 public static boolean release (Object msg) if (msg instanceof ReferenceCounted) {return ((ReferenceCounted) msg).release();return false ;
HeadContext 释放出站未处理ByteBuf逻辑
1 2 3 4 public void write (ChannelHandlerContext ctx, Object msg, ChannelPromise promise) this .unsafe.write(msg, promise);
1 2 3 4 5 6 7 8 9 10 11 12 13 14 15 16 17 18 19 20 21 22 23 24 public final void write (Object msg, ChannelPromise promise) this .assertEventLoop();this .outboundBuffer;if (outboundBuffer == null ) {this .safeSetFailure(promise, this .newClosedChannelException(AbstractChannel.this .initialCloseCause));else {int size;try {this .filterOutboundMessage(msg);this .pipeline.estimatorHandle().size(msg);if (size < 0 ) {0 ;catch (Throwable var6) {this .safeSetFailure(promise, var6);return ;
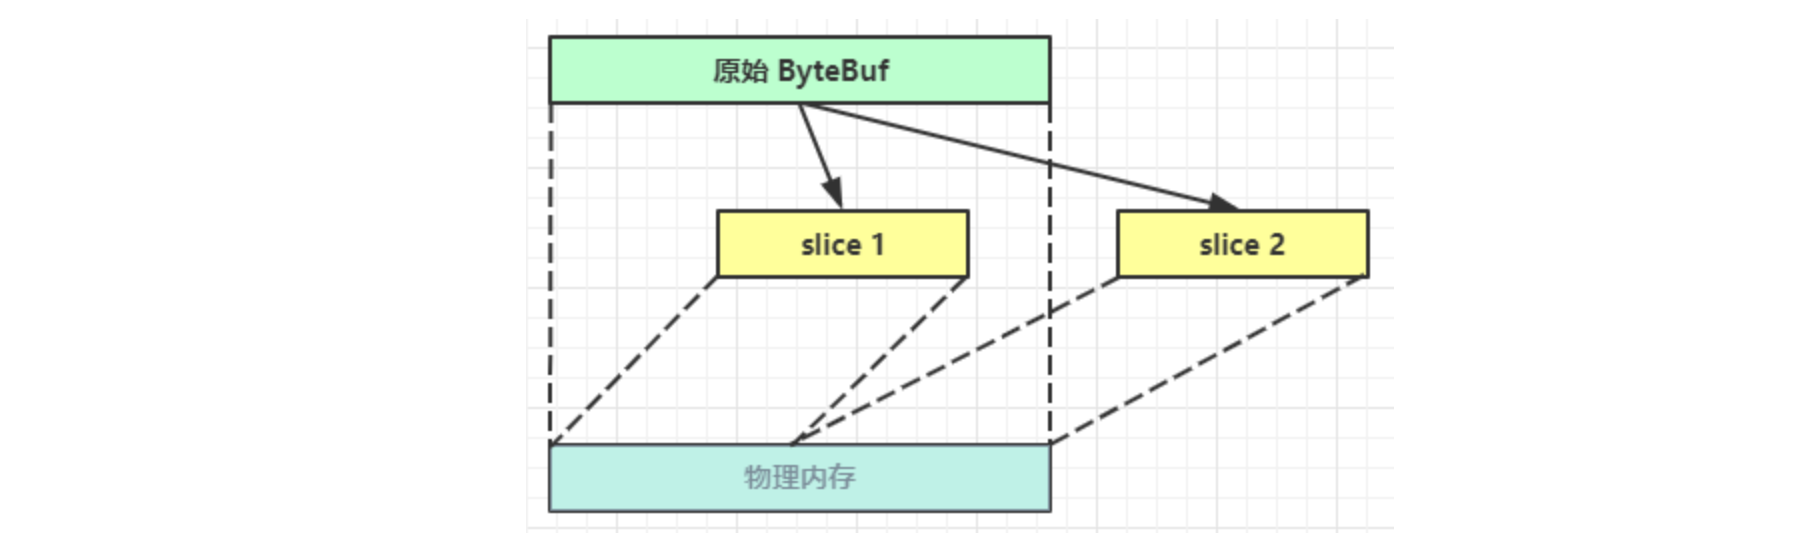
9)slice()方法 【零拷贝】的体现之一,对原始 ByteBuf 进行切片成多个 ByteBuf,切片后的 ByteBuf 并没有发生内存复制,还是使用原始 ByteBuf 的内存,切片后的 ByteBuf 维护独立的 read,write 指针
需要注意的是,切片后的ByteBuf的max capacity被固定为该切片的大小,不能实行追加写操作,但是可以在该切片大小内修改值。
例,原始 ByteBuf 进行一些初始操作
1 2 3 4 ByteBuf origin = ByteBufAllocator.DEFAULT.buffer(10 );new byte []{1 , 2 , 3 , 4 });
输出
1 2 3 4 5 +-------------------------------------------------+ | 0 1 2 3 4 5 6 7 8 9 a b c d e f | +--------+-------------------------------------------------+----------------+ |00000000| 02 03 04 |... | +--------+-------------------------------------------------+----------------+
这时调用 slice 进行切片,无参 slice 是从原始 ByteBuf 的 read index 到 write index 之间的内容进行切片,切片后的 max capacity 被固定为这个区间的大小,因此不能追加 write
1 2 3 ByteBuf slice = origin.slice();
输出
1 2 3 4 5 +-------------------------------------------------+ | 0 1 2 3 4 5 6 7 8 9 a b c d e f | +--------+-------------------------------------------------+----------------+ |00000000| 02 03 04 |... | +--------+-------------------------------------------------+----------------+
如果原始 ByteBuf 再次读操作(又读了一个字节)
1 2 origin.readByte();
输出
1 2 3 4 5 +-------------------------------------------------+ | 0 1 2 3 4 5 6 7 8 9 a b c d e f | +--------+-------------------------------------------------+----------------+ |00000000| 03 04 |.. | +--------+-------------------------------------------------+----------------+
这时的 slice 不受影响,因为它有独立的读写指针
1 System.out.println(ByteBufUtil.prettyHexDump(slice));
输出
1 2 3 4 5 +-------------------------------------------------+ | 0 1 2 3 4 5 6 7 8 9 a b c d e f | +--------+-------------------------------------------------+----------------+ |00000000| 02 03 04 |... | +--------+-------------------------------------------------+----------------+
如果 slice 的内容发生了更改
1 2 slice.setByte(2 , 5 );
输出
1 2 3 4 5 +-------------------------------------------------+ | 0 1 2 3 4 5 6 7 8 9 a b c d e f | +--------+-------------------------------------------------+----------------+ |00000000| 02 03 05 |... | +--------+-------------------------------------------------+----------------+
这时,原始 ByteBuf 也会受影响,因为底层都是同一块内存
1 System .ByteBufUtil .HexDump(origin ) );
输出
1 2 3 4 5 +-------------------------------------------------+ | 0 1 2 3 4 5 6 7 8 9 a b c d e f | +--------+-------------------------------------------------+----------------+ |00000000| 03 05 |.. | +--------+-------------------------------------------------+----------------+
需要注意的是:
如果原始ByteBuf或者该对象的切片调用release()方法并且导致该对象被释放,此时原始的ByteBuf对象和所有的切片也被释放掉了。
1 2 3 4 5 6 7 8 9 10 11 import io.netty.buffer.ByteBuf;import io.netty.buffer.ByteBufAllocator;public class Test public static void main (String[] args) 10 );0 , 5 );new byte []{'a' }));
1 2 3 4 5 6 7 Exception in thread "main" io.netty.util.IllegalReferenceCountException: refCnt: 0
10)duplicate()方法 【零拷贝】的体现之一,就好比截取了原始 ByteBuf 所有内容,并且没有 max capacity 的限制(意思是可以追加写入),也是与原始 ByteBuf 使用同一块底层内存,只是读写指针是独立的。
1 2 3 4 5 6 7 8 9 10 11 12 13 14 15 16 import io.netty.buffer.ByteBuf;import io.netty.buffer.ByteBufAllocator;public class Test public static void main (String[] args) 10 );new byte []{1 , 2 , 3 , 4 , 5 });0 , 5 );new byte []{6 });5 ));
1 2 3 4 PooledUnsafeDirectByteBuf(ridx: 0 , widx: 5 , cap: 10 )0 , widx: 5 , cap: 5 /5 , unwrapped: PooledUnsafeDirectByteBuf(ridx: 0 , widx: 5 , cap: 10 ))0 , widx: 6 , cap: 10 , unwrapped: PooledUnsafeDirectByteBuf(ridx: 0 , widx: 5 , cap: 10 ))6
11)copy()方法 会将底层内存数据进行深拷贝,因此无论读写,都与原始 ByteBuf 无关。
12)CompositeByteBuf类 【零拷贝】的体现之一,可以将多个 ByteBuf 合并为一个逻辑上的 ByteBuf,避免拷贝
有两个 ByteBuf 如下
1 2 3 4 5 6 ByteBuf buf1 = ByteBufAllocator.DEFAULT.buffer(5 );new byte []{1 , 2 , 3 , 4 , 5 });5 );new byte []{6 , 7 , 8 , 9 , 10 });
输出
1 2 3 4 5 6 7 8 9 10 +-------------------------------------------------+ | 0 1 2 3 4 5 6 7 8 9 a b c d e f | +--------+-------------------------------------------------+----------------+ |00000000| 01 02 03 04 05 |..... | +--------+-------------------------------------------------+----------------+ +-------------------------------------------------+ | 0 1 2 3 4 5 6 7 8 9 a b c d e f | +--------+-------------------------------------------------+----------------+ |00000000| 06 07 08 09 0a |..... | +--------+-------------------------------------------------+----------------+
现在需要一个新的 ByteBuf,内容来自于刚才的 buf1 和 buf2,如何实现?
方法1:
1 2 3 4 ByteBuf buf3 = ByteBufAllocator.DEFAULT
结果
1 2 3 4 5 +-------------------------------------------------+ | 0 1 2 3 4 5 6 7 8 9 a b c d e f | +--------+-------------------------------------------------+----------------+ |00000000| 01 02 03 04 05 06 07 08 09 0a |.......... | +--------+-------------------------------------------------+----------------+
这种方法好不好?回答是不太好,因为进行了数据的内存复制操作
方法2:
1 2 3 CompositeByteBuf buf3 = ByteBufAllocator.DEFAULT.compositeBuffer();true , buf1, buf2);
结果是一样的
1 2 3 4 5 +-------------------------------------------------+ | 0 1 2 3 4 5 6 7 8 9 a b c d e f | +--------+-------------------------------------------------+----------------+ |00000000| 01 02 03 04 05 06 07 08 09 0a |.......... | +--------+-------------------------------------------------+----------------+
CompositeByteBuf 是一个组合的 ByteBuf,它内部维护了一个 Component 数组,每个 Component 管理一个 ByteBuf,记录了这个 ByteBuf 相对于整体偏移量等信息,代表着整体中某一段的数据。
优点,对外是一个虚拟视图,组合这些 ByteBuf 不会产生内存复制
缺点,复杂了很多,多次操作会带来性能的损耗
13)Unpooled工具类 Unpooled 是一个工具类,类如其名,提供了非池化的 ByteBuf 创建、组合、复制等操作
这里仅介绍其跟【零拷贝】相关的 wrappedBuffer 方法,可以用来包装 ByteBuf
1 2 3 4 5 6 7 8 ByteBuf buf1 = ByteBufAllocator.DEFAULT.buffer(5 );new byte []{1 , 2 , 3 , 4 , 5 });5 );new byte []{6 , 7 , 8 , 9 , 10 });
输出
1 2 3 4 5 +-------------------------------------------------+ | 0 1 2 3 4 5 6 7 8 9 a b c d e f | +--------+-------------------------------------------------+----------------+ |00000000| 01 02 03 04 05 06 07 08 09 0a |.......... | +--------+-------------------------------------------------+----------------+
也可以用来包装普通字节数组,底层也不会有拷贝操作
1 2 3 ByteBuf buf4 = Unpooled.wrappedBuffer(new byte []{1 , 2 , 3 }, new byte []{4 , 5 , 6 });
输出
1 2 3 4 5 6 class io.netty.buffer.CompositeByteBuf +-------------------------------------------------+ | 0 1 2 3 4 5 6 7 8 9 a b c d e f | +--------+-------------------------------------------------+----------------+ |00000000| 01 02 03 04 05 06 |...... | +--------+-------------------------------------------------+----------------+
💡 ByteBuf 优势
池化 - 可以重用池中 ByteBuf 实例,更节约内存,减少内存溢出的可能
读写指针分离,不需要像 ByteBuffer 一样切换读写模式
可以自动扩容
支持链式调用,使用更流畅
很多地方体现零拷贝,例如 slice、duplicate、CompositeByteBuf
4. 双向通信 4.1 练习 实现一个 echo server
编写 server
1 2 3 4 5 6 7 8 9 10 11 12 13 14 15 16 17 18 19 20 21 22 23 new ServerBootstrap()new NioEventLoopGroup())new ChannelInitializer<NioSocketChannel>() {@Override protected void initChannel (NioSocketChannel ch) new ChannelInboundHandlerAdapter(){@Override public void channelRead (ChannelHandlerContext ctx, Object msg) 8080 );
编写 client
1 2 3 4 5 6 7 8 9 10 11 12 13 14 15 16 17 18 19 20 21 22 23 24 25 26 27 28 29 30 31 32 33 34 35 NioEventLoopGroup group = new NioEventLoopGroup();new Bootstrap()new ChannelInitializer<NioSocketChannel>() {@Override protected void initChannel (NioSocketChannel ch) throws Exception new StringEncoder());new ChannelInboundHandlerAdapter() {@Override public void channelRead (ChannelHandlerContext ctx, Object msg) "127.0.0.1" , 8080 ).sync().channel();new Thread(() -> {new Scanner(System.in);while (true ) {if ("q" .equals(line)) {break ;
💡 读和写的误解 我最初在认识上有这样的误区,认为只有在 netty,nio 这样的多路复用 IO 模型时,读写才不会相互阻塞,才可以实现高效的双向通信,但实际上,Java Socket 是全双工的:在任意时刻,线路上存在A 到 B 和 B 到 A 的双向信号传输。即使是阻塞 IO,读和写是可以同时进行的,只要分别采用读线程和写线程即可,读不会阻塞写、写也不会阻塞读
例如
1 2 3 4 5 6 7 8 9 10 11 12 13 14 15 16 17 18 19 20 21 22 23 24 25 26 27 28 29 30 31 public class TestServer public static void main (String[] args) throws IOException new ServerSocket(8888 );new Thread(() -> {try {new BufferedReader(new InputStreamReader(s.getInputStream()));while (true ) {catch (IOException e) {new Thread(() -> {try {new BufferedWriter(new OutputStreamWriter(s.getOutputStream()));for (int i = 0 ; i < 100 ; i++) {catch (IOException e) {
客户端
1 2 3 4 5 6 7 8 9 10 11 12 13 14 15 16 17 18 19 20 21 22 23 24 25 26 27 28 29 public class TestClient public static void main (String[] args) throws IOException new Socket("localhost" , 8888 );new Thread(() -> {try {new BufferedReader(new InputStreamReader(s.getInputStream()));while (true ) {catch (IOException e) {new Thread(() -> {try {new BufferedWriter(new OutputStreamWriter(s.getOutputStream()));for (int i = 0 ; i < 100 ; i++) {catch (IOException e) {
三. Netty 进阶 1. 粘包与半包 1.1 粘包现象 服务端代码
1 2 3 4 5 6 7 8 9 10 11 12 13 14 15 16 17 18 19 20 21 22 23 24 25 26 27 28 29 30 31 32 33 34 35 36 37 38 39 40 41 42 43 44 45 46 47 48 49 50 public class HelloWorldServer static final Logger log = LoggerFactory.getLogger(HelloWorldServer.class);void start () new NioEventLoopGroup(1 );new NioEventLoopGroup();try {new ServerBootstrap();10 );new AdaptiveRecvByteBufAllocator(16 , 16 , 16 ));new ChannelInitializer<SocketChannel>() {@Override protected void initChannel (SocketChannel ch) throws Exception new LoggingHandler(LogLevel.DEBUG));new ChannelInboundHandlerAdapter() {@Override public void channelActive (ChannelHandlerContext ctx) throws Exception "connected {}" , ctx.channel());super .channelActive(ctx);@Override public void channelInactive (ChannelHandlerContext ctx) throws Exception "disconnect {}" , ctx.channel());super .channelInactive(ctx);8080 );"{} binding..." , channelFuture.channel());"{} bound..." , channelFuture.channel());catch (InterruptedException e) {"server error" , e);finally {"stoped" );public static void main (String[] args) new HelloWorldServer().start();
客户端代码希望发送 10 个消息,每个消息是 16 字节
1 2 3 4 5 6 7 8 9 10 11 12 13 14 15 16 17 18 19 20 21 22 23 24 25 26 27 28 29 30 31 32 33 34 35 36 37 38 public class HelloWorldClient static final Logger log = LoggerFactory.getLogger(HelloWorldClient.class);public static void main (String[] args) new NioEventLoopGroup();try {new Bootstrap();new ChannelInitializer<SocketChannel>() {@Override protected void initChannel (SocketChannel ch) throws Exception "connetted..." );new ChannelInboundHandlerAdapter() {@Override public void channelActive (ChannelHandlerContext ctx) throws Exception "sending..." );new Random();char c = 'a' ;for (int i = 0 ; i < 10 ; i++) {new byte []{0 , 1 , 2 , 3 , 4 , 5 , 6 , 7 , 8 , 9 , 10 , 11 , 12 , 13 , 14 , 15 });"127.0.0.1" , 8080 ).sync();catch (InterruptedException e) {"client error" , e);finally {
服务器端的某次输出,可以看到一次就接收了 160 个字节,而非分 10 次接收
1 2 3 4 5 6 7 8 9 10 11 12 13 14 15 16 17 18 19 20 21 08:24:46 [DEBUG] [main] c.i.n.HelloWorldServer - [id: 0x81e0fda5] binding... 0 1 2 3 4 5 6 7 8 9 a b c d e f | 00 01 02 03 04 05 06 07 08 09 0a 0b 0c 0d 0e 0f |................| 00 01 02 03 04 05 06 07 08 09 0a 0b 0c 0d 0e 0f |................| 00 01 02 03 04 05 06 07 08 09 0a 0b 0c 0d 0e 0f |................| 00 01 02 03 04 05 06 07 08 09 0a 0b 0c 0d 0e 0f |................| 00 01 02 03 04 05 06 07 08 09 0a 0b 0c 0d 0e 0f |................| 00 01 02 03 04 05 06 07 08 09 0a 0b 0c 0d 0e 0f |................| 00 01 02 03 04 05 06 07 08 09 0a 0b 0c 0d 0e 0f |................| 00 01 02 03 04 05 06 07 08 09 0a 0b 0c 0d 0e 0f |................| 00 01 02 03 04 05 06 07 08 09 0a 0b 0c 0d 0e 0f |................| 00 01 02 03 04 05 06 07 08 09 0a 0b 0c 0d 0e 0f |................|
1.2 半包现象 客户端代码希望发送 1 个消息,这个消息是 160 字节,代码改为
1 2 3 4 5 ByteBuf buffer = ctx.alloc().buffer();for (int i = 0 ; i < 10 ; i++) {new byte []{0 , 1 , 2 , 3 , 4 , 5 , 6 , 7 , 8 , 9 , 10 , 11 , 12 , 13 , 14 , 15 });
为现象明显,服务端修改一下接收缓冲区,其它代码不变
1 serverBootstrap.option(ChannelOption.SO_RCVBUF, 10 );
服务器端的某次输出,可以看到接收的消息被分为两节,第一次 20 字节,第二次 140 字节
1 2 3 4 5 6 7 8 9 10 11 12 13 14 15 16 17 18 19 20 21 22 23 24 25 26 27 28 08:43:49 [DEBUG] [main] c.i.n.HelloWorldServer - [id: 0x4d6c6a84] binding... 0 1 2 3 4 5 6 7 8 9 a b c d e f | 00 01 02 03 04 05 06 07 08 09 0a 0b 0c 0d 0e 0f |................| 00 01 02 03 |.... | 0 1 2 3 4 5 6 7 8 9 a b c d e f | 04 05 06 07 08 09 0a 0b 0c 0d 0e 0f 00 01 02 03 |................| 04 05 06 07 08 09 0a 0b 0c 0d 0e 0f 00 01 02 03 |................| 04 05 06 07 08 09 0a 0b 0c 0d 0e 0f 00 01 02 03 |................| 04 05 06 07 08 09 0a 0b 0c 0d 0e 0f 00 01 02 03 |................| 04 05 06 07 08 09 0a 0b 0c 0d 0e 0f 00 01 02 03 |................| 04 05 06 07 08 09 0a 0b 0c 0d 0e 0f 00 01 02 03 |................| 04 05 06 07 08 09 0a 0b 0c 0d 0e 0f 00 01 02 03 |................| 04 05 06 07 08 09 0a 0b 0c 0d 0e 0f 00 01 02 03 |................| 04 05 06 07 08 09 0a 0b 0c 0d 0e 0f |............ |
注意
serverBootstrap.option(ChannelOption.SO_RCVBUF, 10) 影响的底层接收缓冲区(即滑动窗口)大小,仅决定了 netty 读取的最小单位,netty 实际每次读取的一般是它的整数倍
1.3 现象分析 粘包
现象,发送 abc def,接收 abcdef
原因
应用层:接收方 ByteBuf 设置太大(Netty 默认 1024字节)
滑动窗口(TCP原因\接收方原因 ):假设发送方 256 bytes 表示一个完整报文,但由于接收方处理不及时且窗口大小足够大,这 256 bytes 字节就会缓冲在接收方的滑动窗口中,当滑动窗口中缓冲了多个报文就会粘包
Nagle 算法(TCP原因\发送方原因 ):会造成粘包
半包
现象,发送 abcdef,接收 abc def
原因
应用层:接收方 ByteBuf 小于实际发送数据量
滑动窗口(TCP原因\接收方原因 ):假设接收方的窗口只剩了 128 bytes,发送方的报文大小是 256 bytes,这时放不下了,只能先发送前 128 bytes,等待 ack 后才能发送剩余部分,这就造成了半包
MSS 限制(数据链路层MTU原因\发送方原因 ):当发送的数据超过 MSS 限制后,会将数据切分发送,就会造成半包。MSS(Maximum Segment Size)是传输层分段的单位,一般是1460字节,是根据数据链路层的MTU:Maximum Transmission Unit,最大传输单元 计算而来
本质是因为 TCP 是流式协议,消息无边界
滑动窗口
MSS 限制
链路层对一次能够发送的最大数据有限制,这个限制称之为 MTU(maximum transmission unit),不同的链路设备的 MTU 值也有所不同,例如
以太网的 MTU 是 1500
FDDI(光纤分布式数据接口)的 MTU 是 4352
本地回环地址的 MTU 是 65535 - 本地测试不走网卡
MSS 是最大段长度(maximum segment size),它是 MTU 刨去 tcp 头和 ip 头后剩余能够作为数据传输的字节数
ipv4 tcp 头占用 20 bytes,ip 头占用 20 bytes,因此以太网 MSS 的值为 1500 - 40 = 1460
TCP 在传递大量数据时,会按照 MSS 大小将数据进行分割发送
MSS 的值在三次握手时通知对方自己 MSS 的值,然后在两者之间选择一个小值作为 MSS
Nagle 算法
即使发送一个字节,也需要加入 tcp 头和 ip 头,也就是总字节数会使用 41 bytes,非常不经济。因此为了提高网络利用率,tcp 希望尽可能发送足够大的数据,这就是 Nagle 算法产生的缘由
该算法是指发送端即使还有应该发送的数据,但如果这部分数据很少的话,则进行延迟发送
如果 SO_SNDBUF 的数据达到 MSS,则需要发送
如果 SO_SNDBUF 中含有 FIN(表示需要连接关闭)这时将剩余数据发送,再关闭
如果 TCP_NODELAY = true,则需要发送
已发送的数据都收到 ack 时,则需要发送
上述条件不满足,但发生超时(一般为 200ms)则需要发送
除上述情况,延迟发送
1.4 解决方案
短链接,发一个包建立一次连接,这样连接建立到连接断开之间就是消息的边界,缺点效率太低
每一条消息采用固定长度,缺点浪费空间
每一条消息采用分隔符,例如 \n,缺点需要转义
每一条消息分为 head 和 body,head 中包含 body 的长度
方法1,短链接 以解决粘包为例
1 2 3 4 5 6 7 8 9 10 11 12 13 14 15 16 17 18 19 20 21 22 23 24 25 26 27 28 29 30 31 32 33 34 35 36 37 38 39 40 41 42 43 44 public class HelloWorldClient static final Logger log = LoggerFactory.getLogger(HelloWorldClient.class);public static void main (String[] args) for (int i = 0 ; i < 10 ; i++) {private static void send () new NioEventLoopGroup();try {new Bootstrap();new ChannelInitializer<SocketChannel>() {@Override protected void initChannel (SocketChannel ch) throws Exception "conneted..." );new LoggingHandler(LogLevel.DEBUG));new ChannelInboundHandlerAdapter() {@Override public void channelActive (ChannelHandlerContext ctx) throws Exception "sending..." );new byte []{0 , 1 , 2 , 3 , 4 , 5 , 6 , 7 , 8 , 9 , 10 , 11 , 12 , 13 , 14 , 15 });"localhost" , 8080 ).sync();catch (InterruptedException e) {"client error" , e);finally {
输出,略
半包用这种办法还是不好解决,因为接收方的缓冲区大小是有限的
方法2,固定长度 让所有数据包长度固定(假设长度为 8 字节),服务器端加入
1 ch.pipeline().addLast(new FixedLengthFrameDecoder(8 ));
客户端测试代码,注意, 采用这种方法后,客户端什么时候 flush 都可以
1 2 3 4 5 6 7 8 9 10 11 12 13 14 15 16 17 18 19 20 21 22 23 24 25 26 27 28 29 30 31 32 33 34 35 36 37 38 39 40 41 42 43 44 45 public class HelloWorldClient static final Logger log = LoggerFactory.getLogger(HelloWorldClient.class);public static void main (String[] args) new NioEventLoopGroup();try {new Bootstrap();new ChannelInitializer<SocketChannel>() {@Override protected void initChannel (SocketChannel ch) throws Exception "connetted..." );new LoggingHandler(LogLevel.DEBUG));new ChannelInboundHandlerAdapter() {@Override public void channelActive (ChannelHandlerContext ctx) throws Exception "sending..." );new Random();char c = 'a' ;for (int i = 0 ; i < 10 ; i++) {byte [] bytes = new byte [8 ];for (int j = 0 ; j < r.nextInt(8 ); j++) {byte ) c;"192.168.0.103" , 9090 ).sync();catch (InterruptedException e) {"client error" , e);finally {
客户端输出
1 2 3 4 5 6 7 8 9 10 11 12 13 14 15 16 12:07:00 [DEBUG] [nioEventLoopGroup-2-1] c.i.n.HelloWorldClient - connetted... 0 1 2 3 4 5 6 7 8 9 a b c d e f | 61 61 61 61 00 00 00 00 62 00 00 00 00 00 00 00 |aaaa....b.......| 63 63 00 00 00 00 00 00 64 00 00 00 00 00 00 00 |cc......d.......| 00 00 00 00 00 00 00 00 66 66 66 66 00 00 00 00 |........ffff....| 67 67 67 00 00 00 00 00 68 00 00 00 00 00 00 00 |ggg.....h.......| 69 69 69 69 69 00 00 00 6a 6a 6a 6a 00 00 00 00 |iiiii...jjjj....|
服务端输出
1 2 3 4 5 6 7 8 9 10 11 12 13 14 15 16 17 18 19 20 21 22 23 24 25 26 27 28 29 30 31 32 33 34 35 36 37 38 39 40 41 42 43 44 45 46 47 48 49 50 51 52 53 54 55 56 57 58 59 60 61 62 63 64 65 66 12:06:51 [DEBUG] [main] c.i.n.HelloWorldServer - [id: 0xe3d9713f] binding... +-------------------------------------------------+ | 0 1 2 3 4 5 6 7 8 9 a b c d e f | +--------+-------------------------------------------------+----------------+ |00000000| 61 61 61 61 00 00 00 00 |aaaa.... | +--------+-------------------------------------------------+----------------+ +-------------------------------------------------+ | 0 1 2 3 4 5 6 7 8 9 a b c d e f | +--------+-------------------------------------------------+----------------+ |00000000| 62 00 00 00 00 00 00 00 |b....... | +--------+-------------------------------------------------+----------------+ +-------------------------------------------------+ | 0 1 2 3 4 5 6 7 8 9 a b c d e f | +--------+-------------------------------------------------+----------------+ |00000000| 63 63 00 00 00 00 00 00 |cc...... | +--------+-------------------------------------------------+----------------+ +-------------------------------------------------+ | 0 1 2 3 4 5 6 7 8 9 a b c d e f | +--------+-------------------------------------------------+----------------+ |00000000| 64 00 00 00 00 00 00 00 |d....... | +--------+-------------------------------------------------+----------------+ +-------------------------------------------------+ | 0 1 2 3 4 5 6 7 8 9 a b c d e f | +--------+-------------------------------------------------+----------------+ |00000000| 00 00 00 00 00 00 00 00 |........ | +--------+-------------------------------------------------+----------------+ +-------------------------------------------------+ | 0 1 2 3 4 5 6 7 8 9 a b c d e f | +--------+-------------------------------------------------+----------------+ |00000000| 66 66 66 66 00 00 00 00 |ffff.... | +--------+-------------------------------------------------+----------------+ +-------------------------------------------------+ | 0 1 2 3 4 5 6 7 8 9 a b c d e f | +--------+-------------------------------------------------+----------------+ |00000000| 67 67 67 00 00 00 00 00 |ggg..... | +--------+-------------------------------------------------+----------------+ +-------------------------------------------------+ | 0 1 2 3 4 5 6 7 8 9 a b c d e f | +--------+-------------------------------------------------+----------------+ |00000000| 68 00 00 00 00 00 00 00 |h....... | +--------+-------------------------------------------------+----------------+ +-------------------------------------------------+ | 0 1 2 3 4 5 6 7 8 9 a b c d e f | +--------+-------------------------------------------------+----------------+ |00000000| 69 69 69 69 69 00 00 00 |iiiii... | +--------+-------------------------------------------------+----------------+ +-------------------------------------------------+ | 0 1 2 3 4 5 6 7 8 9 a b c d e f | +--------+-------------------------------------------------+----------------+ |00000000| 6a 6a 6a 6a 00 00 00 00 |jjjj.... | +--------+-------------------------------------------------+----------------+
缺点是,数据包的大小不好把握
长度定的太大,浪费
长度定的太小,对某些数据包又显得不够
方法3,固定分隔符 服务端加入,默认以 \n 或 \r\n 作为分隔符,如果超出指定长度仍未出现分隔符,则抛出异常
1 ch.pipeline().addLast(new LineBasedFrameDecoder(1024 ));
或者服务端使用自定义分隔符Decoder消息。
客户端在每条消息之后,加入 \n 分隔符
1 2 3 4 5 6 7 8 9 10 11 12 13 14 15 16 17 18 19 20 21 22 23 24 25 26 27 28 29 30 31 32 33 34 35 36 37 38 39 40 41 42 43 public class HelloWorldClient static final Logger log = LoggerFactory.getLogger(HelloWorldClient.class);public static void main (String[] args) new NioEventLoopGroup();try {new Bootstrap();new ChannelInitializer<SocketChannel>() {@Override protected void initChannel (SocketChannel ch) throws Exception "connetted..." );new LoggingHandler(LogLevel.DEBUG));new ChannelInboundHandlerAdapter() {@Override public void channelActive (ChannelHandlerContext ctx) throws Exception "sending..." );new Random();char c = 'a' ;for (int i = 0 ; i < 10 ; i++) {for (int j = 1 ; j <= r.nextInt(16 )+1 ; j++) {byte ) c);10 );"192.168.0.103" , 9090 ).sync();catch (InterruptedException e) {"client error" , e);finally {
客户端输出
1 2 3 4 5 6 7 8 9 10 11 12 13 14 15 14:08:18 [DEBUG] [nioEventLoopGroup-2-1] c.i.n.HelloWorldClient - connetted... 0 1 2 3 4 5 6 7 8 9 a b c d e f | 61 0a 62 62 62 0a 63 63 63 0a 64 64 0a 65 65 65 |a.bbb.ccc.dd.eee| 65 65 65 65 65 65 65 0a 66 66 0a 67 67 67 67 67 |eeeeeee.ff.ggggg| 67 67 0a 68 68 68 68 0a 69 69 69 69 69 69 69 0a |gg.hhhh.iiiiiii.|
服务端输出
1 2 3 4 5 6 7 8 9 10 11 12 13 14 15 16 17 18 19 20 21 22 23 24 25 26 27 28 29 30 31 32 33 34 35 36 37 38 39 40 41 42 43 44 45 46 47 48 49 50 51 52 53 54 55 56 57 58 59 60 61 62 14:08:18 [DEBUG] [nioEventLoopGroup-3-5] c.i.n.HelloWorldServer - connected [id: 0xa4b3be43, L:/192.168.0.103:9090 - R:/192.168.0.103:63641] +-------------------------------------------------+ | 0 1 2 3 4 5 6 7 8 9 a b c d e f | +--------+-------------------------------------------------+----------------+ |00000000| 61 |a | +--------+-------------------------------------------------+----------------+ +-------------------------------------------------+ | 0 1 2 3 4 5 6 7 8 9 a b c d e f | +--------+-------------------------------------------------+----------------+ |00000000| 62 62 62 |bbb | +--------+-------------------------------------------------+----------------+ +-------------------------------------------------+ | 0 1 2 3 4 5 6 7 8 9 a b c d e f | +--------+-------------------------------------------------+----------------+ |00000000| 63 63 63 |ccc | +--------+-------------------------------------------------+----------------+ +-------------------------------------------------+ | 0 1 2 3 4 5 6 7 8 9 a b c d e f | +--------+-------------------------------------------------+----------------+ |00000000| 64 64 |dd | +--------+-------------------------------------------------+----------------+ +-------------------------------------------------+ | 0 1 2 3 4 5 6 7 8 9 a b c d e f | +--------+-------------------------------------------------+----------------+ |00000000| 65 65 65 65 65 65 65 65 65 65 |eeeeeeeeee | +--------+-------------------------------------------------+----------------+ +-------------------------------------------------+ | 0 1 2 3 4 5 6 7 8 9 a b c d e f | +--------+-------------------------------------------------+----------------+ |00000000| 66 66 |ff | +--------+-------------------------------------------------+----------------+ +-------------------------------------------------+ | 0 1 2 3 4 5 6 7 8 9 a b c d e f | +--------+-------------------------------------------------+----------------+ |00000000| 67 67 67 67 67 67 67 |ggggggg | +--------+-------------------------------------------------+----------------+ +-------------------------------------------------+ | 0 1 2 3 4 5 6 7 8 9 a b c d e f | +--------+-------------------------------------------------+----------------+ |00000000| 68 68 68 68 |hhhh | +--------+-------------------------------------------------+----------------+ +-------------------------------------------------+ | 0 1 2 3 4 5 6 7 8 9 a b c d e f | +--------+-------------------------------------------------+----------------+ |00000000| 69 69 69 69 69 69 69 |iiiiiii | +--------+-------------------------------------------------+----------------+ +-------------------------------------------------+ | 0 1 2 3 4 5 6 7 8 9 a b c d e f | +--------+-------------------------------------------------+----------------+ |00000000| 6a 6a 6a 6a 6a 6a 6a 6a 6a 6a 6a |jjjjjjjjjjj | +--------+-------------------------------------------------+----------------+
缺点,处理字符数据比较合适,但如果内容本身包含了分隔符(字节数据常常会有此情况),那么就会解析错误
方法4,预设长度 帧解码器LengthFieldBasedFrameDecoder 在发送消息前,先约定用定长字节表示接下来数据的长度
使用Netty里的**帧解码器LengthFieldBasedFrameDecoder**来处理黏包半包问题。
1 2 3 new LengthFieldBasedFrameDecoder(1024 , 0 , 1 , 0 , 1 ));
客户端代码
1 2 3 4 5 6 7 8 9 10 11 12 13 14 15 16 17 18 19 20 21 22 23 24 25 26 27 28 29 30 31 32 33 34 35 36 37 38 39 40 41 42 43 44 45 46 public class HelloWorldClient static final Logger log = LoggerFactory.getLogger(HelloWorldClient.class);public static void main (String[] args) new NioEventLoopGroup();try {new Bootstrap();new ChannelInitializer<SocketChannel>() {@Override protected void initChannel (SocketChannel ch) throws Exception "connetted..." );new LoggingHandler(LogLevel.DEBUG));new ChannelInboundHandlerAdapter() {@Override public void channelActive (ChannelHandlerContext ctx) throws Exception "sending..." );new Random();char c = 'a' ;for (int i = 0 ; i < 10 ; i++) {byte length = (byte ) (r.nextInt(16 ) + 1 );for (int j = 1 ; j <= length; j++) {byte ) c);"192.168.0.103" , 9090 ).sync();catch (InterruptedException e) {"client error" , e);finally {
客户端输出
1 2 3 4 5 6 7 8 9 10 11 12 13 14 15 16 17 18 14:37:10 [DEBUG] [nioEventLoopGroup-2-1] c.i.n.HelloWorldClient - connetted... 0 1 2 3 4 5 6 7 8 9 a b c d e f | 09 61 61 61 61 61 61 61 61 61 09 62 62 62 62 62 |.aaaaaaaaa.bbbbb| 62 62 62 62 06 63 63 63 63 63 63 08 64 64 64 64 |bbbb.cccccc.dddd| 64 64 64 64 0f 65 65 65 65 65 65 65 65 65 65 65 |dddd.eeeeeeeeeee| 65 65 65 65 0d 66 66 66 66 66 66 66 66 66 66 66 |eeee.fffffffffff| 66 66 02 67 67 02 68 68 0e 69 69 69 69 69 69 69 |ff.gg.hh.iiiiiii| 69 69 69 69 69 69 69 09 6a 6a 6a 6a 6a 6a 6a 6a |iiiiiii.jjjjjjjj|
服务端输出
1 2 3 4 5 6 7 8 9 10 11 12 13 14 15 16 17 18 19 20 21 22 23 24 25 26 27 28 29 30 31 32 33 34 35 36 37 38 39 40 41 42 43 44 45 46 47 48 49 50 51 52 53 54 55 56 57 58 59 60 61 62 63 64 65 66 67 14:36:50 [DEBUG] [main] c.i.n.HelloWorldServer - [id: 0xdff439d3] binding... +-------------------------------------------------+ | 0 1 2 3 4 5 6 7 8 9 a b c d e f | +--------+-------------------------------------------------+----------------+ |00000000| 61 61 61 61 61 61 61 61 61 |aaaaaaaaa | +--------+-------------------------------------------------+----------------+ +-------------------------------------------------+ | 0 1 2 3 4 5 6 7 8 9 a b c d e f | +--------+-------------------------------------------------+----------------+ |00000000| 62 62 62 62 62 62 62 62 62 |bbbbbbbbb | +--------+-------------------------------------------------+----------------+ +-------------------------------------------------+ | 0 1 2 3 4 5 6 7 8 9 a b c d e f | +--------+-------------------------------------------------+----------------+ |00000000| 63 63 63 63 63 63 |cccccc | +--------+-------------------------------------------------+----------------+ +-------------------------------------------------+ | 0 1 2 3 4 5 6 7 8 9 a b c d e f | +--------+-------------------------------------------------+----------------+ |00000000| 64 64 64 64 64 64 64 64 |dddddddd | +--------+-------------------------------------------------+----------------+ +-------------------------------------------------+ | 0 1 2 3 4 5 6 7 8 9 a b c d e f | +--------+-------------------------------------------------+----------------+ |00000000| 65 65 65 65 65 65 65 65 65 65 65 65 65 65 65 |eeeeeeeeeeeeeee | +--------+-------------------------------------------------+----------------+ +-------------------------------------------------+ | 0 1 2 3 4 5 6 7 8 9 a b c d e f | +--------+-------------------------------------------------+----------------+ |00000000| 66 66 66 66 66 66 66 66 66 66 66 66 66 |fffffffffffff | +--------+-------------------------------------------------+----------------+ +-------------------------------------------------+ | 0 1 2 3 4 5 6 7 8 9 a b c d e f | +--------+-------------------------------------------------+----------------+ |00000000| 67 67 |gg | +--------+-------------------------------------------------+----------------+ +-------------------------------------------------+ | 0 1 2 3 4 5 6 7 8 9 a b c d e f | +--------+-------------------------------------------------+----------------+ |00000000| 68 68 |hh | +--------+-------------------------------------------------+----------------+ +-------------------------------------------------+ | 0 1 2 3 4 5 6 7 8 9 a b c d e f | +--------+-------------------------------------------------+----------------+ |00000000| 69 69 69 69 69 69 69 69 69 69 69 69 69 69 |iiiiiiiiiiiiii | +--------+-------------------------------------------------+----------------+ +-------------------------------------------------+ | 0 1 2 3 4 5 6 7 8 9 a b c d e f | +--------+-------------------------------------------------+----------------+ |00000000| 6a 6a 6a 6a 6a 6a 6a 6a 6a |jjjjjjjjj | +--------+-------------------------------------------------+----------------+
2. 协议设计与解析 2.1 为什么需要协议? TCP/IP 中消息传输基于流的方式,没有边界。
协议的目的就是划定消息的边界,制定通信双方要共同遵守的通信规则
例如:在网络上传输
是中文一句著名的无标点符号句子,在没有标点符号情况下,这句话有数种拆解方式,而意思却是完全不同,所以常被用作讲述标点符号的重要性
一种解读
另一种解读
如何设计协议呢?其实就是给网络传输的信息加上“标点符号”。但通过分隔符来断句不是很好,因为分隔符本身如果用于传输,那么必须加以区分。因此,下面一种协议较为常用
例如,假设一个中文字符长度为 3,按照上述协议的规则,发送信息方式如下,就不会被接收方弄错意思了
小故事
很久很久以前,一位私塾先生到一家任教。双方签订了一纸协议:“无鸡鸭亦可无鱼肉亦可白菜豆腐不可少不得束修金”。此后,私塾先生虽然认真教课,但主人家则总是给私塾先生以白菜豆腐为菜,丝毫未见鸡鸭鱼肉的款待。私塾先生先是很不解,可是后来也就想通了:主人把鸡鸭鱼肉的钱都会换为束修金的,也罢。至此双方相安无事。
年关将至,一个学年段亦告结束。私塾先生临行时,也不见主人家为他交付束修金,遂与主家理论。然主家亦振振有词:“有协议为证——无鸡鸭亦可,无鱼肉亦可,白菜豆腐不可少,不得束修金。这白纸黑字明摆着的,你有什么要说的呢?”
私塾先生据理力争:“协议是这样的——无鸡,鸭亦可;无鱼,肉亦可;白菜豆腐不可,少不得束修金。”
双方唇枪舌战,你来我往,真个是不亦乐乎!
这里的束修金,也作“束脩”,应当是泛指教师应当得到的报酬
2.2 redis 协议举例 先发送*N,代表该指令N个参数;然后依次发送每个参数,$M,代表该参数M个字符,以上每个字符长度以及参数之间都使用回车换行进行隔开。
1 2 3 4 5 6 7 8 9 10 11 12 13 14 15 16 17 18 19 20 21 22 23 24 25 26 27 28 29 30 31 32 33 34 35 36 37 38 39 40 41 42 43 44 45 46 47 48 49 50 51 52 53 54 55 56 57 58 59 60 61 62 63 64 65 NioEventLoopGroup worker = new NioEventLoopGroup();byte [] LINE = {13 , 10 };try {new Bootstrap();new ChannelInitializer<SocketChannel>() {@Override protected void initChannel (SocketChannel ch) new LoggingHandler());new ChannelInboundHandlerAdapter() {@Override public void channelActive (ChannelHandlerContext ctx) private void get (ChannelHandlerContext ctx) "*2" .getBytes());"$3" .getBytes());"get" .getBytes());"$3" .getBytes());"aaa" .getBytes());private void set (ChannelHandlerContext ctx) "*3" .getBytes());"$3" .getBytes());"set" .getBytes());"$3" .getBytes());"aaa" .getBytes());"$3" .getBytes());"bbb" .getBytes());@Override public void channelRead (ChannelHandlerContext ctx, Object msg) throws Exception "localhost" , 6379 ).sync(); catch (InterruptedException e) {"client error" , e);finally {
2.3 http 协议举例 Netty已经实现好了Redis、HTTP等等协议,可以直接使用。
1 2 3 4 5 6 7 8 9 10 11 12 13 14 15 16 17 18 19 20 21 22 23 24 25 26 27 28 29 30 31 32 33 34 35 36 37 38 39 40 41 42 43 44 45 46 47 48 49 50 51 52 53 54 NioEventLoopGroup boss = new NioEventLoopGroup();new NioEventLoopGroup();try {new ServerBootstrap();new ChannelInitializer<SocketChannel>() {@Override protected void initChannel (SocketChannel ch) throws Exception new LoggingHandler(LogLevel.DEBUG));new HttpServerCodec()); new SimpleChannelInboundHandler<HttpRequest>() { @Override protected void channelRead0 (ChannelHandlerContext ctx, HttpRequest msg) throws Exception new DefaultFullHttpResponse(msg.protocolVersion(), HttpResponseStatus.OK);byte [] bytes = "<h1>Hello, world!</h1>" .getBytes();8080 ).sync();catch (InterruptedException e) {"server error" , e);finally {
2.4 自定义协议要素
魔数,用来在第一时间判定是否是无效数据包
版本号,可以支持协议的升级
序列化算法,消息正文到底采用哪种序列化反序列化方式,可以由此扩展,例如:json、protobuf、hessian、jdk
指令类型,是登录、注册、单聊、群聊… 跟业务相关
请求序号,为了双工通信,提供异步能力
正文长度
消息正文
编解码器 根据上面的要素,设计一个登录请求消息和登录响应消息,并使用 Netty 完成收发
1 2 3 4 5 6 7 8 9 10 11 12 13 14 15 16 17 18 19 20 21 22 23 24 25 26 27 28 29 30 31 32 33 34 35 36 37 38 39 40 41 42 43 44 45 46 @Slf4j public class MessageCodec extends ByteToMessageCodec <Message > @Override protected void encode (ChannelHandlerContext ctx, Message msg, ByteBuf out) throws Exception new byte []{1 , 2 , 3 , 4 });1 );0 );0xff );new ByteArrayOutputStream();new ObjectOutputStream(bos);byte [] bytes = bos.toByteArray();@Override protected void decode (ChannelHandlerContext ctx, ByteBuf in, List<Object> out) throws Exception int magicNum = in.readInt();byte version = in.readByte();byte serializerType = in.readByte();byte messageType = in.readByte();int sequenceId = in.readInt();int length = in.readInt();byte [] bytes = new byte [length];0 , length);new ObjectInputStream(new ByteArrayInputStream(bytes));"{}, {}, {}, {}, {}, {}" , magicNum, version, serializerType, messageType, sequenceId, length);"{}" , message);
测试
1 2 3 4 5 6 7 8 9 10 11 12 13 14 15 16 17 18 19 20 EmbeddedChannel channel = new EmbeddedChannel(new LoggingHandler(),new LengthFieldBasedFrameDecoder(1024 , 12 , 4 , 0 , 0 ), new MessageCodec()new LoginRequestMessage("zhangsan" , "123" , "张三" );new MessageCodec().encode(null , message, buf);0 , 100 );100 , buf.readableBytes() - 100 );
解读
💡 什么时候可以加 @Sharable 可不可以创建一个Handler,将来添加到多个Channel里面,被多个Channel共享。
对于Netty中的Handler,能不能被多个Channel共享,主要看该类有没有加@Sharable注解,如果加了@Sharable注解说明,可以被多个Channel共享,比如Netty中的LoggingHandler类。
当 handler 不保存状态时,就可以安全地在多线程下被共享
但要注意对于编解码器类,不能继承 ByteToMessageCodec 或 CombinedChannelDuplexHandler 父类,他们的构造方法对 @Sharable 有限制。因为ByteToMessageCodec设计之初,考虑到它的子类要保存上一次触发的状态,所以强制规定,它的子类不可以加@Sharable注解(**ByteToMessageCodec抽象类的构造器,利用反射检查,当前对象的运行类型是否加上了@Sharable注解,如果加上了,那么抛出异常*,在 抽象类中 可以有构造方法,只是不能直接创建 抽象类的实例对象,但实例化子类的时候,就会初始化父类,不管父类是不是 抽象类*都会调用父类的构造方法)。
如果能确保编解码器不会保存状态,可以继承 MessageToMessageCodec类
1 2 3 4 5 6 7 8 9 10 11 12 13 14 15 16 17 18 19 20 21 22 23 24 25 26 27 28 29 30 31 32 33 34 35 36 37 38 39 40 41 42 43 44 45 46 47 48 49 50 51 @Slf4j @ChannelHandler .Sharablepublic class MessageCodecSharable extends MessageToMessageCodec <ByteBuf , Message > @Override protected void encode (ChannelHandlerContext ctx, Message msg, List<Object> outList) throws Exception new byte []{1 , 2 , 3 , 4 });1 );0 );0xff );new ByteArrayOutputStream();new ObjectOutputStream(bos);byte [] bytes = bos.toByteArray();@Override protected void decode (ChannelHandlerContext ctx, ByteBuf in, List<Object> out) throws Exception int magicNum = in.readInt();byte version = in.readByte();byte serializerType = in.readByte();byte messageType = in.readByte();int sequenceId = in.readInt();int length = in.readInt();byte [] bytes = new byte [length];0 , length);new ObjectInputStream(new ByteArrayInputStream(bytes));"{}, {}, {}, {}, {}, {}" , magicNum, version, serializerType, messageType, sequenceId, length);"{}" , message);
3. 聊天室案例 3.1 聊天室业务介绍 1 2 3 4 5 6 7 8 9 10 11 12 13 public interface UserService boolean login (String username, String password)
1 2 3 4 5 6 7 8 9 10 11 12 13 14 15 16 17 18 19 20 21 22 23 24 25 26 27 28 29 30 31 32 33 34 35 36 37 38 39 40 41 public interface Session void bind (Channel channel, String username) void unbind (Channel channel) Object getAttribute (Channel channel, String name) ;void setAttribute (Channel channel, String name, Object value) Channel getChannel (String username) ;
1 2 3 4 5 6 7 8 9 10 11 12 13 14 15 16 17 18 19 20 21 22 23 24 25 26 27 28 29 30 31 32 33 34 35 36 37 38 39 40 41 42 43 44 45 46 47 48 49 50 public interface GroupSession Group createGroup (String name, Set<String> members) ;Group joinMember (String name, String member) ;Group removeMember (String name, String member) ;Group removeGroup (String name) ;Set<String> getMembers (String name) ;List<Channel> getMembersChannel (String name) ;
3.2 聊天室业务-登录 SimpleChannelInboundHandler<LoginRequestMessage>SimpleChannelInboundHandler<LoginRequestMessage>意思是只有泛型类型LoginRequestMessage消息类型才会触发该Handler。
1 2 3 4 5 6 7 8 9 10 11 12 13 14 15 16 17 18 19 20 21 22 23 24 25 26 27 28 29 30 31 32 33 34 35 36 37 38 39 40 41 42 43 44 45 @Slf4j public class ChatServer public static void main (String[] args) new NioEventLoopGroup();new NioEventLoopGroup();new LoggingHandler(LogLevel.DEBUG);new MessageCodecSharable();try {new ServerBootstrap();new ChannelInitializer<SocketChannel>() {@Override protected void initChannel (SocketChannel ch) throws Exception new ProcotolFrameDecoder());new SimpleChannelInboundHandler<LoginRequestMessage>() {@Override protected void channelRead0 (ChannelHandlerContext ctx, LoginRequestMessage msg) throws Exception boolean login = UserServiceFactory.getUserService().login(username, password);if (login) {new LoginResponseMessage(true , "登录成功" );else {new LoginResponseMessage(false , "用户名或密码不正确" );8080 ).sync().channel();catch (InterruptedException e) {"server error" , e);finally {
1 2 3 4 5 6 7 8 9 10 11 12 13 14 15 16 17 18 19 20 21 22 23 24 25 26 27 28 29 30 31 32 33 34 35 36 37 38 39 40 41 42 43 44 45 46 47 48 49 50 51 52 53 54 55 56 57 58 59 60 61 62 63 64 65 66 67 68 69 70 71 72 73 74 75 76 77 78 79 80 81 82 83 84 85 86 87 88 89 90 91 92 93 94 95 96 97 98 99 100 101 102 103 104 105 106 107 108 109 110 111 @Slf4j public class ChatClient public static void main (String[] args) new NioEventLoopGroup();new LoggingHandler(LogLevel.DEBUG);new MessageCodecSharable();new CountDownLatch(1 );new AtomicBoolean(false );try {new Bootstrap();new ChannelInitializer<SocketChannel>() {@Override protected void initChannel (SocketChannel ch) throws Exception new ProcotolFrameDecoder());"client handler" , new ChannelInboundHandlerAdapter() {@Override public void channelRead (ChannelHandlerContext ctx, Object msg) throws Exception "msg: {}" , msg);if ((msg instanceof LoginResponseMessage)) {if (response.isSuccess()) {true );@Override public void channelActive (ChannelHandlerContext ctx) throws Exception new Thread(() -> {new Scanner(System.in);"请输入用户名:" );"请输入密码:" );new LoginRequestMessage(username, password);"等待后续操作..." );try {catch (InterruptedException e) {if (!LOGIN.get()) {return ;while (true ) {"==================================" );"send [username] [content]" );"gsend [group name] [content]" );"gcreate [group name] [m1,m2,m3...]" );"gmembers [group name]" );"gjoin [group name]" );"gquit [group name]" );"quit" );"==================================" );" " );switch (s[0 ]){case "send" :new ChatRequestMessage(username, s[1 ], s[2 ]));break ;case "gsend" :new GroupChatRequestMessage(username, s[1 ], s[2 ]));break ;case "gcreate" :new HashSet<>(Arrays.asList(s[2 ].split("," )));new GroupCreateRequestMessage(s[1 ], set));break ;case "gmembers" :new GroupMembersRequestMessage(s[1 ]));break ;case "gjoin" :new GroupJoinRequestMessage(username, s[1 ]));break ;case "gquit" :new GroupQuitRequestMessage(username, s[1 ]));break ;case "quit" :return ;"system in" ).start();"localhost" , 8080 ).sync().channel();catch (Exception e) {"client error" , e);finally {
3.3 聊天室业务-单聊 服务器端将 handler 独立出来
登录 handler
1 2 3 4 5 6 7 8 9 10 11 12 13 14 15 16 17 @ChannelHandler .Sharablepublic class LoginRequestMessageHandler extends SimpleChannelInboundHandler <LoginRequestMessage > @Override protected void channelRead0 (ChannelHandlerContext ctx, LoginRequestMessage msg) throws Exception boolean login = UserServiceFactory.getUserService().login(username, password);if (login) {new LoginResponseMessage(true , "登录成功" );else {new LoginResponseMessage(false , "用户名或密码不正确" );
单聊 handler
1 2 3 4 5 6 7 8 9 10 11 12 13 14 15 16 @ChannelHandler .Sharablepublic class ChatRequestMessageHandler extends SimpleChannelInboundHandler <ChatRequestMessage > @Override protected void channelRead0 (ChannelHandlerContext ctx, ChatRequestMessage msg) throws Exception if (channel != null ) {new ChatResponseMessage(msg.getFrom(), msg.getContent()));else {new ChatResponseMessage(false , "对方用户不存在或者不在线" ));
3.4 聊天室业务-群聊 创建群聊
1 2 3 4 5 6 7 8 9 10 11 12 13 14 15 16 17 18 19 20 21 22 @ChannelHandler .Sharablepublic class GroupCreateRequestMessageHandler extends SimpleChannelInboundHandler <GroupCreateRequestMessage > @Override protected void channelRead0 (ChannelHandlerContext ctx, GroupCreateRequestMessage msg) throws Exception if (group == null ) {new GroupCreateResponseMessage(true , groupName + "创建成功" ));for (Channel channel : channels) {new GroupCreateResponseMessage(true , "您已被拉入" + groupName));else {new GroupCreateResponseMessage(false , groupName + "已经存在" ));
群聊
1 2 3 4 5 6 7 8 9 10 11 12 @ChannelHandler .Sharablepublic class GroupChatRequestMessageHandler extends SimpleChannelInboundHandler <GroupChatRequestMessage > @Override protected void channelRead0 (ChannelHandlerContext ctx, GroupChatRequestMessage msg) throws Exception for (Channel channel : channels) {new GroupChatResponseMessage(msg.getFrom(), msg.getContent()));
加入群聊
1 2 3 4 5 6 7 8 9 10 11 12 @ChannelHandler .Sharablepublic class GroupJoinRequestMessageHandler extends SimpleChannelInboundHandler <GroupJoinRequestMessage > @Override protected void channelRead0 (ChannelHandlerContext ctx, GroupJoinRequestMessage msg) throws Exception if (group != null ) {new GroupJoinResponseMessage(true , msg.getGroupName() + "群加入成功" ));else {new GroupJoinResponseMessage(true , msg.getGroupName() + "群不存在" ));
退出群聊
1 2 3 4 5 6 7 8 9 10 11 12 @ChannelHandler .Sharablepublic class GroupQuitRequestMessageHandler extends SimpleChannelInboundHandler <GroupQuitRequestMessage > @Override protected void channelRead0 (ChannelHandlerContext ctx, GroupQuitRequestMessage msg) throws Exception if (group != null ) {new GroupJoinResponseMessage(true , "已退出群" + msg.getGroupName()));else {new GroupJoinResponseMessage(true , msg.getGroupName() + "群不存在" ));
查看成员
1 2 3 4 5 6 7 8 9 @ChannelHandler .Sharablepublic class GroupMembersRequestMessageHandler extends SimpleChannelInboundHandler <GroupMembersRequestMessage > @Override protected void channelRead0 (ChannelHandlerContext ctx, GroupMembersRequestMessage msg) throws Exception new GroupMembersResponseMessage(members));
3.5 聊天室业务-退出 1 2 3 4 5 6 7 8 9 10 11 12 13 14 15 16 17 18 @Slf4j @ChannelHandler .Sharablepublic class QuitHandler extends ChannelInboundHandlerAdapter @Override public void channelInactive (ChannelHandlerContext ctx) throws Exception "{} 已经断开" , ctx.channel());@Override public void exceptionCaught (ChannelHandlerContext ctx, Throwable cause) throws Exception "{} 已经异常断开 异常是{}" , ctx.channel(), cause.getMessage());
3.6 聊天室业务-空闲检测 连接假死 原因
网络设备出现故障,例如网卡,机房等,底层的 TCP 连接已经断开了,但应用程序没有感知到,仍然占用着资源。
公网网络不稳定,出现丢包。如果连续出现丢包,这时现象就是客户端数据发不出去,服务端也一直收不到数据,就这么一直耗着
应用程序线程阻塞,无法进行数据读写
问题
假死的连接占用的资源不能自动释放
向假死的连接发送数据,得到的反馈是发送超时
服务器端解决
怎么判断客户端连接是否假死呢?如果能收到客户端数据,说明没有假死。因此策略就可以定为,每隔一段时间就检查这段时间内是否接收到客户端数据,没有就可以判定为连接假死
IdleStateHandler空闲状态处理器用来判断是不是 读空闲时间过长,或 写空闲时间过长。根据IdleStateHandler的构造器来指定检测读或者写事件是否空闲时间过长。
IdleStateHandler构造器的三个参数如下:
Property
Meaning
readerIdleTime
an [IdleStateEvent](dfile:///Users/jiayonggang/Library/Application Support/Dash/User Contributed/Netty/Netty5.docset/Contents/Resources/Documents/io/netty/handler/timeout/IdleStateEvent.html) whose state is [IdleState.READER_IDLE](dfile:///Users/jiayonggang/Library/Application Support/Dash/User Contributed/Netty/Netty5.docset/Contents/Resources/Documents/io/netty/handler/timeout/IdleState.html#READER_IDLE) will be triggered when no read was performed for the specified period of time. Specify 0 to disable.
writerIdleTime
an [IdleStateEvent](dfile:///Users/jiayonggang/Library/Application Support/Dash/User Contributed/Netty/Netty5.docset/Contents/Resources/Documents/io/netty/handler/timeout/IdleStateEvent.html) whose state is [IdleState.WRITER_IDLE](dfile:///Users/jiayonggang/Library/Application Support/Dash/User Contributed/Netty/Netty5.docset/Contents/Resources/Documents/io/netty/handler/timeout/IdleState.html#WRITER_IDLE) will be triggered when no write was performed for the specified period of time. Specify 0 to disable.
allIdleTime
an [IdleStateEvent](dfile:///Users/jiayonggang/Library/Application Support/Dash/User Contributed/Netty/Netty5.docset/Contents/Resources/Documents/io/netty/handler/timeout/IdleStateEvent.html) whose state is [IdleState.ALL_IDLE](dfile:///Users/jiayonggang/Library/Application Support/Dash/User Contributed/Netty/Netty5.docset/Contents/Resources/Documents/io/netty/handler/timeout/IdleState.html#ALL_IDLE) will be triggered when neither read nor write was performed for the specified period of time. Specify 0 to disable.
ChannelDuplexHandler双工处理器ChannelDuplexHandler双工处理器可以同时作为入站和出站处理器
1 2 3 4 5 6 7 8 9 10 11 12 13 14 15 16 new IdleStateHandler(5 , 0 , 0 ));new ChannelDuplexHandler() {@Override public void userEventTriggered (ChannelHandlerContext ctx, Object evt) throws Exceptionif (event.state() == IdleState.READER_IDLE) {"已经 5s 没有读到数据了" );
客户端定时心跳
客户端可以定时向服务器端发送数据,只要这个时间间隔小于服务器定义的空闲检测的时间间隔,那么就能防止前面提到的误判,客户端可以定义如下心跳处理器
1 2 3 4 5 6 7 8 9 10 11 12 13 14 15 16 new IdleStateHandler(0 , 3 , 0 ));new ChannelDuplexHandler() {@Override public void userEventTriggered (ChannelHandlerContext ctx, Object evt) throws Exceptionif (event.state() == IdleState.WRITER_IDLE) {new PingMessage());
四. 优化与源码 1. 优化 1.1 扩展序列化算法 序列化,反序列化主要用在消息正文的转换上
序列化时,需要将 Java 对象变为要传输的数据(可以是 byte[],或 json 等,最终都需要变成 byte[])
反序列化时,需要将传入的正文数据还原成 Java 对象,便于处理
目前的代码仅支持 Java 自带的序列化,反序列化机制,核心代码如下
1 2 3 4 5 6 7 8 9 10 11 byte [] body = new byte [bodyLength];new ObjectInputStream(new ByteArrayInputStream(body));new ByteArrayOutputStream();new ObjectOutputStream(out).writeObject(message);byte [] bytes = out.toByteArray();
为了支持更多序列化算法,抽象一个 Serializer 接口
1 2 3 4 5 6 7 8 9 public interface Serializer T deserialize (Class<T> clazz, byte [] bytes) ;byte [] serialize(T object);
提供两个实现,我这里直接将实现加入了枚举类 Serializer.Algorithm 中
1 2 3 4 5 6 7 8 9 10 11 12 13 14 15 16 17 18 19 20 21 22 23 24 25 26 27 28 29 30 31 32 33 34 35 36 37 38 39 40 41 42 43 44 45 46 47 48 enum SerializerAlgorithm implements Serializer @Override public <T> T deserialize (Class<T> clazz, byte [] bytes) {try {new ObjectInputStream(new ByteArrayInputStream(bytes));return (T) object;catch (IOException | ClassNotFoundException e) {throw new RuntimeException("SerializerAlgorithm.Java 反序列化错误" , e);@Override public <T> byte [] serialize(T object) {try {new ByteArrayOutputStream();new ObjectOutputStream(out).writeObject(object);return out.toByteArray();catch (IOException e) {throw new RuntimeException("SerializerAlgorithm.Java 序列化错误" , e);@Override public <T> T deserialize (Class<T> clazz, byte [] bytes) {return new Gson().fromJson(new String(bytes, StandardCharsets.UTF_8), clazz);@Override public <T> byte [] serialize(T object) {return new Gson().toJson(object).getBytes(StandardCharsets.UTF_8);public static SerializerAlgorithm getByInt (int type) if (type < 0 || type > array.length - 1 ) {throw new IllegalArgumentException("超过 SerializerAlgorithm 范围" );return array[type];
增加配置类和配置文件
1 2 3 4 5 6 7 8 9 10 11 12 13 14 15 16 17 18 19 20 21 22 23 24 25 26 27 public abstract class Config static Properties properties;static {try (InputStream in = Config.class.getResourceAsStream("/application.properties" )) {new Properties();catch (IOException e) {throw new ExceptionInInitializerError(e);public static int getServerPort () "server.port" );if (value == null ) {return 8080 ;else {return Integer.parseInt(value);public static Serializer.Algorithm getSerializerAlgorithm () {"serializer.algorithm" );if (value == null ) {return Serializer.Algorithm.Java;else {return Serializer.Algorithm.valueOf(value);
配置文件
1 serializer.algorithm =Json
修改编解码器
1 2 3 4 5 6 7 8 9 10 11 12 13 14 15 16 17 18 19 20 21 22 23 24 25 26 27 28 29 30 31 32 33 34 35 36 37 38 39 40 41 42 43 44 45 46 47 48 49 50 public class MessageCodecSharable extends MessageToMessageCodec <ByteBuf , Message > @Override public void encode (ChannelHandlerContext ctx, Message msg, List<Object> outList) throws Exception new byte []{1 , 2 , 3 , 4 });1 );0xff );byte [] bytes = Config.getSerializerAlgorithm().serialize(msg);@Override protected void decode (ChannelHandlerContext ctx, ByteBuf in, List<Object> out) throws Exception int magicNum = in.readInt();byte version = in.readByte();byte serializerAlgorithm = in.readByte(); byte messageType = in.readByte(); int sequenceId = in.readInt();int length = in.readInt();byte [] bytes = new byte [length];0 , length);
其中确定具体消息类型,可以根据 消息类型字节 获取到对应的 消息 class
1 2 3 4 5 6 7 8 9 10 11 12 13 14 15 16 17 18 19 20 21 22 23 24 25 26 27 28 29 30 31 32 33 34 35 36 37 38 39 40 41 42 43 44 45 46 47 48 49 50 51 52 53 @Data public abstract class Message implements Serializable public static Class<? extends Message> getMessageClass(int messageType) {return messageClasses.get(messageType);private int sequenceId;private int messageType;public abstract int getMessageType () public static final int LoginRequestMessage = 0 ;public static final int LoginResponseMessage = 1 ;public static final int ChatRequestMessage = 2 ;public static final int ChatResponseMessage = 3 ;public static final int GroupCreateRequestMessage = 4 ;public static final int GroupCreateResponseMessage = 5 ;public static final int GroupJoinRequestMessage = 6 ;public static final int GroupJoinResponseMessage = 7 ;public static final int GroupQuitRequestMessage = 8 ;public static final int GroupQuitResponseMessage = 9 ;public static final int GroupChatRequestMessage = 10 ;public static final int GroupChatResponseMessage = 11 ;public static final int GroupMembersRequestMessage = 12 ;public static final int GroupMembersResponseMessage = 13 ;public static final int PingMessage = 14 ;public static final int PongMessage = 15 ;private static final Map<Integer, Class<? extends Message>> messageClasses = new HashMap<>();static {
1.2 参数调优
new ServerBootstrap().option() //是给 ServerSocketChannel 配置参数
new ServerBootstrap().childOption()) //给 SocketChannet配置参数
new Bootstrap().option()方法给SocketChannel配置参数
1)CONNECT_TIMEOUT_MILLIS
1 2 3 4 5 6 7 8 9 10 11 12 13 14 15 16 17 18 19 20 @Slf4j public class TestConnectionTimeout public static void main (String[] args) new NioEventLoopGroup();try {new Bootstrap()300 )new LoggingHandler());"127.0.0.1" , 8080 );catch (Exception e) {"timeout" );finally {
可以故意不开服务器,使得客户端连接超时。
另外源码部分 io.netty.channel.nio.AbstractNioChannel.AbstractNioUnsafe#connect。在NioEventLoop线程里面设置定时任务,如果连接超时,该定时任务向Promise提交连接超时异常,主线程通过Promise对象异步收到异常对象,catch住该异常对象。
1 2 3 4 5 6 7 8 9 10 11 12 13 14 15 16 17 18 19 20 21 @Override public final void connect ( final SocketAddress remoteAddress, final SocketAddress localAddress, final ChannelPromise promise) int connectTimeoutMillis = config().getConnectTimeoutMillis();if (connectTimeoutMillis > 0 ) {new Runnable() {@Override public void run () this .connectPromise;new ConnectTimeoutException("connection timed out: " + remoteAddress); if (connectPromise != null && connectPromise.tryFailure(cause)) {
2)SO_BACKLOG
属于 ServerSocketChannal 参数
sequenceDiagram
participant c as client
participant s as server
participant sq as syns queue
participant aq as accept queue
s ->> s : bind()
s ->> s : listen()
c ->> c : connect()
c ->> s : 1. SYN
Note left of c : SYN_SEND
s ->> sq : put
Note right of s : SYN_RCVD
s ->> c : 2. SYN + ACK
Note left of c : ESTABLISHED
c ->> s : 3. ACK
sq ->> aq : put
Note right of s : ESTABLISHED
aq -->> s :
s ->> s : accept()
第一次握手,client 发送 SYN 到 server,状态修改为 SYN_SEND,server 收到,状态改变为 SYN_REVD,并将该请求放入 sync queue 队列
第二次握手,server 回复 SYN + ACK 给 client,client 收到,状态改变为 ESTABLISHED,并发送 ACK 给 server
第三次握手,server 收到 ACK,状态改变为 ESTABLISHED,将该请求从 sync queue 放入 accept queue
其中
1 2 3 4 import java.nio.channels.ServerSocketChannel;
可以通过 option(ChannelOption.SO_BACKLOG, 值) 来设置大小,由于Netty的NioEventLoop处理连接请求的能力很强,accept队列一有请求就被处理了,所以需要将断点设置到accept队列出队那个函数上,让其阻塞,使得accept队列一直只进不出。
课堂调试关键断点为:io.netty.channel.nio.NioEventLoop#processSelectedKey
可以通过下面源码查看默认大小
1 2 3 4 5 6 public class DefaultServerSocketChannelConfig extends DefaultChannelConfig implements ServerSocketChannelConfig {private volatile int backlog = NetUtil.SOMAXCONN;
bio 中更容易说明,不用 debug 模式
1 2 3 4 5 6 7 8 public class Server public static void main (String[] args) throws IOException new ServerSocket(8888 , 2 );
客户端启动 4 个
1 2 3 4 5 6 7 8 9 10 11 12 13 14 15 public class Client public static void main (String[] args) throws IOException try {new Socket();new Date()+" connecting..." );new InetSocketAddress("localhost" , 8888 ),1000 );new Date()+" connected..." );1 );catch (IOException e) {new Date()+" connecting timeout..." );
第 1,2,3 个客户端都打印,但除了第一个处于 accpet 外,其它两个都处于 accept queue 中
1 2 Tue Apr 21 20 :30 :28 CST 2020 connecting...21 20 :30 :28 CST 2020 connected...
第 4 个客户端连接时
1 2 3 Tue Apr 21 20 :53 :58 CST 2020 connecting...Tue Apr 21 20 :53 :59 CST 2020 connecting timeout...java .net.SocketTimeoutException: connect timed out
3)ulimit -n Linux命令
属于操作系统参数,在LInux中限制每个进程打开的最大文件描述符(FD)
4)TCP_NODELAY
属于 SocketChannal 参数,Netty默认TCP_NODELAY = false,默认是开始TCP的nagle算法的。但是这里建议把TCP_NODELAY = true,因为可能有一些小数据包,不建议打开TCP的nagle算法。
5)SO_SNDBUF & SO_RCVBUF
SO_SNDBUF 属于 SocketChannal 参数,发送缓冲区。
SO_RCVBUF 既可用于 SocketChannal 参数,也可以用于 ServerSocketChannal 参数(建议设置到 ServerSocketChannal 上),接收缓冲区。
操作系统实现的TCP流量控制和拥塞控制机制会自动控制这两个参数,故而不建议程序员手动设置这两个参数。
6)ALLOCATOR
属于 SocketChannal 参数
用来分配 ByteBuf, ctx.alloc()方法返回ALLOCATOR分配器对象,该对象在调用buffer()方法即可分配ByteBuf对象,在MacOS下,默认分配直接内存的池化ByteBuf对象。通过阅读源码发现在ByteBufUtil.java中使用系统变量io.netty.allocator.type决定分配池化还是非池化ByteBuf对象,可以通过在IDEA中对ByteBufUtil.java的虚拟机参数增加-Dio.netty.allocator.type=unpooled来指定分配池化还是非池化ByteBuf对象。通过阅读源码发现在PlatformDependent.java中使用系统变量io.netty.noPerferDirect决定分配直接内存还是堆内存ByteBuf对象,可以通过在IDEA中对PlatformDependent.java的虚拟机参数增加-Dio.netty.noPerferDirect=true来指定分配直接内存还是堆内存ByteBuf对象。
7)RCVBUF_ALLOCATOR
属于 SocketChannal 参数
控制 netty 接收缓冲区大小
负责入站数据的分配,决定入站缓冲区的大小(并可动态调整),统一采用 direct 直接内存(因为对于IO操作,使用直接内存ByteBuf可以减少数据的复制次数已经内核态和用户态的切换次数,所以netty强制对于IO操作接收缓冲区使用直接内存ByteBuf ),具体池化还是非池化由 ALLOCATOR 决定,即通过阅读源码发现在ByteBufUtil.java中使用系统变量io.netty.allocator.type决定分配池化还是非池化ByteBuf对象,可以通过在IDEA中对ByteBufUtil.java的虚拟机参数增加-Dio.netty.allocator.type=unpooled来指定分配池化还是非池化ByteBuf对象。
AbstractNioByteChannel.java源码如下:
1.3 RPC 框架 1)准备工作 这些代码可以认为是现成的,无需从头编写练习
为了简化起见,在原来聊天项目的基础上新增 Rpc 请求和响应消息
1 2 3 4 5 6 7 8 9 10 11 12 13 14 15 @Data public abstract class Message implements Serializable public static final int RPC_MESSAGE_TYPE_REQUEST = 101 ;public static final int RPC_MESSAGE_TYPE_RESPONSE = 102 ;static {
请求消息
1 2 3 4 5 6 7 8 9 10 11 12 13 14 15 16 17 18 19 20 21 22 23 24 25 26 27 28 29 30 31 32 33 34 35 36 37 38 39 @Getter @ToString(callSuper = true) public class RpcRequestMessage extends Message private String interfaceName;private String methodName;private Class<?> returnType;private Class[] parameterTypes;private Object[] parameterValue;public RpcRequestMessage (int sequenceId, String interfaceName, String methodName, Class<?> returnType, Class[] parameterTypes, Object[] parameterValue) super .setSequenceId(sequenceId);this .interfaceName = interfaceName;this .methodName = methodName;this .returnType = returnType;this .parameterTypes = parameterTypes;this .parameterValue = parameterValue;@Override public int getMessageType () return RPC_MESSAGE_TYPE_REQUEST;
响应消息
1 2 3 4 5 6 7 8 9 10 11 12 13 14 15 16 17 @Data @ToString(callSuper = true) public class RpcResponseMessage extends Message private Object returnValue;private Exception exceptionValue;@Override public int getMessageType () return RPC_MESSAGE_TYPE_RESPONSE;
服务器架子
1 2 3 4 5 6 7 8 9 10 11 12 13 14 15 16 17 18 19 20 21 22 23 24 25 26 27 28 29 30 31 32 33 @Slf4j public class RpcServer public static void main (String[] args) new NioEventLoopGroup();new NioEventLoopGroup();new LoggingHandler(LogLevel.DEBUG);new MessageCodecSharable();new RpcRequestMessageHandler();try {new ServerBootstrap();new ChannelInitializer<SocketChannel>() {@Override protected void initChannel (SocketChannel ch) throws Exception new ProcotolFrameDecoder());8080 ).sync().channel();catch (InterruptedException e) {"server error" , e);finally {
客户端架子
1 2 3 4 5 6 7 8 9 10 11 12 13 14 15 16 17 18 19 20 21 22 23 24 25 26 27 28 29 30 public class RpcClient public static void main (String[] args) new NioEventLoopGroup();new LoggingHandler(LogLevel.DEBUG);new MessageCodecSharable();new RpcResponseMessageHandler();try {new Bootstrap();new ChannelInitializer<SocketChannel>() {@Override protected void initChannel (SocketChannel ch) throws Exception new ProcotolFrameDecoder());"localhost" , 8080 ).sync().channel();catch (Exception e) {"client error" , e);finally {
服务器端的 service 获取
1 2 3 4 5 6 7 8 9 10 11 12 13 14 15 16 17 18 19 20 21 22 23 24 25 26 public class ServicesFactory static Properties properties;static Map<Class<?>, Object> map = new ConcurrentHashMap<>();static {try (InputStream in = Config.class.getResourceAsStream("/application.properties" )) {new Properties();for (String name : names) {if (name.endsWith("Service" )) {catch (IOException | ClassNotFoundException | InstantiationException | IllegalAccessException e) {throw new ExceptionInInitializerError(e);public static <T> T getService (Class<T> interfaceClass) {return (T) map.get(interfaceClass);
相关配置 application.properties
1 2 serializer.algorithm=Json.itcast .server .service .HelloService=cn.itcast .server .service .HelloServiceImpl
2)服务器 handler 1 2 3 4 5 6 7 8 9 10 11 12 13 14 15 16 17 18 19 20 21 22 23 24 25 26 27 28 29 @Slf4j @ChannelHandler .Sharablepublic class RpcRequestMessageHandler extends SimpleChannelInboundHandler <RpcRequestMessage > @Override protected void channelRead0 (ChannelHandlerContext ctx, RpcRequestMessage message) new RpcResponseMessage();try {catch (Exception e) {
3)客户端代码第一版 只发消息
1 2 3 4 5 6 7 8 9 10 11 12 13 14 15 16 17 18 19 20 21 22 23 24 25 26 27 28 29 30 31 32 33 34 35 36 37 38 39 40 41 42 43 44 @Slf4j public class RpcClient public static void main (String[] args) new NioEventLoopGroup();new LoggingHandler(LogLevel.DEBUG);new MessageCodecSharable();new RpcResponseMessageHandler();try {new Bootstrap();new ChannelInitializer<SocketChannel>() {@Override protected void initChannel (SocketChannel ch) throws Exception new ProcotolFrameDecoder());"localhost" , 8080 ).sync().channel();new RpcRequestMessage(1 ,"cn.itcast.server.service.HelloService" ,"sayHello" ,new Class[]{String.class},new Object[]{"张三" }if (!promise.isSuccess()) {"error" , cause);catch (Exception e) {"client error" , e);finally {
gson不能处理Class对象 解决方式如下:
1 2 3 4 5 6 7 8 9 10 11 12 13 14 15 16 17 18 19 20 21 22 23 24 25 26 27 28 29 30 31 32 33 34 35 36 37 38 39 40 41 42 43 44 45 46 47 48 49 50 51 52 53 54 55 56 57 58 59 60 61 62 63 64 65 66 67 68 69 70 71 72 73 74 75 76 77 78 79 80 package cn.jyg.protocol;import com.google.gson.*;import java.io.*;import java.lang.reflect.Type;import java.nio.charset.StandardCharsets;public interface Serializer T deserialize (Class<T> clazz, byte [] bytes) ;byte [] serialize(T object);enum Algorithm implements Serializer @Override public <T> T deserialize (Class<T> clazz, byte [] bytes) {try {new ObjectInputStream(new ByteArrayInputStream(bytes));return (T) ois.readObject();catch (IOException | ClassNotFoundException e) {throw new RuntimeException("反序列化失败" , e);@Override public <T> byte [] serialize(T object) {try {new ByteArrayOutputStream();new ObjectOutputStream(bos);return bos.toByteArray();catch (IOException e) {throw new RuntimeException("序列化失败" , e);@Override public <T> T deserialize (Class<T> clazz, byte [] bytes) {new GsonBuilder().registerTypeAdapter(Class.class, new Serializer.ClassCodec()).create();new String(bytes, StandardCharsets.UTF_8);return gson.fromJson(json, clazz);@Override public <T> byte [] serialize(T object) {new GsonBuilder().registerTypeAdapter(Class.class, new Serializer.ClassCodec()).create();return json.getBytes(StandardCharsets.UTF_8);class ClassCodec implements JsonSerializer <Class <?>>, JsonDeserializer <Class <?>> @Override public Class<?> deserialize(JsonElement json, Type typeOfT, JsonDeserializationContext context) throws JsonParseException {try {return Class.forName(str);catch (ClassNotFoundException e) {throw new JsonParseException(e);@Override public JsonElement serialize (Class<?> src, Type typeOfSrc, JsonSerializationContext context) return new JsonPrimitive(src.getName());
4)客户端 handler 第一版 1 2 3 4 5 6 7 8 @Slf4j @ChannelHandler .Sharablepublic class RpcResponseMessageHandler extends SimpleChannelInboundHandler <RpcResponseMessage > @Override protected void channelRead0 (ChannelHandlerContext ctx, RpcResponseMessage msg) throws Exception "{}" , msg);
5)客户端代码 第二版
包括 channel 管理,代理,接收结果
1 2 3 4 5 6 7 8 9 10 11 12 13 14 15 16 17 18 19 20 21 22 23 24 25 26 27 28 29 30 31 32 33 34 35 36 37 38 39 40 41 42 43 44 45 46 47 48 49 50 51 52 53 54 55 56 57 58 59 60 61 62 63 64 65 66 67 68 69 70 71 72 73 74 75 76 77 78 79 80 81 82 83 84 85 86 87 88 89 90 91 92 93 94 95 96 @Slf4j public class RpcClientManager public static void main (String[] args) "zhangsan" ));public static <T> T getProxyService (Class<T> serviceClass) {new Class[]{serviceClass};int sequenceId = SequenceIdGenerator.nextId();new RpcRequestMessage(new DefaultPromise<>(getChannel().eventLoop());if (promise.isSuccess()) {return promise.getNow();else {throw new RuntimeException(promise.cause());return (T) o;private static volatile Channel channel = null ;private static final Object LOCK = new Object();public static Channel getChannel () if (channel != null ) {return channel;synchronized (LOCK) { if (channel != null ) { return channel;return channel;private static void initChannel () new NioEventLoopGroup();new LoggingHandler(LogLevel.DEBUG);new MessageCodecSharable();new RpcResponseMessageHandler();new Bootstrap();new ChannelInitializer<SocketChannel>() {@Override protected void initChannel (SocketChannel ch) throws Exception new ProcotolFrameDecoder());try {"localhost" , 8080 ).sync().channel();catch (Exception e) {"client error" , e);
6)客户端 handler 第二版 1 2 3 4 5 6 7 8 9 10 11 12 13 14 15 16 17 18 19 20 21 22 23 24 @Slf4j @ChannelHandler .Sharablepublic class RpcResponseMessageHandler extends SimpleChannelInboundHandler <RpcResponseMessage > public static final Map<Integer, Promise<Object>> PROMISES = new ConcurrentHashMap<>();@Override protected void channelRead0 (ChannelHandlerContext ctx, RpcResponseMessage msg) throws Exception "{}" , msg);if (promise != null ) {if (exceptionValue != null ) {else {
2. 源码分析 2.1 启动剖析 我们就来看看 netty 中对下面的代码是怎样进行处理的,理论上应该有以下7步来建立连接。
1 2 3 4 5 6 7 8 9 10 11 12 13 14 15 16 17 18 19 20 21 22 new NioServerSocketChannel();false );0 , attachment);new InetSocketAddress(8080 ));
实际上,Netty的流程图如下所示:
入口 io.netty.bootstrap.ServerBootstrap#bind
关键代码 io.netty.bootstrap.AbstractBootstrap#doBind
1 2 3 4 5 6 7 8 9 10 11 12 13 14 15 16 17 18 19 20 21 22 23 24 25 26 27 28 29 30 31 32 33 34 35 36 37 private ChannelFuture doBind (final SocketAddress localAddress) final ChannelFuture regFuture = initAndRegister();final Channel channel = regFuture.channel();if (regFuture.cause() != null ) {return regFuture;if (regFuture.isDone()) {return promise;else {final PendingRegistrationPromise promise = new PendingRegistrationPromise(channel);new ChannelFutureListener() {@Override public void operationComplete (ChannelFuture future) throws Exception if (cause != null ) {else {return promise;
关键代码 io.netty.bootstrap.AbstractBootstrap#initAndRegister
1 2 3 4 5 6 7 8 9 10 11 12 13 14 15 16 17 18 final ChannelFuture initAndRegister () null ;try {catch (Throwable t) {return new DefaultChannelPromise(new FailedChannel(), GlobalEventExecutor.INSTANCE).setFailure(t);if (regFuture.cause() != null ) {return regFuture;
关键代码 io.netty.bootstrap.ServerBootstrap#init
1 2 3 4 5 6 7 8 9 10 11 12 13 14 15 16 17 18 19 20 21 22 23 24 25 26 27 28 29 30 31 32 33 34 35 36 37 38 39 40 41 42 43 44 45 46 47 48 49 50 void init (Channel channel) throws Exception final Map<ChannelOption<?>, Object> options = options0();synchronized (options) {final Map<AttributeKey<?>, Object> attrs = attrs0();synchronized (attrs) {for (Entry<AttributeKey<?>, Object> e: attrs.entrySet()) {@SuppressWarnings("unchecked") final EventLoopGroup currentChildGroup = childGroup;final ChannelHandler currentChildHandler = childHandler;final Entry<ChannelOption<?>, Object>[] currentChildOptions;final Entry<AttributeKey<?>, Object>[] currentChildAttrs;synchronized (childOptions) {0 ));synchronized (childAttrs) {0 ));new ChannelInitializer<Channel>() {@Override public void initChannel (final Channel ch) throws Exception final ChannelPipeline pipeline = ch.pipeline();if (handler != null ) {new Runnable() {@Override public void run () new ServerBootstrapAcceptor(
关键代码 io.netty.channel.AbstractChannel.AbstractUnsafe#register
1 2 3 4 5 6 7 8 9 10 11 12 13 14 15 16 17 18 19 20 21 22 23 24 25 26 public final void register (EventLoop eventLoop, final ChannelPromise promise) this .eventLoop = eventLoop;if (eventLoop.inEventLoop()) { else {try {new Runnable() {@Override public void run () catch (Throwable t) {
io.netty.channel.AbstractChannel.AbstractUnsafe#register0
1 2 3 4 5 6 7 8 9 10 11 12 13 14 15 16 17 18 19 20 21 22 23 24 25 26 27 28 29 30 31 32 private void register0 (ChannelPromise promise) try {if (!promise.setUncancellable() || !ensureOpen(promise)) {return ;boolean firstRegistration = neverRegistered;false ;true ;if (isActive()) {if (firstRegistration) {else if (config().isAutoRead()) {catch (Throwable t) {
关键代码 io.netty.channel.ChannelInitializer#initChannel
1 2 3 4 5 6 7 8 9 10 11 12 13 14 15 16 17 18 private boolean initChannel (ChannelHandlerContext ctx) throws Exception if (initMap.add(ctx)) { try {catch (Throwable cause) {finally {if (pipeline.context(this ) != null ) {this );return true ;return false ;
关键代码 io.netty.bootstrap.AbstractBootstrap#doBind0
1 2 3 4 5 6 7 8 9 10 11 12 13 14 15 16 private static void doBind0 ( final ChannelFuture regFuture, final Channel channel, final SocketAddress localAddress, final ChannelPromise promise) new Runnable() {@Override public void run () if (regFuture.isSuccess()) {else {
关键代码 io.netty.channel.AbstractChannel.AbstractUnsafe#bind
1 2 3 4 5 6 7 8 9 10 11 12 13 14 15 16 17 18 19 20 21 22 23 24 25 26 27 28 29 30 31 32 33 34 35 36 37 public final void bind (final SocketAddress localAddress, final ChannelPromise promise) if (!promise.setUncancellable() || !ensureOpen(promise)) {return ;if (Boolean.TRUE.equals(config().getOption(ChannelOption.SO_BROADCAST)) &&instanceof InetSocketAddress &&boolean wasActive = isActive();try {catch (Throwable t) {return ;if (!wasActive && isActive()) { new Runnable() {@Override public void run ()
3.3 关键代码 io.netty.channel.socket.nio.NioServerSocketChannel#doBind
1 2 3 4 5 6 7 protected void doBind (SocketAddress localAddress) throws Exception if (PlatformDependent.javaVersion() >= 7 ) { else {
3.4 关键代码 io.netty.channel.DefaultChannelPipeline.HeadContext#channelActive
1 2 3 4 5 public void channelActive (ChannelHandlerContext ctx)
关键代码 io.netty.channel.nio.AbstractNioChannel#doBeginRead
1 2 3 4 5 6 7 8 9 10 11 12 13 14 15 protected void doBeginRead () throws Exception final SelectionKey selectionKey = this .selectionKey;if (!selectionKey.isValid()) {return ;true ;final int interestOps = selectionKey.interestOps();if ((interestOps & readInterestOp) == 0 ) {
2.2 NioEventLoop 剖析 再强调一遍:
selector 何时创建 在NioEventLoop的构造器中创建Selector对象
1.1 NioEventLoop类中 为何有两个 selector 成员? 第一个selector是成员变量unwrappedSelector,原本JDK中的selectedKeys的底层是哈希表HashSet,哈希表的遍历时间复杂度高。所以Netty进行改进了,第二selector是成员变量selector,底层的selectedKeys是数组,遍历性能好。
nio 线程在何时启动
首次调用EventLoop对象的execute方法时启动nio线程,通过NioEventLoop父类中的成员变量state状态位控制nio线程只会启动一次。
提交普通任务会不会结束 select 阻塞?
回答:会,如果提交普通任务,会使用NioEventLoop的wakeup方法唤醒被selector方法阻塞的Nio线程。
3.1 wakeup方法中的代码如何理解
1 2 3 4 5 6 7 @Override protected void wakeup (boolean inEventLoop) if (!inEventLoop && wakenUp.compareAndSet(false , true )) {
inEventLoop指的是,当前提交任务(也就是执行execute方法)的线程是否是Nio线程,只有不是Nio线程才有可能进入if块
3.2 wakenUp变量的作用是什么
因为多个 IO 线程或者提交任务线程都有可能执行 wakeup,而 Nio线程的wakeup方法 属于比较昂贵的操作,为了避免Nio线程的wakeup方法频繁被调用,所以使用了一个原子布尔对象 wakenUp,它取值为 true 时,表示该由当前线程唤醒。由于CAS操作,同一时间只允许一个线程设置成功,这样就避免了同时又多个多个线程同时提交任务,多次执行Nio线程的wakeup方法。
1 2 3 4 5 6 7 8 @Override protected void wakeup (boolean inEventLoop) if (!inEventLoop && wakenUp.compareAndSet(false , true )) {
每次循环时,什么时候会进入SelectStrategy.SELECT 分支
只有没有任务时,才会进入 SelectStrategy.SELECT。即下图中的hasTasks()方法获取是否有任务, 当没有任务时,返回SelectStrategy.SELECT,进入该分支。
当有任务时,会调用 selectNow方法,顺便拿到io事件。即下图中的selectNowSupplier调用get()方法中调用了selector.selectNow()方法获取io事件。
4.1何时会 select 阻塞,阻塞多久?
如果没有scheduleTask,那么只会最大阻塞时间就是 1s + 0.5ms,有 scheduledTask,那么最大阻塞时间就是为 下一个定时任务执行时间 - 当前时间 + 0.5ms
1 2 3 4 5 6 7 8 9 10 11 12 13 14 15 16 17 18 19 20 21 22 23 24 25 26 27 28 29 30 31 32 33 34 35 36 37 38 39 40 41 42 43 44 45 46 47 48 49 50 51 52 53 54 55 56 57 58 59 60 61 62 63 64 65 66 67 68 69 70 71 private void select (boolean oldWakenUp) throws IOException this .selector;try {int selectCnt = 0 ;long currentTimeNanos = System.nanoTime();long selectDeadLineNanos = currentTimeNanos + delayNanos(currentTimeNanos);for (;;) {long timeoutMillis = (selectDeadLineNanos - currentTimeNanos + 500000L ) / 1000000L ; if (timeoutMillis <= 0 ) {if (selectCnt == 0 ) {1 ;break ;if (hasTasks() && wakenUp.compareAndSet(false , true )) {1 ;break ;int selectedKeys = selector.select(timeoutMillis);if (selectedKeys != 0 || oldWakenUp || wakenUp.get() || hasTasks() || hasScheduledTasks()) {break ;if (Thread.interrupted()) {1 ;break ;long time = System.nanoTime();if (time - TimeUnit.MILLISECONDS.toNanos(timeoutMillis) >= currentTimeNanos) {1 ;else if (SELECTOR_AUTO_REBUILD_THRESHOLD > 0 &&1 ;break ;if (selectCnt > MIN_PREMATURE_SELECTOR_RETURNS) {catch (CancelledKeyException e) {
如果有定时任务时间到了、期间有新任务被提交了、或者有IO事件了等等,都会退出死循环。
nio空轮询 bug 在哪里体现,如何解决
注意 nio 有 bug,当 bug 出现(bug发生概率较小)时,select 方法即使没有事件发生,也不会阻塞住,导致不断空轮询,cpu 占用 100%。使用selectCnt变量计算,如果selectCnt大于设置的阈值,那么退出死循环,不要继续空轮询了。
由于JDK(linux版本)中的Nio中的Selector上有bug,所以重新创建了一个Selector对象,把原来旧的Selector对象上绑定的SelectionKeys和附件移到新的Selector对象上。
当然,Netty还有一个解决方法,就是Netty重写了Selector类,不使用JDK的Selector类。
ioRatio 控制什么,设置为 100 有何作用?
1 2 3 4 5 6 7 8 9 10 11 12 13 14 15 16 17 18 19 20 21 22 23 24 25 26 27 28 29 30 31 32 33 34 35 36 37 38 39 40 41 42 43 44 45 46 47 48 49 50 51 52 53 54 55 56 57 58 59 60 61 62 63 64 65 66 67 68 69 70 71 72 73 protected void run () for (;;) {try {try {switch (selectStrategy.calculateStrategy(selectNowSupplier, hasTasks())) {case SelectStrategy.CONTINUE:continue ;case SelectStrategy.BUSY_WAIT:case SelectStrategy.SELECT:boolean oldWakenUp = wakenUp.getAndSet(false );if (wakenUp.get()) {default :catch (IOException e) {continue ;0 ;false ;final int ioRatio = this .ioRatio;if (ioRatio == 100 ) {try {finally {else { final long ioStartTime = System.nanoTime();try {finally {final long ioTime = System.nanoTime() - ioStartTime;100 - ioRatio) / ioRatio); catch (Throwable t) {try {if (isShuttingDown()) {if (confirmShutdown()) {return ;catch (Throwable t) {
如果有任务,那么会跳出switch-case块,但是为了防止非IO任务占用大量时间,所以设计了ioratio变量,ioRatio 控制处理io事件所占用的时间比例,默认是50。
如果ioRatio设置为100,那么就是总是运行完所有非 IO 任务。
selectedKeys 优化是怎么回事?
1 2 3 4 5 6 7 8 9 private void processSelectedKeys () if (selectedKeys != null ) {else {
第一个selector是成员变量unwrappedSelector,原本JDK中的selectedKeys的底层是哈希表HashSet,哈希表的遍历时间复杂度高。所以Netty进行改进了,第二selector是成员变量selector,底层的selectedKeys是数组,遍历性能好。
在哪里区分不同事件类型
在processSelectedKey()方法中区分不同事件类型。
1 2 3 4 5 6 7 8 9 10 11 12 13 14 15 16 17 18 19 20 21 22 23 24 25 26 27 28 29 30 31 32 33 34 private void processSelectedKey (SelectionKey k, AbstractNioChannel ch) final AbstractNioChannel.NioUnsafe unsafe = ch.unsafe();if (!k.isValid()) {return ;try {int readyOps = k.readyOps();if ((readyOps & SelectionKey.OP_CONNECT) != 0 ) {int ops = k.interestOps();if ((readyOps & SelectionKey.OP_WRITE) != 0 ) {if ((readyOps & (SelectionKey.OP_READ | SelectionKey.OP_ACCEPT)) != 0 || readyOps == 0 ) {catch (CancelledKeyException ignored) {
NioEventLoop 线程不仅要处理 IO 事件,还要处理 Task(包括普通任务和定时任务),
提交任务代码 io.netty.util.concurrent.SingleThreadEventExecutor#execute
1 2 3 4 5 6 7 8 9 10 11 12 13 14 15 16 17 18 19 20 21 public void execute (Runnable task) if (task == null ) {throw new NullPointerException("task" );boolean inEventLoop = inEventLoop();if (!inEventLoop) {if (isShutdown()) {if (!addTaskWakesUp && wakesUpForTask(task)) {
唤醒 select 阻塞线程io.netty.channel.nio.NioEventLoop#wakeup
1 2 3 4 5 6 7 @Override protected void wakeup (boolean inEventLoop) if (!inEventLoop && wakenUp.compareAndSet(false , true )) {
启动 EventLoop 主循环 io.netty.util.concurrent.SingleThreadEventExecutor#doStartThread
1 2 3 4 5 6 7 8 9 10 11 12 13 14 15 16 17 18 19 20 21 22 23 24 25 private void doStartThread () assert thread == null ;new Runnable() {@Override public void run () if (interrupted) {boolean success = false ;try {this .run();true ;catch (Throwable t) {"Unexpected exception from an event executor: " , t);finally {
io.netty.channel.nio.NioEventLoop#run 主要任务是执行死循环,不断看有没有新任务,有没有 IO 事件
1 2 3 4 5 6 7 8 9 10 11 12 13 14 15 16 17 18 19 20 21 22 23 24 25 26 27 28 29 30 31 32 33 34 35 36 37 38 39 40 41 42 43 44 45 46 47 48 49 50 51 52 53 54 55 56 57 58 59 60 61 62 63 64 65 66 67 68 69 70 71 72 73 protected void run () for (;;) {try {try {switch (selectStrategy.calculateStrategy(selectNowSupplier, hasTasks())) {case SelectStrategy.CONTINUE:continue ;case SelectStrategy.BUSY_WAIT:case SelectStrategy.SELECT:boolean oldWakenUp = wakenUp.getAndSet(false );if (wakenUp.get()) {default :catch (IOException e) {continue ;0 ;false ;final int ioRatio = this .ioRatio;if (ioRatio == 100 ) {try {finally {else { final long ioStartTime = System.nanoTime();try {finally {final long ioTime = System.nanoTime() - ioStartTime;100 - ioRatio) / ioRatio); catch (Throwable t) {try {if (isShuttingDown()) {if (confirmShutdown()) {return ;catch (Throwable t) {
⚠️ 注意
这里有个费解的地方就是 wakeup,它既可以由提交任务的线程来调用(比较好理解),也可以由 EventLoop 线程来调用(比较费解),这里要知道 wakeup 方法的效果:
由非 EventLoop 线程调用,会唤醒当前在执行 select 阻塞的 EventLoop 线程
由 EventLoop 自己调用,本次的 wakeup 会取消下一次的 select 操作
参考下图
io.netty.channel.nio.NioEventLoop#select
1 2 3 4 5 6 7 8 9 10 11 12 13 14 15 16 17 18 19 20 21 22 23 24 25 26 27 28 29 30 31 32 33 34 35 36 37 38 39 40 41 42 43 44 45 46 47 48 49 50 51 52 53 54 55 56 57 58 59 60 61 62 63 64 65 66 67 68 69 70 71 72 private void select (boolean oldWakenUp) throws IOException this .selector;try {int selectCnt = 0 ;long currentTimeNanos = System.nanoTime();long selectDeadLineNanos = currentTimeNanos + delayNanos(currentTimeNanos);for (;;) {long timeoutMillis = (selectDeadLineNanos - currentTimeNanos + 500000L ) / 1000000L ; if (timeoutMillis <= 0 ) {if (selectCnt == 0 ) {1 ;break ;if (hasTasks() && wakenUp.compareAndSet(false , true )) {1 ;break ;int selectedKeys = selector.select(timeoutMillis);if (selectedKeys != 0 || oldWakenUp || wakenUp.get() || hasTasks() || hasScheduledTasks()) {break ;if (Thread.interrupted()) {1 ;break ;long time = System.nanoTime();if (time - TimeUnit.MILLISECONDS.toNanos(timeoutMillis) >= currentTimeNanos) {1 ;else if (SELECTOR_AUTO_REBUILD_THRESHOLD > 0 &&1 ;break ;if (selectCnt > MIN_PREMATURE_SELECTOR_RETURNS) {catch (CancelledKeyException e) {
处理 keys io.netty.channel.nio.NioEventLoop#processSelectedKeys
1 2 3 4 5 6 7 8 9 private void processSelectedKeys () if (selectedKeys != null ) {else {
io.netty.channel.nio.NioEventLoop#processSelectedKey
1 2 3 4 5 6 7 8 9 10 11 12 13 14 15 16 17 18 19 20 21 22 23 24 25 26 27 28 29 30 31 32 33 34 private void processSelectedKey (SelectionKey k, AbstractNioChannel ch) final AbstractNioChannel.NioUnsafe unsafe = ch.unsafe();if (!k.isValid()) {return ;try {int readyOps = k.readyOps();if ((readyOps & SelectionKey.OP_CONNECT) != 0 ) {int ops = k.interestOps();if ((readyOps & SelectionKey.OP_WRITE) != 0 ) {if ((readyOps & (SelectionKey.OP_READ | SelectionKey.OP_ACCEPT)) != 0 || readyOps == 0 ) {catch (CancelledKeyException ignored) {
2.3 accept 剖析 accept 流程:
Step1: selector.select()阻塞直到事件发生
Step2: 遍历处理 selectedKeys
Step3: 拿到一个 key,判断事件类型是否为accept
Step4: 创建 SocketChannel, 设置非阻塞 ,即创建NioSocketChannel
Step5: 将SocketChannel 注册至 selector
sc.register(eventLoop的选择器,0, NioSocketChannel)
调用NioSocketChannel 上的初始化器,即给SocketChannel加上一些handler
Step6: 关注 selection Key 的 read事件
nio 中如下代码,在 netty 中的流程
1 2 3 4 5 6 7 8 9 10 11 12 13 14 15 16 17 18 19 20 while (iter.hasNext()) { if (key.isAcceptable()) {false );
Step1 - 3,在NioEventLoop里面已经讲明,接下来从Step4开始讲起,即NioEventLoop中的processSelectedKey()中的unsafe.read()方法讲起。
先来看可接入事件处理(accept)
io.netty.channel.nio.AbstractNioMessageChannel.NioMessageUnsafe#read
1 2 3 4 5 6 7 8 9 10 11 12 13 14 15 16 17 18 19 20 21 22 23 24 25 26 27 28 29 30 31 32 33 34 35 36 37 38 39 40 41 42 43 44 45 46 47 48 49 50 51 52 53 54 55 56 57 public void read () assert eventLoop () .inEventLoop () final ChannelConfig config = config();final ChannelPipeline pipeline = pipeline(); final RecvByteBufAllocator.Handle allocHandle = unsafe().recvBufAllocHandle();boolean closed = false ;null ;try {try {do {int localRead = doReadMessages(readBuf);if (localRead == 0 ) {break ;if (localRead < 0 ) {true ;break ;while (allocHandle.continueReading());catch (Throwable t) {int size = readBuf.size();for (int i = 0 ; i < size; i ++) {false ;if (exception != null ) {if (closed) {true ;if (isOpen()) {finally {if (!readPending && !config.isAutoRead()) {
关键代码 io.netty.bootstrap.ServerBootstrap.ServerBootstrapAcceptor#channelRead
1 2 3 4 5 6 7 8 9 10 11 12 13 14 15 16 17 18 19 20 21 22 23 24 25 26 27 28 public void channelRead (ChannelHandlerContext ctx, Object msg) final Channel child = (Channel) msg;for (Entry<AttributeKey<?>, Object> e: childAttrs) {try {new ChannelFutureListener() {@Override public void operationComplete (ChannelFuture future) throws Exception if (!future.isSuccess()) {catch (Throwable t) {
又回到了熟悉的 io.netty.channel.AbstractChannel.AbstractUnsafe#register 方法
1 2 3 4 5 6 7 8 9 10 11 12 13 14 15 16 17 18 19 20 21 22 23 24 public final void register (EventLoop eventLoop, final ChannelPromise promise) this .eventLoop = eventLoop;if (eventLoop.inEventLoop()) {else {try {new Runnable() {@Override public void run () catch (Throwable t) {
io.netty.channel.AbstractChannel.AbstractUnsafe#register0
1 2 3 4 5 6 7 8 9 10 11 12 13 14 15 16 17 18 19 20 21 22 23 24 25 26 27 28 29 30 31 private void register0 (ChannelPromise promise) try {if (!promise.setUncancellable() || !ensureOpen(promise)) {return ;boolean firstRegistration = neverRegistered;false ;true ;if (isActive()) {if (firstRegistration) {else if (config().isAutoRead()) {catch (Throwable t) {
回到了熟悉的代码 io.netty.channel.DefaultChannelPipeline.HeadContext#channelActive
1 2 3 4 5 public void channelActive (ChannelHandlerContext ctx)
io.netty.channel.nio.AbstractNioChannel#doBeginRead
1 2 3 4 5 6 7 8 9 10 11 12 13 14 15 protected void doBeginRead () throws Exception final SelectionKey selectionKey = this .selectionKey;if (!selectionKey.isValid()) {return ;true ;final int interestOps = selectionKey.interestOps();if ((interestOps & readInterestOp) == 0 ) {
2.4 read 剖析 read 流程
selector.select()阻塞直到事件发生
遍历处理 selectedKeys
拿到一个key,判断事件类型是否为read
读取操作
再来看可读事件 io.netty.channel.nio.AbstractNioByteChannel.NioByteUnsafe#read,注意发送的数据未必能够一次读完,因此会触发多次 nio read 事件,一次事件内会触发多次 pipeline read,一次事件会触发一次 pipeline read complete
1 2 3 4 5 6 7 8 9 10 11 12 13 14 15 16 17 18 19 20 21 22 23 24 25 26 27 28 29 30 31 32 33 34 35 36 37 38 39 40 41 42 43 44 45 46 47 48 49 50 51 52 53 54 public final void read () final ChannelConfig config = config();if (shouldBreakReadReady(config)) {return ;final ChannelPipeline pipeline = pipeline();final ByteBufAllocator allocator = config.getAllocator();final RecvByteBufAllocator.Handle allocHandle = recvBufAllocHandle();null ;boolean close = false ;try {do {if (allocHandle.lastBytesRead() <= 0 ) {null ;0 ;if (close) {false ;break ;1 );false ;null ;while (allocHandle.continueReading());if (close) {catch (Throwable t) {finally {if (!readPending && !config.isAutoRead()) {
io.netty.channel.DefaultMaxMessagesRecvByteBufAllocator.MaxMessageHandle#continueReading(io.netty.util.UncheckedBooleanSupplier)
1 2 3 4 5 6 7 8 9 10 11 12 public boolean continueReading (UncheckedBooleanSupplier maybeMoreDataSupplier) return 0 ;